- Greenbrae Chair
- Rhomba Bench
- Quadra Fire Cube
- Tripod Stool
- Outdoor Concrete Table
- More Concrete Videos
- Floor Videos
- Countertop Videos
- Outdoor Living Videos
- Furniture Videos
- Demonstration Videos
- Concrete Tool Videos
- Concrete Stain Videos
- Sealer Videos
- Concrete Stencil Videos
- Concrete Stamps Videos
- Surface Preparation Videos
- Concrete Forms Videos
Outdoor Concrete Table
This 48-inch-diameter tabletop demonstrates the design possibilities of CHENG D-FRC lightweight concrete. The table is modeled after a heavier, more time-consuming version. The edges appear thick, but the majority of the table is actually quite thin, which cuts down on the weight. This tabletop works in conjunction with the outdoor table base.
The table can be created in many colors and inlays can be added for decorative interest. It is the perfect height for dining outdoors and will accommodate typical patios chairs as well as the CHENG tripods. The plans for the tabletop and base are available online (chengconcrete.com/dfrcplans).
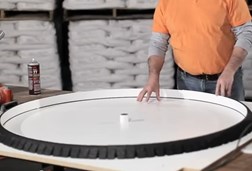
Top Forming
Time: 03:26
A video transcript featuring Mike Heidebrink, Cheng Concrete
For this project, we're going to be casting a 48-inch-diameter tabletop. This is the template that we used for this, at a 2-inch thickness. To build this mold, after we've traced out the template of the diameter of this, we've gone ahead and marked it out onto a ¾-inch sheet of melamine. We use melamine on projects like this because melamine is already sealed with plastic and gives us a nice smooth finish to cast onto. After we've traced out the diameter, we've gone ahead using the Pro-Form curved form system. This is what's called a wall section. It's a curved form that allows us to make inside and outside curves, and it's about 2 inches thick. Using the 3M Super 77 spray adhesive, we've just sprayed the bottom of this form wall and we've sprayed onto our form base and then applied, or basically stuck this around the template onto the base.
Top Spraying
Time: 02:48
A video transcript featuring Mike Heidebrink, Cheng Concrete
For casting this project, there are a few things that I want to go over. You might notice that we have these vibrators set up here and here, next to this piece. We're going to be spraying the casting blend into the form to about 1/4 inch on the base. And while we're spraying we're going to have these vibrators going to help ensure that the casting blend is air or bubble free once it hits the form. When we're spraying you'll notice that the casting blend levels out and a lot of little air bubbles will percolate up to the surface and escape.
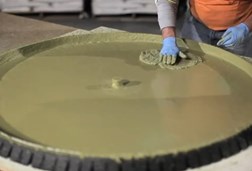
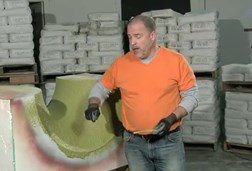
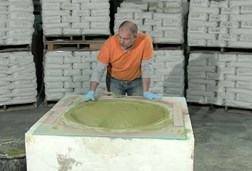
Outdoor Tabletop Casting
Time: 03:19
A video transcript featuring Mike Heidebrink, Cheng Concrete
We're done spraying the casting blend into the form. We vibrated the base. We've got about 1/4 inch of material laying here on the base. Put another 1/8 inch, not quite a quarter, that's sprayed up on the sides. We've gone ahead and brushed this all out and I've mixed up a 50/50 blend of casting blend and the D-FRC fiber backing blend. This gives me kind of a nice, not really packable material. It's a little more smearable. I'm going to put this down, building up about 1/2 inch on top of the existing 1/4 inch that I've got. And I'm taking care not to push into this. I don't want this backing material that I've mixed up to push through the face. While I've pigmented them to both be the same color, there's some larger fiber in this backing blend, but I prefer it not to be on the face of my tabletop.
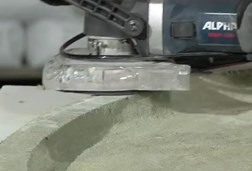
Outdoor Table Demolding
Time: 05:01
A video transcript featuring Mike Heidebrink, Cheng Concrete
Now that the tabletop has cured overnight, we're ready to go ahead and demold it. There's one thing we need to do before we start removing the molds, and that is to grind down, or cut down, any excess material that is around the perimeter of the form. So what I'm going to be doing is grinding this excess material down to the top of my form. Remember that this is a 2-inch-thick form, and I want to make sure that the profile of my tabletop is 2 inches thick all the way around. So I'm going to use the form as the registry point to get that 2 inches thick. To do this, I'm going to be using the Alpha WDP-120, a wet/dry polisher with variable speed, which helps me keep control of the rate that I'm cutting into this material. I don't want to cut too deep, or my edge profile isn't going to be 2 inches thick, it's going to be shorter. Also, I'm using a 60-grit universal polishing pad, which is the coarsest pad, but it's going to help us cut down this surface pretty quickly. Safety glasses are important. I'm not going to be wet polishing, or wet grinding. This is going to be a dry grind, so I do have the tool hooked up to a HEPA vacuum to keep dust controlled.
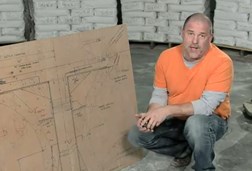
Outdoor Table Base Form
Time: 03:29
A video transcript featuring Mike Heidebrink, Cheng Concrete
We’ve got a project here. It’s a table base that I want to talk about a variation on. The original template that you see laid out here describes a table that was wet cast using just conventional concrete, but the walls of this table base were about 3 inches thick and the piece stood about 28 inches tall and had a 3-inch-thick tabletop that went on it, with a very, very complicated mold to create this curve. It actually requires us to get into plaster forming and fiberglass to create this. But we want to create kind of a low-cost version of this, and something that has much less weight incorporated into it. So instead of wet casting and creating these 3-inch-thick walls, we’re actually going to use the same molds that were used for this wet cast, but we’re going to spray casting blend into those forms to create a ½ to ¾ inch wall thickness for the same table base. So when we’re all done, we’ll have a table base that’s going to weigh only about 100 to 120 pounds instead of the 300 to 400 pounds of the original table base.
Outdoor Table Base Spraying
Time: 05:05
A video transcript featuring Mike Heidebrink, Cheng Concrete
Outdoor Table Base Casting
Time: 03:26
A video transcript featuring Mike Heidebrink, Cheng Concrete

