- Concrete slabs home
- Use a low water-cement ratio: How to calculate
- Subgrades and subbases for concrete slabs: Tips for ensuring good support
- Concrete Slab Finishing Tips
- DIY Slab Mistakes to Avoid
- How to Prevent Cracks
- Guidelines for preventing cracks in concrete slabs
- Be active in deciding where control joints will be placed
- Reinforcing Concrete Slabs
- Proper Curing of Concrete Slabs
- Properly curing concrete slabs: Why and how
- Related Information:
- Concrete fasteners
- Concrete forms
- The three types of concrete foundations
- Aggregates in ready-mix concrete
- Vapor barriers for concrete slabs
- Post-tensioned concrete slabs
- Concrete slabjacking
- Concrete testing
Pouring a DIY Concrete Slab? Avoid These 12 Common Mistakes
Pouring a basic concrete slab isn’t as easy as you might think. Here are 12 things that can go wrong when you do the job yourself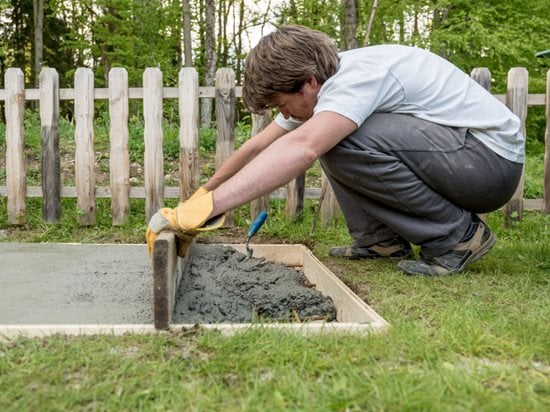
Gajus / Shutterstock.
You can find numerous videos online, posted by pros and amateurs alike, showing you how to pour a concrete slab for small home improvement projects such as a shed foundation, front porch, backyard patio, or sidewalk. While pouring your own concrete slab may look like a simple DIY project, it can easily turn into your worst nightmare if you don’t know what you’re doing.
Unsure? Find a concrete contractor near me.
Even if the slab looks great once you’re finished, any missteps during the process can lead to big trouble later, such as cracking, spalling, and insufficient strength. "I've seen firsthand how pouring a concrete slab yourself can quickly go wrong. Even small mistakes in site preparation, concrete mixing, or finishing can cause structural problems down the line," says Jim Peterson, founder of ConcreteNetwork.com.
Here are the most common mistakes DIY enthusiasts make when pouring a concrete slab and the consequences they can have, both short- and long-term.
1. Lack of subgrade preparation
One of the most common reasons a DIY concrete slab fails is improper subgrade preparation. You can’t just excavate an area and pour the concrete directly on loose dirt. The soil may not drain well, and it can be difficult to compact to the proper grade. To create a solid, uniform base, you’ll need to cover the soil with a 2- to 3-inch base of compacted and leveled gravel or crushed stone. Learn more about subgrades and subbases for concrete slabs.
2. Not using the right tools
Placing and finishing a concrete slab requires the use of specialized tools to achieve good results. Essentials to have on hand include a screed to level off the freshly placed concrete, a bull float to flatten the surface and eliminate ridges, and a finishing trowel to produce a smooth, dense surface.
While most of these tools are readily available at hardware and home improvement stores, many DIYers don’t have the skill it takes to use them properly. In the hands of an inexperienced user, even the highest-quality finishing tools won’t make up for poor technique, resulting in a concrete surface that looks rough, messy, and uneven.
3. Not paying attention to the weather
Pouring a concrete slab when the weather is too hot or too cold is a common mistake DIYers make in an attempt to complete the project over a long weekend. Pouring concrete when it’s above 80° F is ill-advised because it can accelerate the rate of moisture loss and cause the concrete to set before you get around to finishing it (see Pouring Concrete In Hot Weather). And pouring concrete when there’s a danger of temperatures dropping below 40° F can inhibit curing and strength development (see Pouring Concrete In Cold Weather).
Rain in the forecast should also be a red flag because a driving rain can ruin the appearance of the finished surface and increase the tendency for dusting and scaling (see Pouring Concrete in Rain). Moderately warm, rain-free days are always best for pouring a concrete slab.
4. Sloppy formwork construction
DIYers often don’t realize how important form assembly and construction are to the success of a concrete slab project. Concrete forms create a rigid framework that holds the wet concrete in place and ensures smooth, perfect edges. The forming boards must be set to the proper level and securely braced so that the pressure of the concrete won’t cause them to bow outward. The timing of form removal is also critical. Removing the forms too soon, before the concrete hardens, can result in slab failure and collapse. Typically, formwork should be removed 24 to 48 hours after the concrete has been poured and finished.
5. Pouring the slab too thin
Thickness is a major factor (even more than the strength of the concrete itself) in determining a slab's structural capacity. For the average patio or sidewalk, concrete should be poured at a minimum thickness of 4 inches. But if the slab will be bearing heavy loads, such as a tool shed or outdoor spa, a depth of at least 5 inches may be required. Although increasing the slab thickness from 4 to 5 inches will add approximately 20% to the cost, it will boost the load-carrying capacity by nearly 50%.
6. Underestimating the amount of concrete required
An unfortunate scenario that happens all too often on a DIY slab project is coming up short on the amount of concrete needed to fill the forms once the pour is in underway. Whether you’re using a preblended, bagged concrete mix or ordering the concrete from a ready-mix supplier, you’ll need to determine the length, width, and depth of your concrete slab to calculate the number of cubic yards needed to complete your project. To allow room for error, it’s always better to have a little more concrete than is actually needed than to have too little.
Use our online concrete calculator to quickly and accurately determine the amount of concrete needed for your next slab project.
7. Adding too much water to the concrete mix
Many of the problems DIYers experience with concrete, including drying shrinkage and cracking, are due to adding more water than needed to the mix, often in efforts to make the concrete more workable and easier to place. A less common but equally serious mistake is adding too little water, which results in concrete that’s impossible to pour and spread properly. Using the right water-cement ratio and mixing the concrete thoroughly are crucial to achieving the proper consistency and optimum strength.
Related: Is Dry Pour Concrete a Good Idea?
8. Ignoring the importance of reinforcement
Too few DIYers think about reinforcing their concrete slabs to improve strength and crack resistance. Although reinforcement, such as rebar and welded wire mesh, isn’t essential for all residential concrete, slabs that will bear a lot of weight or are greater than 4 inches thick will often require it to help them withstand tension forces caused by subgrade settlement, heavy loads, and drying shrinkage. Slabs regularly exposed to freeze-thaw cycles will also benefit from added rebar. Even if you’re conscientious about using reinforcement, it must be installed properly to be of full benefit.
9. Finishing the concrete too soon (or too late)
Most DIYers lack the savvy of knowing when it’s the ideal time to start concrete finishing operations. Starting the troweling process too soon can weaken the surface and cause dusting and craze cracking, and starting too late makes it impossible to smooth the surface because the concrete has already begun to set. Using improper techniques for concrete finishing, such as overworking the concrete with a bull float or trowel, can also result in an unsightly surface that will be impossible to correct later.
10. Not taking safety precautions
Wet concrete is highly alkaline and can cause chemical burns if it comes in contact with exposed skin or gets in your eyes. To remain protected while mixing and pouring concrete, both professionals and DIYers alike should wear long pants and sleeves, safety glasses, alkali-resistant gloves, and rubber boots. Also wear a disposable dust mask when mixing your own concrete, since inhaling dust from dry concrete can irritate your throat and lungs.
11. Trying to do the work solo
Although you can do all the prep work for your slab in advance and at your own pace, such as compacting the subbase and erecting the forms, once you start mixing up the concrete, you have a short window of time to place and finish it before it sets. If you are placing a larger slab, one or more helpers will be essential to keep ahead of the drying concrete.
12. Not consulting a professional first
Can you install a small concrete slab yourself even if you don’t have much experience? It’s certainly doable with good planning, preparation, and a little know-how. However, the work is time and labor intensive and a lot can go wrong along the way. Although a DIY concrete slab is typically cheaper than hiring a professional concrete contractor to do the work, you could be facing substantial costs for concrete repair or replacement if you make any serious mistakes. Before embarking on a DIY concrete slab project, it’s always best to consult with a concrete professional for advice.
RELATED:
Can I Pour My Own Patio?
DIY Stamped Concrete
Pouring Concrete in 8 Steps
 Brickform Ultra-M1x
Add color and fiber with one product
Brickform Ultra-M1x
Add color and fiber with one product
 Rescue-Pak
Contains six of the most effective admixtures
Rescue-Pak
Contains six of the most effective admixtures
 UltraFiber 500®
Will not ball or fuzz, accepts color
UltraFiber 500®
Will not ball or fuzz, accepts color

