- Staining Concrete
- Stamped Concrete
- Concrete Overlays
- Concrete Resurfacing
- Concrete Polishing
- Concrete Dyes
- Colored Concrete
- Indoor Concrete
- Concrete Floors
- Concrete Countertops
- Garage Floor Coatings
- Furniture, Sinks, Fire Bowls
- Basement Floors
- Outdoor Concrete
- Concrete Patios
- Concrete Driveways
- Concrete Pool Decks
- Outdoor Kitchens & Counters
- Outdoor Fireplace
- Concrete Walkways
- Concrete Pavers
- Concrete Walls
- Repair & Maintenance
- Foundation Repair
- Concrete Crack Repair
- Concrete Sealers
- Building with Concrete
- Concrete Homes
- Concrete Basements
- Decorative Concrete
- Fire Resistant
How to Pour Concrete: A 10 Step Guide
From prep work to curing, learn proven techniques for placing concrete successfully.Pouring concrete may seem straightforward, but preparation and technique make all the difference. Whether you’re installing a sidewalk, driveway, or patio, the process involves much more than mixing and placing material. From setting forms to finishing and curing, each step in the concrete installation process directly affects the strength and appearance of the finished product.
For contractors, mastering these fundamentals is key to ensuring durable, problem-free concrete that stands up to time and weather. For ambitious DIYers, understanding the basics can turn a daunting task into a manageable project. This guide breaks down the essential steps of pouring concrete, offering contractors a refresher on best practices while giving homeowners clear insight into what goes into a successful project.
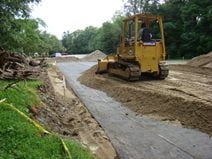
Step 1 - Prepare the site
Taking the time to prepare the site carefully is a crucial part of the concrete process. It not only makes concrete placement easier but also ensures that the slab cures evenly and has uniform support.
Start by clearing the area of grass, roots, rocks, and debris to create a clean, stable surface. Excavate to the required depth, keeping the subgrade level and well-compacted to prevent concrete settling or cracking.
For sidewalks, driveways, and patios, add a 4-inch layer of gravel or crushed stone to improve drainage and provide extra support, then compact the subbase thoroughly with a hand tamper or plate compactor to ensure long-term stability.
Read more about subgrades and subbases for concrete slabs.
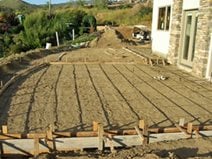
Step 2 - Install formwork
Once the base is prepared, install sturdy concrete forms to define the shape and dimensions of the pour. Position boards or reusable forms along the slab perimeter, anchoring and bracing them securely to withstand the pressure of wet concrete. Fasten the forms with stakes and screws, checking often with a level to ensure proper alignment and grade. Properly installed formwork not only defines the slab’s boundaries but also helps control thickness and slope for effective drainage.
Attention to detail at this stage pays off in the finished product. Gaps or misaligned forms can lead to uneven edges, bulging, or water pooling, while tight well-fitted joints produce clean lines and a professional appearance.

Step 3 - Add reinforcement
For most load-bearing slabs, reinforcement is essential for strengthening concrete and preventing cracks caused by shifting and settling. Steel rebar or welded wire mesh is commonly used to provide tensile strength, helping the slab resist stresses that plain concrete can’t handle on its own.
Distribute the reinforcement evenly across the prepared subbase, supporting it on chairs or blocks so it sits within the slab rather than directly on the ground. This positioning allows the concrete to fully encase the steel, protecting it from moisture and corrosion.
In addition to enhancing long-term performance, proper installation of rebar or mesh reduces the risk of costly repairs by helping the slab better withstand traffic, weather extremes, and everyday use.
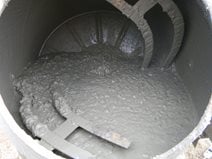
Step 4 - Mix the concrete
For small DIY projects such as patios, walkways, or posts, using a bagged concrete mix is often the most practical choice. It comes preblended with cement, sand, and aggregate, requiring only the addition of water.
You can use a wheelbarrow, bucket, or portable mixer for mixing concrete, but consistency is key. Add water gradually and blend until the mixture has a uniform, workable texture. Too much water will weaken the finished slab and increase the risk of cracking, while too little makes placement difficult. (Learn more about the importance of using the right water-cement ratio.)
For larger jobs such as driveways or foundations, ready mixed concrete delivered by truck is the better option. Professionally batched at a plant, it ensures consistent quality and can be customized with admixtures for specific conditions. Ready mixed concrete saves time and labor, but should be placed promptly since it begins setting once batched and delivered.
Sound like a lot of work? Hire a pro: Find concrete pouring companies near me.
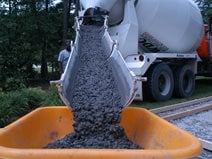
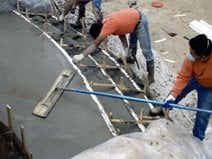
Step 5 - Place the concrete in the forms
Once the concrete is mixed, shovel or pour the concrete directly into the forms until it reaches the top of the form boards. For larger projects, wheelbarrows, chutes, or concrete pumps can be used to move the material more efficiently. As you place the concrete, use a square shovel or a come-along (a specialized concrete rake) to spread the mix evenly and eliminate voids or air pockets.
What the Pros Say
“In slab construction, start placing your concrete along the perimeter at one end of the work, with each batch placed against previously dispatched concrete. Deposit the material only as fast as it can be handled, and as close as possible to its final position.”
 — American Cement Association, Working with Concrete
Step 6 - Level and float the concrete
After concrete placement, strike off or screed the surface with a straight board or metal screed to bring the slab to the proper grade and ensure uniform thickness. Screeding compacts and consolidates the concrete while beginning the smoothing process, laying the foundation for all subsequent finishing steps.
Next, use a float to further compact the slab, fill voids, and even out high or low spots. A bull float is ideal for covering large areas quickly, while smaller hand floats work best for edges, corners, and detail work. Floating also draws a thin layer of paste to the surface, which helps create a smooth, workable finish. Read more about tools and techniques for concrete finishing.

Step 7 - Cut control joints
At this stage, while the concrete is still plastic but firm enough to hold its shape, cut control joints with a groover to help manage cracking. At the same time, run an edger along the slab’s perimeter to create clean lines.
Cutting control joints while the concrete is still plastic ensures that they form cleanly without tearing the surface. If you delay jointing until after the slab has hardened, the joints must be saw-cut instead. This is typically done within 6 to 18 hours of placement, before shrinkage cracks have a chance to develop.

Step 8 - Trowel the surface
Once the concrete has set enough to support your weight without leaving deep footprints, you can begin troweling to smooth and densify the slab. The exact timing depends on factors such as humidity, temperature, and the concrete mix. But if the slab is allowed to harden too much, effective troweling becomes nearly impossible.
Using a steel hand trowel or fresno (a steel trowel attached to a long handle) work in sweeping, overlapping strokes to create a uniform finish. For large projects, such as long driveways or commercial slabs, power trowels can be used, moving in overlapping passes to ensure consistent coverage.
The troweling process is typically repeated several times, with pressure reduced on each successive pass to refine the surface. Because troweling is as much an art as a technique, using the right tools and methods is essential to achieving a durable, professional-looking finish.
What the Pros Say
“When hard troweling concrete, care must be taken to avoid burning the slab. This happens when a portion of the concrete is overworked, creating a distinct circular pattern and discoloration. Also be careful to avoid finishing in bleedwater or adding water, as this can weaken and discolor concrete.”
 — Solomon Colors, Many Ways For Finishing of Concrete
Step 9 - Perform final finishing
Once troweling is complete, the final finish can be applied to the concrete. The type of finish often depends on the slab’s intended use and should balance appearance, durability, and safety:
- A smooth steel-troweled finish produces a dense, polished surface that works well for interior floors but may be too slippery for outdoor slabs.
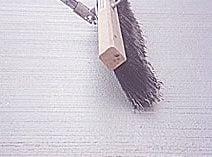
- For exterior applications such as sidewalks, patios, and driveways, a broom finish is often preferred because it adds texture and slip resistance.
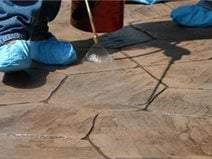
- If a more distinctive look is desired, consider applying a decorative finish, such as exposed aggregate or stamped concrete, to create greater visual appeal.
Step 10 - Allow the concrete to cure
In the first week or so after concrete is poured, it’s essential to maintain the proper temperature and moisture to ensure full hydration. Without adequate curing, the slab can dry too quickly, leading to surface cracking, reduced strength, and long-term durability problems.
There are several effective curing methods you can use to maintain optimal moisture levels for proper curing, including wet curing, coverings that trap moisture, and the application of a curing compound. The best approach often depends on project conditions, the climate, and practicality.
While it generally takes about 28 days for concrete to fully harden and attain maximum strength, the most critical period for curing is the first 7 to 10 days.
FREQUENTLY ASKED QUESTIONS
What is the 90-minute rule for concrete?
The “90-minute rule” is a long-standing guideline stating that ready mixed concrete should be discharged from the truck within 90 minutes of water being added to ensure it remains workable and strong. Established by ASTM in the 1930s, the rule was meant to prevent premature setting and loss of quality. However, modern admixtures and technology now allow concrete to remain usable beyond that window.
Is it okay to pour concrete in October?
Yes! In many regions, the weather in October and even November is ideal for pouring concrete. The ground is usually warm enough to support hydration, and daytime temperatures often fall within the recommended range of 50° to 70°F for proper curing—avoiding both the summer heat that can cause rapid drying and the extreme cold that risks freezing.
Timing, however, is important. In colder climates prone to early frosts, protective measures such as insulating blankets or heated enclosures may be needed to ensure the concrete cures properly. Learn more about placing concrete successfully in cold weather.
How long does it take poured concrete to cure?
Concrete typically takes about 28 days to fully cure, but it reaches most of its strength much sooner. After 7 days, concrete reaches roughly 70% of its design strength, which is often sufficient for supporting light loads.
Is pouring concrete a good DIY project?
DIY concrete pouring can be feasible for small projects like garden walkways or patios, provided you’re prepared, equipped with the right tools, and have extra help. For driveways and other large slabs, hiring a professional is well worth the investment to guarantee strength, durability, and a high-quality finish.
Learn more: 12 DIY Concrete Slab Mistakes to Avoid When Pouring Concrete.
Mike Day, owner of Day’s Concrete Floors, offers a comprehensive walk-through on pouring concrete sidewalks to achieve durable, high-quality flatwork. He covers essential materials, proper forming and reinforcing techniques, and demonstrates the best tools and practices for effective concrete placement and finishing.
TIPS FOR A SUCCESSFUL CONCRETE POUR
- Plan ahead: Measure carefully and calculate how much concrete you’ll need before mixing.
- Prep the site: Level the ground, set sturdy forms, and add gravel for drainage.
- Mix consistently: Follow the recommended water-cement ratio; too much water weakens concrete.
- Work in sections: Pour manageable areas so you can screed and finish the concrete before it sets.
- Remove air pockets: Tap or vibrate the concrete lightly to avoid hidden voids.
- Apply the right finish: Use a trowel for smoothness, or a broom for slip-resistant texture.
- Cure properly: Keep the surface damp and covered for at least a week to prevent cracks.
- Safety first: Always wear gloves, goggles, and a mask when mixing and pouring concrete.
HOW TO CARE FOR YOUR NEW CONCRETE
Concrete is a durable product, and if placed, finished and cured properly should last a lifetime. While concrete is often viewed as a NO maintenance product, consider the following simple maintenance procedures to increase the service life of your concrete.
- A good quality sealer is always a good idea. Apply a month after the concrete is placed. Exterior concrete sealers can last anywhere from 1 to 5 years, depending primarily on environmental conditions.
- Occasional soap and water cleaning is also advised to keep your concrete looking its best.
- Sealing and regular maintenance will also minimize the chances from staining and discoloration caused by natural or manmade contamination.
Read about cleaning and sealing all types of decorative concrete.
Concrete has been around for thousands of years, and remains the most popular choice for residential patios, walkways, and driveways. When you make the decision to go concrete, understanding the basic steps—from picking a contractor to general maintenance—will make the entire process run smoother for all parties involved.
Related:
9 Types of Concrete Work
Pouring a DIY Concrete Slab
Dry Pouring Concrete

