- Concrete Overlays Home
- Get the Look - Interior Overlay Pictures
- When to Use a Polymer Overlay
- Comparison Chart of Overlay Systems: Which is best for your project?
- Five Factors to Consider when Choosing a Resurfacing System
- Concrete Overlay Reviews
- Types of Overlays
- Epoxy Coatings
- Microtoppings & Skim Coats
- Self-Leveling Overlays
- Spray-Down Toppings
- Polishable Overlays
- Stamped Concrete Overlays
- Preparing Concrete for Resurfacing
- Concrete Resurfacing
- Reducing Bond Failures Caused by Moisture-Vapor Transmission
- Don't Let Water Vapor Delaminate Your Overlay: How to seal concrete before an overlay
- How-To Tips for Installing Concrete Overlays
- Answers to Common Questions About Concrete Overlays: Advice from expert Chris Sullivan
- How to Add Color to Concrete Overlays
- How to Protect and Maintain Resurfaced Concrete
- Overlay Tools: Seven essential tools for concrete resurfacing
- Related Information
- Concrete Overlay Videos, with Bob Harris
- Decorative Concrete Overlays: A primer of the various overlay types and the decorative possibilities with each
- Vertical Concrete Overlays: Lightweight cement-based overlays mimic stone, brick, and other wall textures
Concrete Squeegees and Other Resurfacing Tools
Seven essential tools you'll need to mix, spread, and apply concrete resurfacing productsWhen I was 15 years old, after receiving and cashing my first official payroll check for a very hard earned weeks' worth of wages, my dad took me to the local building supply house to purchase my first set of professional concrete finishing tools. We started with a white canvas bag with leather handles to contain these very important investments. My dad made it clear that I needed to take extremely good care of these tools! After all, they were going to "earn me a living," as he put it. Still, I was pretty bummed when we took all of my new tools and equipment (some of which I still have today) to the checkout clerk, only to find that my first $153.00 paycheck came up $15 short. Fortunately, my dad provided the clerk with the additional money needed to complete the transaction, which he made sure to deduct from my next week's paycheck.
Any skilled craftsperson knows that using the proper tools and equipment is crucial and can make the difference between struggling through an application or a seamless installation. Often one tool may serve multiple functions and can be used with a variety of applications. For instance, magic trowels, squeegees and smoothing paddles are handy tools for applying skim coats, stampable overlays, and a host of other cement-based toppings. My first tool purchase certainly did not include these items, but I did learn the importance of using the appropriate tools for a given task.
Buy Products: Floor Coating Tools
Hire a Pro: Concrete Resurfacing Contractors
With the popularity of cement-based resurfacing products in today's market, installers are continually looking for new and efficient ways of applying these materials. Here's an overview of seven essential tools to invest in. Regardless of the tools of choice, take good care of them and they will take good care of you.
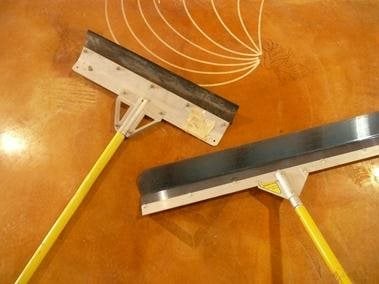
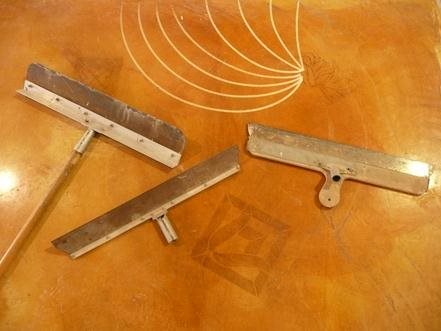
Examples of rubber (left) and metal (right) squeegees.
1. Concrete SqueegeeSqueegees are by far the fastest way to apply microtoppings and bond coats. Although some applicators use small handheld squeegees while working on their knees, predominately they are used while standing upright. Like hand trowels, they come in a wide variety of shapes and sizes. Some applicators prefer using metal squeegees while others prefer rubber. Applying products in this fashion usually produces a surface that is not as smooth and uniform as hand troweling. In most cases, this is fine since a second coat of material will be applied over the first coat.
Tips and techniques: If ridges have been left behind as a result of going too fast or using the improper technique, don't fret. A quick sanding with sandpaper or a sanding screen will smooth out any imperfections. The amount of pressure you apply while squeegeeing depends on the viscosity of the material you are using and the profile of the concrete. If your material is mixed thinly, this will increase the square-foot coverage rate. Thicker materials tend to yield less coverage. Be sure to check your overlay manufacturer's recommendations for mix ratios and application considerations.
Magic Trowel Concrete Resurfacing Video
Time: 03:50
Tips & techniques for using a concrete trowel, magic trowel, skimmer or squegees to apply overlays.
2. Magic TrowelThe magic trowel can technically be considered a squeegee. However, it seems to have earned its own category as a stand-alone tool and has become the tool of choice for many installers. This tool, which got its start in applying faux finishes to plaster walls, is more of a "finesse" tool. Its distant relative, the squeegee, is used for larger and faster applications, like driveways, while the magic trowel lends itself to producing a more refined floor. The rubber blade is much thinner and somewhat flexible when compared to a traditional squeegee. The direction you work with this tool depends on the desired effects. We will sometimes use a left-to-right long, sweeping motion, while other times we use an overlapping rainbow pattern while smoothing.
Tips and techniques: I highly recommend that beginners use the magic trowel, since it's probably the easiest tool to master when starting out. Still, as when using any new finishing tool, it takes a little practice to produce a smooth surface. The angle of the blade and the amount of pressure you apply determine the ultimate effect. I like to apply more pressure on the inner portion of the magic trowel so the opposite edge doesn't leave any ridge lines. Combining techniques, such as applying the topping with hand trowels immediately followed by a magic trowel attached to a handle, can be very effective for getting rid of trowel lines. Remember, if your topping is too thick, the magic trowel will not be sufficient to lay down the material smoothly. The material needs to be fairly viscous for this tool to be effective.
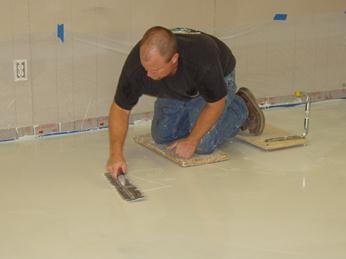
Hand troweling a microtopping.
3. Hand TrowelsThe same finishing trowels used for finishing concrete can also be used for skim coats and overlays. Hand trowels come in many shapes and sizes. For example, some technicians prefer using a square-edged trowel while others choose to use a pool trowel, which has rounded edges. Typically hand trowels range from 4 to 24 inches in length. They can be used to distribute material across the floor from one location to the next, with the primary function being to smooth or texture the topping. The angle of the trowel and how much pressure you apply will determine how thick and smooth the surface will be.
Tips and techniques: Many different techniques can be used with hand trowels, like skip troweling to create texture or random trowel strokes to create interesting effects. To gain confidence before using hand trowels to finish a paying client's floor, make sample boards using a variety of trowels along with different techniques. Remember, the more you practice, the more proficient you become.
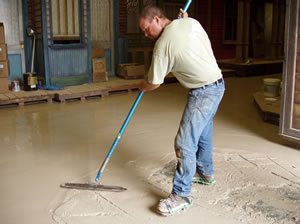
A funny trowel attached to a pole permits
troweling from a standing position.
4. Funny Trowels and FresnosThese types of tools are attached to the end of a pole and are most commonly used for stampable overlays. Having the funny trowel or fresno on a handle allows you to stand upright while finishing the topping, unlike hand trowels, which require you to work on your knees. When using a funny trowel, the troweling direction is usually left to right or arced, whereas the fresno is commonly pushed straight out in front of you and then directly back.
Tips and techniques: Regardless which of these tools you use, one thing is very important: Don't overwork or over trowel the surface. When you trowel over stampable overlays multiple times, air and moisture become trapped beneath the surface paste, which can cause blisters. For this reason, it's best to trowel the surface one time only and then let the material stiffen until it's time for the stamping phase. If you have never used these types of tools, don't plan on mastering them overnight. It takes plenty of practice and finesse to work with them, since the amount of pressure you apply and the timing are crucial.
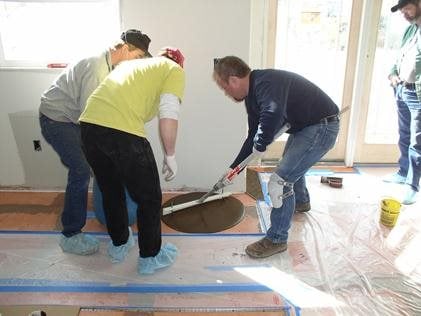
Using a gauge rake to spread a thick overlay.
5. Spreaders and Gauge RakesSpreaders and gauge rakes are most commonly used with materials that are a ¼ inch or thicker, such as self-leveling cements, stampable overlays and repair mortars. Usually, they are fitted with adjustable ears or camlocks that you set to the desired topping thickness. I have always felt that while finishing the material is important, gauge raking and spreading is just as important, since it sets the stage for all of the next steps.
Tips and techniques: One of the main considerations when using these tools is to keep the angle of the handle the same while pushing or pulling the material. If you lift the handle up or push it down while distributing the overlay, it can change the depth of the material being applied. You may not think this tip is important, but when you amortize a thickness change of 1/16 to 1/8 inch when not keeping the gauge rake consistent over a 1,000-square-foot surface, the results can prove catastrophic if you run out of material in the middle of the job. Also, when you are trying to apply self-leveling overlays at a specific depth with the intention of embedding decorative aggregates, like crushed glass, the thickness is crucial. If you apply the material too thinly, the aggregates can become dislodged during the grinding phase because not enough material is securing them. If the material is applied too thickly, the aggregate can sink to the bottom, increasing the time and cost of grinding.
Different types of smoothing paddles.
6. Smoothing PaddlesSmoothing paddles are most commonly used for applying self-leveling overlays. Some overlay manufacturers actually sell and market their own overlay kit that includes smoothing paddles, a mixing bucket and gauge rake. Choosing the appropriate smoothing tool is really a matter of personal preference. Most smoothing paddles come with either a 45-degree-angle edge or a rounded blade, which is my personal favorite. Smoothers serve dual purposes. Not only do they smooth and level the surface (as the name implies), they also greatly reduce the occurrence of air bubbles. During the mixing of self-leveling overlays, you sometimes get entrapped air in the mix. When the smoothing paddle passes over the surface of the overlay, it breaks the surface tension and allows entrapped air to escape.
Tips and techniques: Mastering the smoothing paddle takes a great deal of skill. The timing of when to smooth is critical, as is the amount of pressure and the tool angle you use. If you don't use the proper angle while smoothing, the surface can end up with undesirable lines or ridges. When you start a smoothing pass from north to south, you need to slightly angle the paddle toward the direction you are working, which forces you to keep the wave of material heading in the direction you are going. In other words, don't keep the smoothing paddle directly square while heading from north to south. As if this is not challenging enough, you'll also be working on elevated spiked shoes and if you aren't careful, you can easily twist an ankle. It's a good idea to take a few dry practice runs before you actually apply the overlay material.
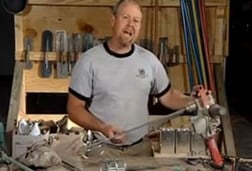
Mixing Paddles Concrete Overlays Video
Time: 05:00
Proper function and use of the mixing paddle tools used to mix concrete.
7. Mixing PaddlesIt's amazing to me why so many applicators pay little, if any, attention to the type of mixing paddles they use. They are quick to complain that the overlay material is clumpy or the color is not mixing in like it should. There is a good chance they are using the wrong type of mixing paddle for the type of material being mixed. On a project I was working on in England, in which we were applying roughly 2,000 square feet of self-leveling overlay, we were using two mixing drums with two different mixing drills and mixing paddles. Every other batch was noticeably wetter. After mentioning to the workers to watch the amount of water being used in each batch, they assured me the same amount of water was being used from mix to mix. Once we got a break, I went back and checked the equipment and noticed that one mixing paddle was a much thicker-gauge steel than the other and it was whipping the material much more aggressively.
Tips and techniques: Some mixing buckets for self-leveling cements have an oval shape and it is important to use a mixing paddle that can follow the contours of the bucket, such as a football-shaped jiffy mixer. Traditional mortar-style mixing paddles are more commonly used when mixing in 5-gallon buckets. A good tip is to use metal buckets, if possible. When aggressively mixing in plastic buckets, the mixing paddle may start to shred the inside of the bucket, and these shreds will end up in your fresh mix. This can prove to be very frustrating when you are trying to install a flat overly and have to continually pick out little pieces of plastic. Do your homework and ask the overlay manufacturer for advice on the best type of mixing paddle to use.
Related resources:
Watch these videos showing resurfacing and overlay tools
Concrete Finishing Tool Buyer's Guide
Find Manufacturers: Interior Overlays & Toppings
Find Local Suppliers: Decorative Concrete Stores
Return to Concrete Overlay Products & Supplies
 Rapid Set Skim Coat
Repairs, levels, and smooths concrete for applications.
Rapid Set Skim Coat
Repairs, levels, and smooths concrete for applications.
 Thin Micro-Topping
Produces durable surface to color or stain
Thin Micro-Topping
Produces durable surface to color or stain
 Self Leveling Overlay
Find the overlay to meet your project's needs
Self Leveling Overlay
Find the overlay to meet your project's needs
 T1000 Stampable Overlay
For use with resurfacing concrete floors and hardscapes.
T1000 Stampable Overlay
For use with resurfacing concrete floors and hardscapes.
 Stamped Concrete Overlay
Warm weather and cold weather formulas
Stamped Concrete Overlay
Warm weather and cold weather formulas
 HellFire® Concrete Coating
Chemical & heat resistance
HellFire® Concrete Coating
Chemical & heat resistance
 Imprinta Stampable Overlay
2-component system
Imprinta Stampable Overlay
2-component system

