- Concrete Stamps
- Get the Look - Stamping Pictures
- Buying Tips for Concrete Stamping Tools: Advice that will help you make smart choices
- Concrete Stamp Cost
- Types of Concrete Stamps: A comparison chart of popular stamps & patterns
- Stamping & Texturing Tools
- Concrete Stamp Mats
- Concrete Texturing Skins
- Medallion Stamps
- Texture Rollers
- Step Forms & Liners
- Installing Stamped Concrete
- How to Stamp Concrete
- Coloring Stamped Concrete
- Concrete Stamp Release Agent
- Sealers for Stamped Concrete
How to Stamp Concrete
A step-by-step guide for stamping concrete from a proThere are a lot of steps involved in stamping concrete, and only a short window of time in which to get them done. Unlike when applying a decorative coating or stain to hardened concrete, crews need to complete the entire stamping process before the fresh concrete sets.
To do the job successfully, contractors must be experienced, organized, and well prepared. For large projects in particular, that means diagraming the stamping layout in advance, having the stamping tools lined up and ready to go, and making sure enough labor is available for the job at hand. If you're a homeowner thinking about stamping your own concrete, read this: DIY Stamped Concrete - Why It's Better Left to the Pros.
Find contractors specializing in stamped concrete near me.
Here, Bob Harris, author of Bob Harris' Guide to Stamped Concrete, offers this step-by-step overview of the stamping process along with tips for achieving the best results.

When applying color hardener, use a motion similar to throwing a bowling ball, starting with your arm low and behind you and extending it forward with your hand outstretched.
1. Apply color hardenerAfter the concrete reaches the right stage of plasticity (generally when no bleedwater is on the surface), broadcast the color hardener by throwing it onto the surface from waist level or a bit lower to minimize the amount of material that drifts into the air. Work from the middle of the slab and back toward the edge forms to avoid a heavy buildup of color hardener on the edges. After the first shake of color hardener has been applied to the surface, give it five to 10 minutes to absorb water from the concrete and then float it into the surface. Right after bull floating the first application of color hardener, follow the same steps and apply a second layer of hardener to ensure complete coverage.
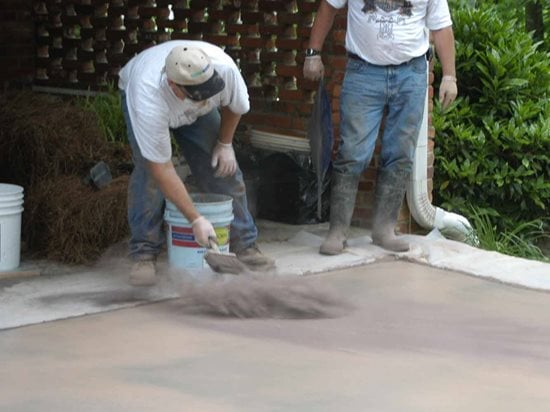
Right before you stamp, apply a powdered release with a dry tampico brush in a flicking motion. Avoid too much buildup, which could interfere with the imprint texture, especially lighter textures.
2. Apply release agentPowdered or liquid release agents serve two important purposes: They impart subtle color contrast while acting as a bond breaker to prevent the stamping mats or skins from sticking to the concrete and disturbing the imprint texture. The best way to apply a powdered release is with a dry tampico brush about 8 inches wide. Dip the brush into the pail of release and fluff it to load the bristles and coat them evenly. Then take the brush by the handle, holding it below belt level, and use your wrist to flick the release onto the surface in a light, uniform layer.
To apply a liquid release agent, use a pump-type sprayer to apply the release in a uniform layer onto the surface of the concrete right before you stamp. If you plan to use a tinted liquid release agent, add the tint a day or two beforehand if possible. This will allow the pigment particles to fully dissolve.
3. Test to see if the concrete is readyBefore you begin stamping, check to see that the concrete has reached the right stage of plasticity. If you begin stamping too soon, the concrete won't be firm enough to support the weight of workers or hold a well-defined imprint. If you start stamping too late, not only will stamping require more effort, you'll produce little or no texture with the stamps, especially as you reach the end of the job. Press your fingers into the concrete surface at several locations on the slab. If you leave a clean imprint about 3/16 to 1/4 inch deep, you can generally begin stamping. Another test is to place a stamp on the concrete and step on it. The stamp should hold your weight and not slide around or sink too deeply into the surface.
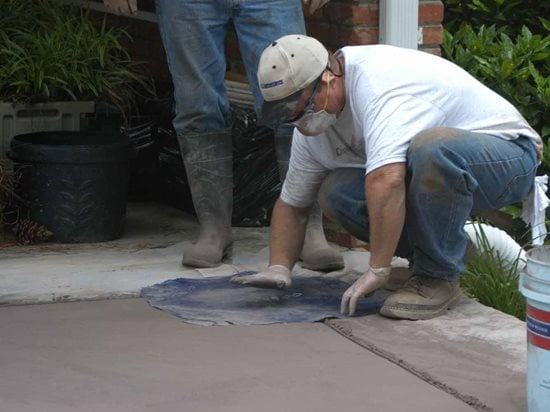
Before stamping, pretexture along the perimeter of the slab with a texturing skin or flex mat.
4. Pretexture the slab perimeterPretexture along the perimeter edges of the slab about 6 to 12 inches inward with a texturing skin or flex mat. This step is important because when you're working with a nonflexible stamp, the tool will overlap the edge of the form and you won’t be able to fully depress it into the concrete surface. By pretexturing the perimeter first, you'll get the texture you need and the full color from the release.
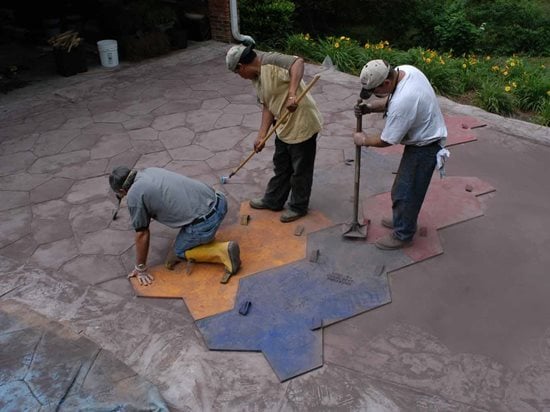
5. Place the first row of stampsOnce the edges are pretextured, the crew can begin stamping the rest of the slab with the mat tools. Generally, you should stamp in the same sequence that you placed and finished the concrete. For example, if you started placing the concrete in the top left-hand corner of the slab and ended on the bottom right corner, this would be the preferred sequence to use for finishing and stamping operations, working row by row from the starting point to the end point. Most stamp sets are labeled with letters or numbers. Always arrange the stamps in the sequence recommended by the manufacturer, such as A,B,C or 1,2,3.
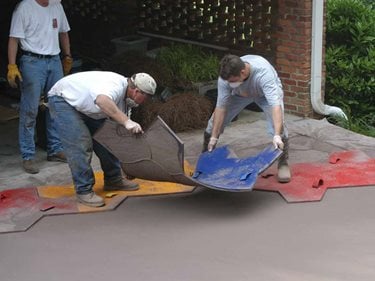
 Start stamping by placing the stamps in the same sequence that you placed and finished the concrete. The stamping crew should complete the first row of stamps before moving on to the next one.
A set of stamp mats. Be sure to have enough stamps on hand to finish a complete row plus two additional tools to start the next one.
Start stamping by placing the stamps in the same sequence that you placed and finished the concrete. The stamping crew should complete the first row of stamps before moving on to the next one.
A set of stamp mats. Be sure to have enough stamps on hand to finish a complete row plus two additional tools to start the next one.
It's important to place the first row of stamps on a straight line because that will serve as the benchmark for the rest of the job. If it's not perfectly straight, the rest of the rows will be out of alignment as well. Use a string line as a guide, especially for aligning stamp patterns that are square or rectangular. For notched or irregular stamp patterns, you can check alignment by using the edge form as a reference point (assuming that it's square). Use a string line or tape measure and run it from the edge of the form to the top and bottom edges of the stamp mat to make sure the tool is running square relative to the form.
Impress the stamps into the surface by walking on the tools, possibly followed by a light tamping.
6. Continue the stamping sequenceIf the concrete is at the ideal stage for stamping, you should be able to impress the stamps into the surface by simply walking on the tools, possibly followed by a light tamping. The stamping crew should complete the first row before moving on to the second one. Typically, one person will place the starter tools and stand on them while grabbing stamps from the first row and leapfrogging them into the next row. While this person is moving and advancing the tools, another person can do the tamping. Depending on the stamp pattern, a third person may be needed to detail the grout joints.
 Ashlar Cut Slate Stamp
Hand-tooled with a pronounced texture
Ashlar Cut Slate Stamp
Hand-tooled with a pronounced texture
 Herringbone Used Brick
Tool Size is 44" x 27"
Herringbone Used Brick
Tool Size is 44" x 27"
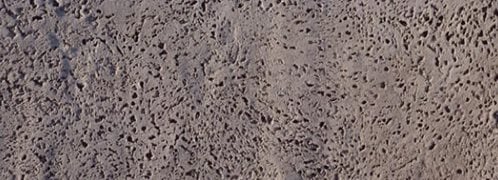 Rock Salt
Seamless travertine off-set
Rock Salt
Seamless travertine off-set
 Bluestone Texturing Skin
6 skin set - only $1,173.20
Bluestone Texturing Skin
6 skin set - only $1,173.20
 Five Point Star Medallion
Concrete stamp only - $292.00
Five Point Star Medallion
Concrete stamp only - $292.00
 Brickform Stamping Tools
Precision stamping tools
Brickform Stamping Tools
Precision stamping tools
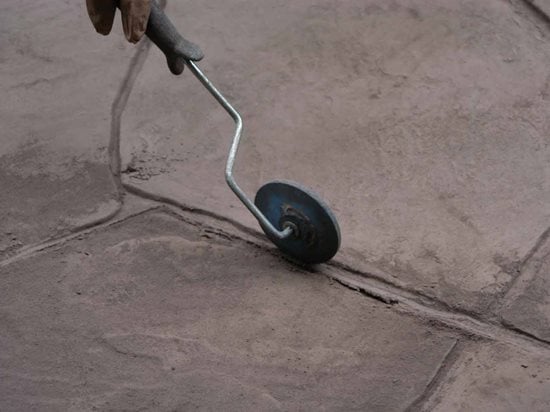
As stamps are placed, have someone stand by with a hand roller to touch up joints where necessary. Usually it's the responsibility of the person who is picking up and moving the stamps to be the observer, looking for any problems or imperfections.
7. Do detailing work as necessaryEven if you have pretextured the edges and used a flex mat against walls, you will often find it necessary to do some detailing with a hand chisel, roller, or texture skin to remove displaced cement paste that comes up through the joints between stamps, to fix any blurred pattern lines, and to correct grout joints where the stamp wasn't tamped down with sufficient pressure. With most stamp patterns, you'll achieve better results if you detail the same day, either as the stamps are being advanced or before going home at the end of the day. For touching up or fixing minor surface flaws, you can use a texture skin as an eraser to correct unevenness or nonuniformity by patting it into the area until it's level and then restamping with the appropriate mat tool.
8. Remove residual release agent and apply curing compound If you've applied a colored release powder to the concrete surface, you can't apply a curing compound until you wash off the residual release agent-a minimum of one day and in some cases two or three days later, depending on weather conditions. Once the surface is sufficiently cleaned and allowed to dry, you can then spray on a liquid membrane-forming curing compound or a cure and seal to retain moisture in the concrete. If you're using a clear or tinted liquid release, you can usually apply the curing membrane to the slab the same day. Check the release manufacturer's recommendations for curing.
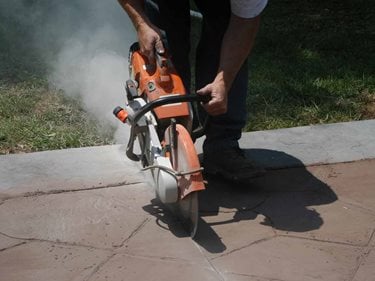
9. Install jointsCutting contraction joints (also called control joints) at the proper depth and spacing in the slab soon after placement provides stress relief at planned locations and prevents uncontrolled random cracking. You can form joints in the concrete as it begins to set using a groover or you can wait to cut the joint until after the concrete has set using a saw equipped with a diamond or abrasive blade. Generally, a sawed joint is less noticeable than grooving.
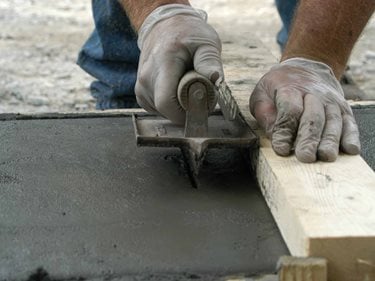
 Use a V-shaped groover to install control joints in the fresh concrete before it sets. Control joints should be cut to a depth of at least one-fourth the slab thickness.
You can also cut joints in concrete after it sets using a handheld cut-off saw. Keep in mind that dry-cut sawing creates a lot of dust, so wear a dust mask and goggles.
Use a V-shaped groover to install control joints in the fresh concrete before it sets. Control joints should be cut to a depth of at least one-fourth the slab thickness.
You can also cut joints in concrete after it sets using a handheld cut-off saw. Keep in mind that dry-cut sawing creates a lot of dust, so wear a dust mask and goggles.
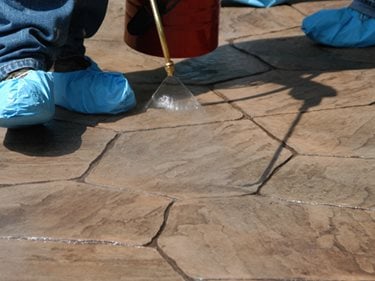
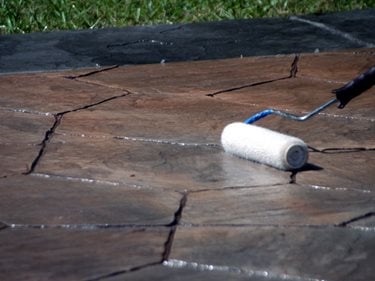
10. Seal the concreteOnce the slab has cured sufficiently, you should apply a finish coat of sealer. Most manufacturers recommend applying the sealer several weeks later, after a light surface cleaning. Be careful not to apply the sealer too heavily, which could trap moisture in the slab. One of the most effective techniques for applying sealer is to combine both spraying and rolling, especially when the stamped pattern has deep grout lines. Going back over the surface with a roller where necessary helps to distribute the sealer uniformly. (For more information, see How to Seal Concrete).

 If you've applied a colored release powder, to the concrete surface, wash off the residual release agent before applying a curing compound.
Once the surface is clean and dry, spray on a liquid membrane-forming curing compound.
If you've applied a colored release powder, to the concrete surface, wash off the residual release agent before applying a curing compound.
Once the surface is clean and dry, spray on a liquid membrane-forming curing compound.
 The final step is to apply sealer to the concrete. To obtain maximum adhesion and long-term durability, be sure to apply the sealer to a clean, dry surface.
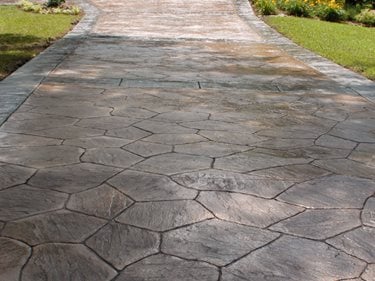
The finished product
The final step is to apply sealer to the concrete. To obtain maximum adhesion and long-term durability, be sure to apply the sealer to a clean, dry surface.
The finished product
Stamping tips
- If you're using a new stamp pattern for the first time, practice with the tools on compacted sand before using them in concrete.
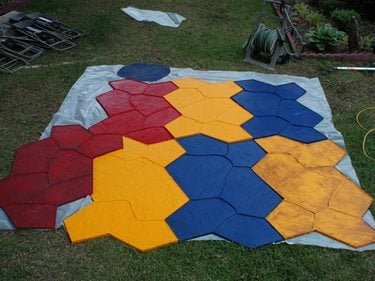
- Avoid pattern repetition, especially with patterns that mimic natural materials such as stone or slate. A random composition will look much more realistic.
- You'll get better results if you precondition, or coat, your stamp mats with some of the release agent. This will provide additional bond breaking to help ensure a clean imprint.
- To obtain a random antiquing effect, apply a very small amount of powdered release to the surface of the concrete and then spray the liquid release over the top of it. The liquid dissolves the light layer of powder to leave subtle accents after the surface is stamped.
- Be sure the release agent gets well-compressed into the concrete by the stamp. Otherwise, it will simply wash off the surface without leaving the desired color.
- Periodically check the alignment of the stamps every couple of rows using a string line. It's not uncommon for stamps to shift as much as 1/4 inch per row, especially on sloped areas.
- On many jobs, you'll be faced with having to stamp up against a vertical surface, such as a wall or a column. Use a floppy mat and texturing to bend or flex up against these surfaces.
- Be sure that the person walking on and moving the stamps is wearing clean boots or work shoes, free of any pebbles, mud, or other debris. Inevitably, these contaminants will end up on top of the stamps and fall onto the fresh concrete surface as the stamps are being lifted.
- If you're using a powdered release, you can save time by sawcutting the contraction joints before removing the release. This allows you to remove the release residue and the dust created from sawing in one step.

