- Concrete Countertop Home
- Concrete Countertop Pictures
- DIY Concrete Countertops: Are They Easy?
- Concrete Countertops Cost
- Countertop Resurfacing
- Design Options
- Concrete Countertop Design Ideas: Edge details, inserts, backsplashes and more
- What Colors are Available / How to Get Samples
- Concrete Countertop Thickness
- Size & Weight of Concrete Countertops
- Other Resources
- Find a Countertop Manufacturer/Designer
- Concrete Contractors: Find Countertop Products and Suppliers
- Design Ideas: Concrete Countertop Info
Eight Step Guide to Lighting Counters with Fiber-Optics
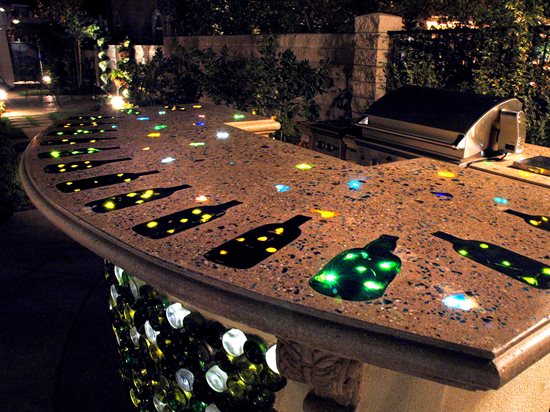
The Green Scene in Chatsworth, CA
There are two primary approaches to lighting counters with fiber-optics. One is to place the cables through the finished surface so that at the end of the polishing process you can easily see the points of light at the end of the exposed cables. While this results in points of light that can easily be seen, the lights can sometimes shine directly into the viewers' eyes for an undesirable effect. Instead, I prefer to glue the ends of the cables to chunks of glass in order to defuse the light and give the counter a more subtle glowing effect. Here's how we do it:
- Step 1: Form the counter
-
Set your forms in place and prep the counter as described previously.
- Step 2: Glue cables to glass chunks
-
Run fiber-optic cables up through the bottom of the forms and spread out the ends of the cables at random. Smash the ends of the cables with a hammer or other blunt object to fray and roughen them. This process helps the cables stick to the glass chunks and also diffuses the light at the end of the strand. Using a hot glue gun, attach strands of cable to chunks of glass. Use one to two cables for lighter colored or smaller chunks of glass; use two to four cables for darker or larger chunks of glass.
- Step 3: Set cabled glass at finish height
-
Using a very dry, low slump concrete mixture (with acrylic fortifier), place the cabled chunks of glass on cones of concrete just slightly higher than the counter finish height. Repeat the process until all glass chunks are set securely in place. Take care to place the glass at random, unless a more structured, formal pattern is desired.
- Step 4: Cast the concrete counter
-
Pour and cast the counter as described at www.howtomakeconcretecountertops.com
- Step 5: Cure the concrete
-
Allow the concrete counter to cure for 7-18 days.
- Step 6: Grind off excess glass
-
Using a single head grinder, remove the excess glass above the finish grade of the counter. This step will save you hours of polishing and excess wear on your tools.
- Step 7: Finish up
-
Grind, hone and polish the counter to the desired finish.
- Step 8: Seal the counter
-
For easy cleaning and durability, follow these guidelines
Related Information:
Coastal Concrete Counters, Inc. Uses TechFab's C-Grid to Develop Illumistone
Learn how to embed glass in concrete countertops
Return to Fiber-Optic Concrete Countertops

