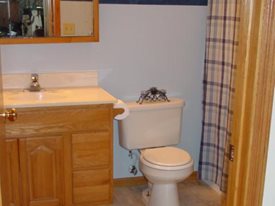
Before
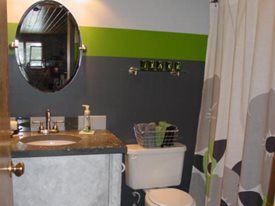
After
Linoleum is one of those materials that can really drag down the interior design of a room. This basement bathroom floor looked outdated and plain with its linoleum flooring, and standard vanity cabinet and sink. But with a few modern upgrades, this bathroom went from monotonous to modern, and all within a reasonable budget.
Matthew Paulus, owner of Simply Concrete in New Richmond, WI, was hired to transform this bathroom. Being artistically-inclined, he saw potential for the floor with a unique Tuscan-inspired custom tile design, and a glass-embed concrete countertop for the vanity.
"The client came in wanting a tile floor," says Paulus. But what neither Paulus nor the client knew was a mess of floor cracks were lurking under the linoleum. "Because of the expense of the tile and repairing the floor, I suggested that we do a concrete overlay." In the end, the overlay was more economical and gave the client a more custom look.
Floor Pattern
To begin, Paulus chased the cracks, opened them up and filled them with an Elite Crete epoxy. "We mix the epoxy with silica sand so that the overlay will bond to it when we apply it." Looking at the bathroom's square footage and shape, Paulus then relied on his art skills to sketch out some custom floor designs from which the client selected the one they liked best. Elite Crete's overlay was placed and Paulus marked the floor so the client could approve the design layout.
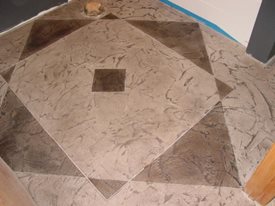
Close-up of the concrete floor pattern.
"We used a grinder to cut out the design," says Paulus. "We wanted a rough edge to give the look of stone, or a rough tile. We rocked a screwdriver back and forth along the edges to get a chipped edge look," he explains.
Custom stains were then used to color the overlay. Mixing them with water, Paulus changed the density of the colors. For darker areas, he mixed a ratio of approximately 9-1. "If I want to get a real light gray, I use a 25-1 ratio to mix black pigment with water. "We used actual grout to fill in the lines and get the look of tile," he says.
Concrete Countertop
The concrete countertop was custom-designed by Paulus to incorporate pieces of glass, stone, and marble. Showing the client various sample pieces, the client chose the embedded counter and handpicked the pieces and colors that would be included.
"We built the form for the countertop and precast it at our shop," says Paulus. "We used adhesive on the bottom of the form to place and hold the glass and other embeds so they'd stay right where we wanted and at the right depth," he explains. "We did grind it down a bit afterward to show more of the concrete aggregate. Then we polished it. Some pieces of the glass are thicker," he explains, "so you can actually see down into the concrete."
Paulus also built the wood vanity cabinet, painting it to look like concrete. The backsplash consisted of glass tile in colors that matched and complemented the floor and counter. "We then painted the walls for the client," says Paulus. "It was a turn-key project."
Simply Concrete
New Richmond, WI
Learn more about concrete bathroom floors