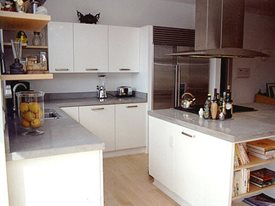
Photo by Concrete Countertop Institute.
Many homeowners are taking advantage of concrete’s versatility when seeking new countertops for kitchens, baths, bars, or outdoor entertaining areas. Skilled do-it-yourselfers, especially those with a little concrete experience under their belt, can also benefit from lower costs by tackling a basic countertop project themselves.
PRE-CAST OR CAST-IN-PLACE?
Concrete countertops are made one of two ways: pre-cast or cast-in-place. Although each method has its advantages, for most basic DIY projects, pre-cast is usually the best choice and that’s the method we’ll focus on here.
(See below for more on the differences between the two methods.)
COUNTERTOP MATERIALS AND TOOLS
These materials and supplies are readily available at your local Home Depot or Lowe's, online at Amazon, or can be found through our supplier directory.
- 1-inch melamine-coated particle board
- 2-inch screws
- 100% silicone caulk
- Galvanized wire mesh and cutting snips
- Countertop concrete mix
- Color pigment - liquid or powder (if desired)
- Sealer
- Concrete mixer; or drill with paddle attachment and 5-gallon bucket
- Shop-Vac or hand-held vacuum
- Circular saw or table saw
- Jig saw (for sink or cooktop cutout - if needed)
- Framing square
- Hand trowel
- Orbital sander and sanding/polishing pads (100-grit to 220-grit)
- Gloves, dust mask or respirator, and eye protection
Using 100% Silicone Caulk to Form Concrete Counters
Time: 02:58
Fu-Tung Cheng shows you how to use caulk during the countertop mold-making process.
HOW TO MAKE CONCRETE COUNTERTOPS
If you’re a first-timer, it's a good idea to make a trial run on a smaller project to practice with mix consistency, color, and finishing techniques. Follow these steps from start to finish for a poured concrete countertop:
Build the mold
- Step 1: Determine the dimensions and cut the mold base from 1-inch melamine-coated particle board to the appropriate size. Add ¾” for overhang on each exposed side.
- Step 2: Place 2 x 4’s that are slightly longer than the mold base across saw horses. Use 3 or 4 of them (depending on the width of the slab) approximately 8” apart and set the mold base, melamine-coated side up, on top of the boards. This will support the base so that it won’t bow under the weight of the concrete.
- NOTE: When assembling the mold, make sure the melamine-coated sides face the inside of the mold; this ensures a smooth finish and easy release.
- Step 3: Measure and cut 2-3/4” strips to the length of the 2 longer sides of the form base and attach them along the outer edges of the base. Drill pilot holes every 6 inches and then insert 2” screws. Pre-drilling the holes will keep the melamine board from splitting.
- Step 4: Measure, cut and attach the 2 shorter sides in the same way.
- Step 5: Check the inside corners of the mold with a square.
- Step 6: Carefully measure and mark any cut-outs needed for a sink or cooktop. Begin cutting them out by drilling the corners of the area to be cut out and then use a jig saw to finish cutting the sides.
- Step 7: Measure, cut, and attach the inside edges for the cut-out in the same manner as the sides above, making sure the melamine-coated surface faces the interior of the mold.
- Step 8: Apply a small bead of 100% silicone caulk to all inside joints. Smooth it into the joint with a wet fingertip to round the edge. This will help make a smooth, slightly rounded edge, as well as prevent wet concrete from leaking through the cracks. Let the silicone dry for 24 hours before adding concrete.
- Step 9: Cut a piece of galvanized metal mesh for added strength and extra crack resistance. Use snips to cut a piece that will fit in the mold and is 1” smaller than the interior dimensions. Set aside. (This can be skipped if you are making a practice run.)
- Step 10: Once the caulking has dried, vacuum out the interior of the mold and get it as clean as possible. Remember, your countertop surface and sides are formed along the interior of the mold, so any debris left behind will leave a mark. You can also wipe the inside of the mold with a little olive oil to aid in the release once the concrete has cured.
- Optional: (Recommended for larger/longer slabs) Add an exterior support frame built with 2 x 4’s to keep the form sides from bowing. Don’t attach this outer frame to the actual mold, just build it to fit snugly around the outside.
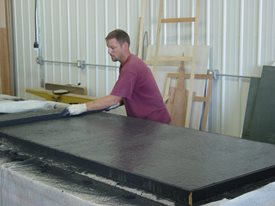
Screeding concrete countertop. Photo by Nobel Concrete.
Mix the concrete
- Step 1: Using a countertop mix, follow the manufacturer’s instructions for the amount of water to be added.
- Step 2: Mix in a standard concrete drum mixer or in a 5-gallon bucket using a mixing paddle attached to a drill. Wear heavy rubber gloves, a dust mask, and eye protection when mixing concrete.
- Step 3: Add color if desired, following manufacturer’s instructions. If using liquid color, account for the amount to be used when measuring water content.
Fill the Mold
- Step 1: Pour the concrete, filling the mold about half full. Spread the concrete evenly and tamp with a hand trowel and work it into the corners and along the edges.
- Step 2: Place the wire mesh reinforcement on top of the concrete and press in lightly.
- Step 3: Fill the mold the rest of the way to slightly over full.
- Step 4: Level the top of the concrete by pulling a 2 x 4 back and forth across the top while slowly moving from one end of the mold to the other. This process is called screeding. Make several passes in both directions.
- Step 5: Settle the concrete and work out air bubbles by lightly tapping along the sides with a rubber mallet, or vibrate it by running an orbital sander (with no sandpaper) along the side walls. Don’t be too aggressive (especially with the tapping) or you can risk cracking the melamine.
- Step 6: Further smooth where the air bubbles have surfaced with a trowel or wood float. Even though this will eventually be the underside of the counter, it needs to be as flat as possible to sit evenly and level on the top of the cabinet.
- Step 7: Cover with plastic sheeting and leave undisturbed while curing. Allow to cure per the manufacturer’s directions before removing from the mold; this can be as little as 18 hours or a couple of days. The longer the countertop is allowed to cure, the stronger it will be.
Remove the slab from the mold
- Step 1: Remove the screws holding the sides in place and carefully pry the sides from the concrete. The boards should come off easily; but if needed, screws can be partially sunk into the sides (careful not to go all the way through and damage the concrete) to use as handles or to grab with the claw end of a hammer and gently pry off.
- Step 2: Flip the slab over and remove the base of the mold to expose the top surface of your new counter. This is where you’ll probably need help to safely lift and turn the slab over.
Finish the surface
- Step 1: There will be imperfections. Work out rough areas along the corners, edges, and surface with an orbital sander or sanding sponges. Start with 100-grit sandpaper and work up to 220-grit, checking for smoothness with your hand as you go. This can be a fairly long process and you’ll go through a lot of sandpaper. It’s also a very messy and dusty job, so wear a mask or respirator and eye protection. If you’ve got a dust collector for your orbital sander, you’ll want to use it.
- Step 2: Voids created from air bubbles or small cracks can be filled with unsanded tile grout and then smoothed with more 220-grit sandpaper.
- Step 3: Wipe with a damp rag to clean off any dust and debris and let dry.
Apply a sealer
- Step 1: Allow the countertop to fully cure, which takes approximately 28 days, then apply a sealer. For any surfaces that will be exposed to food, use a "food-safe" specified product.
- Step 2: Follow the manufacturer’s directions for dilution and application methods.
Install your new countertop
- Step 1: Dry fit your countertop first.
- Step 2: Apply a thick bead of silicone caulk on the upper edge of the cabinet.
- Step 3: Set the slab in place and press down gently to seal the caulk.
PRE-CAST VS. CAST-IN-PLACE
Pre-cast countertops are poured, cured and finished off-site, in your workshop or garage, and then moved to where they’ll be installed. One big advantage to this method is that the countertop is built, cured, sanded and finished out of the way, without disrupting the use of your kitchen or bathroom — or creating a huge mess. Also, you won’t have to remove your existing countertop until it is time to install the new one. However, concrete slabs are extremely heavy (a 2 x 3-foot, 2-inch thick slab weighs approximately 145 pounds), requiring extra help to remove them from the form and install them.
Cast-in-place countertops are, you guessed it, poured right where they go, with the forms built on top of existing kitchen or bar cabinets. The building process can be messy, with wet concrete, sanding, and finishing all being done right there in your kitchen or bath. There’s also the inconvenience of not being able to use your counter until it is finished. Also, if anything goes wrong, say the concrete doesn’t set up correctly or coloring isn’t uniform, it’s much harder to start over. This method does have advantages, like being able to cast longer runs without seams, and there’s no transporting a heavy slab for installation. Also, larger or odd-shaped pieces that might not fit through doorways are already in place.
WHY USE A COUNTERTOP MIX AND NOT ALL-PURPOSE CONCRETE?
Countertop concrete mixes are specially formulated, high-strength mixes - essential for countertops due to their relatively large, yet thin, construction. Countertop mixes should reach a strength of 5000 PSI or higher when fully cured; compared to regular concrete that runs about 4000 PSI. Countertop mixes also contain additives that make it flow better into tight corners and cure quicker to release easily from the form in as little as 18 hours.
WANT TO LEARN MORE?
Concrete Countertop Construction Books
WHEN TO HIRE A CONTRACTOR
If you want to take your concrete countertop a step further with custom color combinations, adding features like drain boards, butcher block, integral sinks; or including embedded stones, glass, tile, or inlays, you’ve probably moved out of the DIY realm and should contact a professional contractor.
Find a local concrete countertop contractor.
More information on Concrete Countertops
When you purchase products through links on our site, we may receive an affiliate commission.