- Staining Concrete
- Stamped Concrete
- Concrete Overlays
- Concrete Resurfacing
- Concrete Polishing
- Concrete Dyes
- Colored Concrete
- Indoor Concrete
- Concrete Floors
- Concrete Countertops
- Garage Floor Coatings
- Furniture, Sinks, Fire Bowls
- Basement Floors
- Outdoor Concrete
- Concrete Patios
- Concrete Driveways
- Concrete Pool Decks
- Outdoor Kitchens & Counters
- Outdoor Fireplace
- Concrete Walkways
- Concrete Pavers
- Concrete Walls
- Repair & Maintenance
- Foundation Repair
- Concrete Crack Repair
- Concrete Sealers
- Building with Concrete
- Concrete Homes
- Concrete Basements
- Decorative Concrete
- Fire Resistant
Five Lessons Learned from a Restaurant Remodel
Kevin Winkler, owner of KW Specialized Concrete in Olympia, Wash. Shares His Insights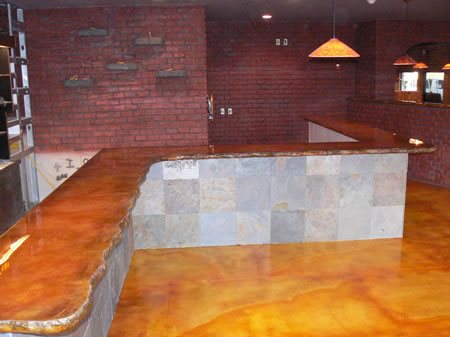
This large countertop/bar was cast-in-place without any seams and has no cracks.
Recently, Kevin Winkler, owner of KW Specialized Concrete completed a restaurant remodel. The project included countertops for the bar and restrooms, a beautifully colored floor overlay, and a creative concrete tree that graces the entryway. However, for Kevin, the best part of the job was not seeing the finished work, it was learning valuable lessons along the way. Here are the timeless lessons which Kevin learned, and now wishes to pass:
Lesson #1: Don't be afraid to walk onto a jobsite, meet the owner, and engage them with the benefits of using concrete on their job.
Kevin noticed a local restaurant in town was closing its doors for remodeling. Curious as to what they had planned, he casually went in and talked to the owner before the remodeling began. After years of experience, Kevin was not only familiar with the benefits of concrete, but also proud of his product, and he shared the versatility, durability, and cost benefits of using concrete with the owner, Mike Barrett. "The more the Mike learned about it, the more he started eliminating other materials he had planned on using based mainly on the durability and cost of using concrete," says Kevin.
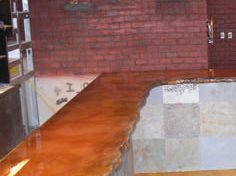
Completed Miracote overlay, with Brickform's dye and seal coloring.
What started as a simple conversation landed Kevin a 4,000 sq. ft. job. "I told him I would do the whole job for $6.50 per square foot if I could have the whole restaurant to work on," says Kevin. And Mike agreed. Kevin brought in some samples and pictures and the job was set.
Lesson #2: Don't be afraid to try a new system on a job. Get the support you need and learn from it.
Kevin wanted to try to use Miracote's overlay. "I didn't have a lot of experience with it," he says, "So I hired top finisher Scott Hogue out of Spokane, Wash. Scott came out to teach me quality and quantity with the product. I figure when you're going into a job with a new product, sometimes it's better to give up some of your bounty."
Scott passed valuable knowledge and skills to Kevin, and was instrumental in making the job go smoothly and quickly. In one instance, Kevin was evaluating the profile of the concrete when Scott suggested that it appeared too smooth. Scott suggested putting an ML primer down and an adhesive to improve the profile. The adhesive helps the overlay bond with the existing concrete.
Bar top with broken slate edge from FossilCrete.
Kevin then proceeded through the overlay process using the new techniques that Scott had taught him. "A Miracote rep also came down and gave me technical support-including what to do and not to do," says Kevin. Due to the experienced coaching, the installation went three times faster once Kevin understood the technique and system.
Kevin also received a great deal of help and support from others in the construction industry. He is especially greatful to Barry Crites of Accent Building Supply along with Jerry Trudeau and Scott Woodard of Miles Sand & Gravel. Without the encouragement of experienced professionals Kevin's work on the restaurant would not have been as successful.
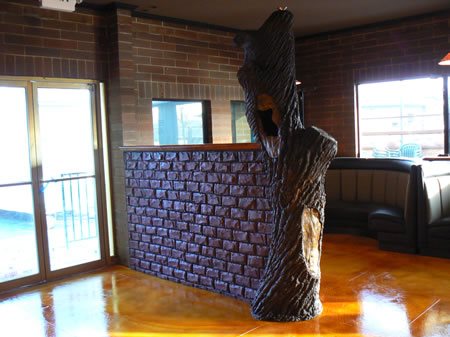
A concrete tree adds interest to the entryway of this restaurant.
Lesson #3: Sometimes you have to think outside-the-box and be confident suggesting floor designs when the customer can't decide.
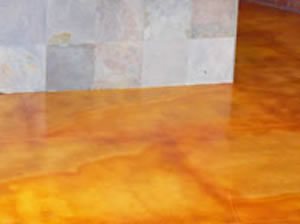
Since the restaurant was undergoing a complete remodel, Kevin was faced with the reality that he was not the only contractor on the job and that his project was one of many. According to Kevin, one challenge that arose was, "The customer was constantly changing the location of a wall that was going to be built. So I had to come up with a pattern for the floor that would still look right in case the wall location was decided after the floor was installed. It had to be interesting but not repetitive, so not to limit the customer's choice for layout." To create the interest without repetition that the restaurant owner desired, Kevin decided to do 4'x6' tile squares each with a unique color pattern. Kevin used strips of construction paper to alter the color/pattern on each large concrete tile.
As was mentioned earlier, Kevin used Miracote, a white-based overlay, and a skip trowel design. "Next we used a Mongoose saw to cut the 4'x6' tile pattern into the concrete and then added the color with Brickform's dye and seal," says Kevin. He used three colors: burnt sienna, gold, and saddle brown. "The combination of colors and the use of our special ripped construction paper technique created a 3-dimensional marble look," explains Kevin. Finally, the floor was sealed with White Mountain, high quality, acrylic sealer.
Lesson #4: Sometimes you have to get creative and be flexible on installation when you can't control the jobsite schedule.
Kevin's biggest challenges on this job were accessibility and jobsite control. In fact, he ended up doing 2/3 of the restaurant to start and then came back and did the kitchen area later after the rest of the remodeling was complete.
The fact that Kevin had little control over the jobsite proved troublesome for the countertop. "I did not have a dust-free environment when applying the epoxy sealer," says Kevin, "so, I couldn't guarantee the customer that there wouldn't be divots on the surface." Often small pits result from dust or particles that land on the wet epoxy during installation and drying time. This can be difficult to avoid when there are other contractors working within close proximity of a concrete surface with freshly applied sealer. Kevin did his best to avoid this situation, but ended up having to do some touch-up work. "I couldn't do the epoxy because of dust in the air for weeks so I put a light coat consisting of 60% White Mountain and 40% acetone on the countertops to hold the colors in place. Then I put construction paper over the top and came back in three weeks. We wiped off the counter, torched the fiber mesh hairs and then realized that the dust had pitted the surface despite our efforts," recalls Kevin. Kevin and his crew had to profile sand it down and add a new coat of epoxy. Kevin chose to mix the sealer with xylene, which makes it flow thinner, lessening the volume so it doesn't overcoat and is easier to handle.
The rest of the countertop was a much smoother process. The counter was cast-in-place, using Stegmeier forms and FossilCrete's broken slate form for the customer side of the counter. The bar was large, 14'x13'x14', with no seams and no cracks. Kevin used enCounter concrete countertop mix because he had taken Doug Bannister's seminars (3 or 4 of them) and worked with his mix. "Because of the seminars, I knew how to use the enCounter mix and how to properly place rebar for extra reinforcement" says Kevin. He used #3 rebar and wire mesh, with double sticks of #3 in corners to reduce cracks and stress.
For coloring the counter, Kevin used Brickform's dye and seal in gold, burnt sienna, eggplant, sandstone and dark walnut. Some black from Nature's Palette, a water-based paint from FossilCrete, was used to create light antiquing on edges. Kevin uses an HVLP sprayer to apply coloring because it cuts down on time without cutting quality. "I was able to color the bar in 90 minutes," he says proudly. Kevin explains his coloring technique by saying "I apply the lighter colors first, then the darker ones, concentrating especially on the edges. This makes it look warm.".
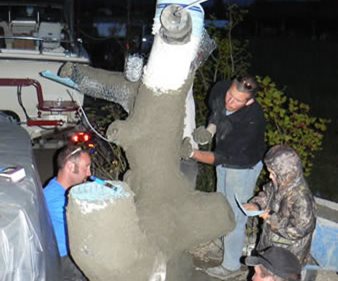
The construction of the concrete tree consisted of creating a frame out of 5 gallon buckets, throwing FossilCrete mix on with towels, stamping with a bark stamp, and handcarving details.
Lesson #5: Customers don't know what you can do. Give them ideas.
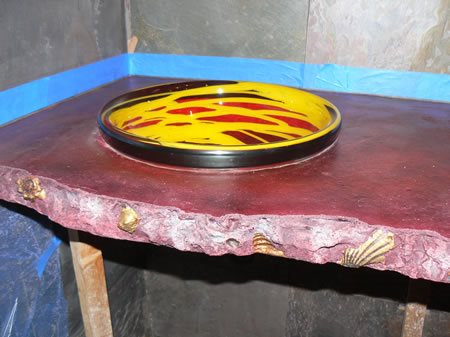
Bathroom counter with seashell edge and a glass sink that glows.
Kevin showed his creativity by offering up some ideas to the customer. He suggested building a concrete tree by the front wall at the entrance, and the customer liked the idea and agreed to it.
Kevin explains that the substrate for the tree was "made of portions of 5 gallon buckets, cut at different angles and screwed together." Then he took ¼" wire lath and wrapped the buckets, securing the wire with a staple gun. "Next we applied FossilCrete using the towel technique, where you scoop the mix from the bucket into a towel and slap it against the tree. The mix sticks to the buckets and wire and holds at about 1-1/4" thick," explains Kevin. Not only does this process sound fun, but it saves time by not troweling. Detail was added to the tree by using liquid release from Brickform and bark stamps from FossilCrete. After stamping, some handcarving had to be done because of the bumpy nature of the tree.
Kevin says he uses FossilCrete "because it is so forgiving. If you lose some when stamping, you can fix it the next day."
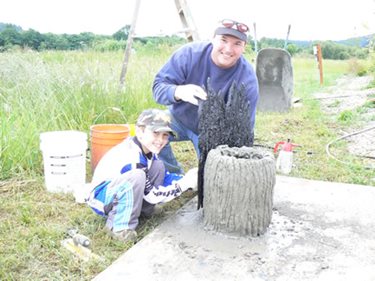
Nature's Palette was used to color the tree bark. Kevin color-mixed shades of brown to make his own custom colors. Once again an HVLP sprayer was used to apply the coloring. "We found that a thick base coat of color helps with antiquing, then you can highlight with lighter and darker browns," says Kevin. The tree was sealed with Nature's Palette paint pigmented sealer. Once complete, the tree was 8'6" tall by 16" wide.
Kevin also offered suggestions to the restaurant owner and convinced him to go for a more elaborate design in the women's bathroom. Some added features included a FossilCrete seashell edge on the counter, glitter underneath the sealer, and a custom spun glass sink with a light underneath to make it glow.
About KW Specialized Construction, LLC
Kevin's company is based in Olympia, Wash. They recently were awarded the title of Top Decorative Company in the Residential Category from the Washington Aggregate and Concrete Association. Their specialties include stamping, staining and refinishing.
KW Specialized Construction LLC
Kevin Winkler
kevinwinkler@wwestsky.net
Read More About Concrete Overlays
Return to Concrete Overlay Projects

