- What is Concrete Made of
- Pouring Concrete
- Concrete Mix Designs
- Aggregates in Ready-Mix Concrete
- Building Concrete Slabs
- Concrete Testing
- Seasonal Pouring Tips
- Repairing Concrete
- Concrete Repair
- Fixing Decorative Concrete
- How-To Videos
- Concrete Videos
- Applications
- Staining Concrete
- Stamped Concrete
- Concrete Countertops
- Concrete Patios
- Concrete Floors
- Commercial Concrete
How to Fix Color Hardeners
Expert Tips on Color Hardener IssuesBEST FLOATS FOR APPLYING COLOR HARDENER
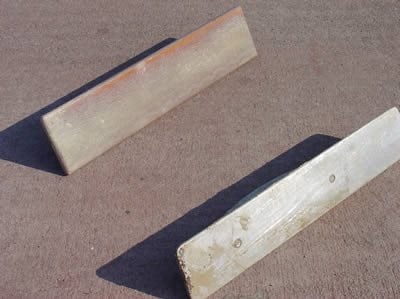
A resin hand float (top left) is often the tool of choice for working in color hardener, vs. a magnesium float(bottom right).
Question:
Why is it recommended to use wood or resin floats when applying dry-shake color hardener?
Answer:
Wood and resin floats leave a rougher surface than magnesium or aluminum floats. The rougher concrete surface allows for more uniform moisture migration. Color hardener needs this surface moisture to react, or "wet out." The hardener also needs to be worked into the concrete. The rougher surface of a wood or resin float provides better dispersion of the hardener and works it into the surface more evenly and consistently than a metal float. That said, using wood or resin floats to apply color hardener is considered best practice, not a hard-and-fast rule. There are many applicators who use metal floats successfully.
COLOR HARDENER FAILS TO ADHERE
Question:
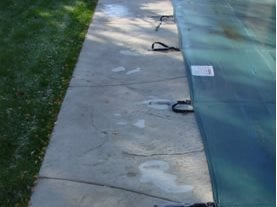
A colored and textured concrete pool deck I placed a year ago is showing signs of surface failure. I used color hardener in conjunction with powdered antiquing release and seamless slate-patterned texturing skins. The entire surface was sealed with a solvent-based acrylic sealer. Only one section of the project is showing signs of failure, while all other areas are wearing well and look good. What is causing this and how can it be repaired? Rip out and replacement of the deck is not an option because of the swimming pool.
Answer:
The problem you are seeing is lack of adhesion between the color hardener and concrete. Color hardener is a dry cement-based powder that is cast on the concrete surface when it is still wet. The water from the concrete "wets out" the color hardener from below as it sits on concrete surface. Timing is everything. Applying the hardener when there is too much bleed water on the surface will wash out the color. Waiting too long, after most of the water evaporates and the concrete becomes too dry, will create a weak, thin layer of color.
The other key factor in successful color hardener application is proper floating. Once the color hardener has completely wet out it needs to be worked in with a float (preferably wood or resin) to become one with the concrete. Certain sections of this slab are showing signs that insufficient floating took place, with the color hardener coming off quite easily, in pieces ranging from penny to quarter size. The final piece of the puzzle came when the homeowner explained that the section with failures was poured late in the day, under poor light conditions, and was rushed. I suspect that lack of floating really caused this problem. Rushing the job and skipping a crucial step (floating color hardener into the surface) ruined what otherwise would have been a very nice problem-free pool deck.
The fix, unfortunately, will never look as good as what the original work would have looked like if it had been done properly. You will need to explain to the homeowner that the look will differ slightly, and the colors and texture may not match exactly. Since the color hardener is flaking off quite easily, high-pressure water or sandblasting can be used to remove all the loose color in the areas that are failing. Once all the loose color is gone, apply a stampable overlay in a matching color. The good news is that the original gray concrete surface is rough enough from the original application so that no additional surface preparation will be needed.
Apply the colored, stampable overlay at a thickness of ¼ inch, and use the same color release and texture skin originally used on the project. If necessary, use water- or alcohol-based stains over the entire slab or select areas to blend the new with the old once the overlay has cured. Once the overlay and color work is complete, the entire project (new and old) should be sealed.
COLORING VERTICAL SURFACES WITH COLOR HARDENER SLURRY
Question:
I plan to use a color hardener on the faces of a set of stairs. I have been told that it's easier to apply color hardener to vertical surfaces by making a slurry with it. Can this be done, and what consistency should the slurry be?
Answer:
Yes, color hardener can be used to make a slurry for coloring vertical surfaces. This process is most often used when "facing" the front of steps or the vertical edges of stamped concrete slabs. An advantage of this method is that you can color the vertical sections as time permits, even days later if necessary. That makes it a convenient alternative on projects with lots of steps or vertical surfaces and not enough time or labor available to remove the forms and finish those vertical faces while the concrete is still workable.
The process involves mixing color hardener with a 1-to-1 mixture of water and a concrete bonding agent. Add enough color hardener to achieve a consistency similar to peanut butter or a stiff paste. Before applying the slurry, remove the forms and work the surface with a wood or resin float to create a rough surface for better adhesion. Apply the color hardener slurry with a small trowel or float, as if icing a cake. When the slurry sets up, trowel it smooth and then use a stamp or skin that matches the corresponding flatwork sections. A common mistake is starting the finishing work too early, while the slurry is still wet. Wait until the slurry reaches the optimum stage for stamping or finishing so it will take a good imprint. At this point, cleaning and sealing can proceed as usual for the entire project.
COVERAGE RATE AND TIMING ARE CRITICAL WHEN APPLYING COLOR HARDENER
Question:
I poured an 800-square-foot residential patio and colored it using a cream-colored dry-shake hardener. After applying eight pails of color hardener, I was still able to see blotches of gray where the color didn't cover completely. I followed the recommended application rate, so why do I still see gray? And how can I hide the gray areas and make the patio more uniform for the homeowner?
Answer:
Average coverage rates for dry-shake color hardener range from 1/2 to 1 pound per square foot, depending on the opacity, or hiding ability, of the color. Lighter colors have less opacity, thus require a higher dosage rate to achieve uniform, total coverage. Conversely, darker colors hide better and require less material to achieve total coverage. In general, I recommend that contractors plan on using 3/4 to 1 pound of color hardener per square foot. It's always better to have leftover material than to run short with 30 feet to go!
While coverage rate is important, the real key to achieving uniform and complete color coverage with dry-shake hardener is proper execution, especially the timing of application. If the concrete is too wet when you apply the hardener, most of the color will be lost because it will be worked down into the wet concrete with the float. I believe this is what occurred with the patio in question. Even though you applied a full pound of color hardener per square foot, blotchy gray areas remained. And there wasn't much you could do to remedy the situation before the slab hardened because all the material planned for the job had been used.
There are two methods for fixing this problem. The first is to apply a coating in a matching color to help hide the gray areas. Options include a color wax, colored curing membrane, colored cure-and-seal, or colored sealer. While these are relatively quick and cost-effective fixes, they aren't permanent and will require occasional application of maintenance coats to rejuvenate the color. The other fix involves applying a thin overlay, or microtopping, to the entire surface. This is more costly and time consuming than applying a colored coating, but the results are more permanent and the surface requires very little maintenance. Both of these remedial measures should be sampled and the pros and cons explained to the homeowner prior to installation.
A colored and textured concrete pool deck I placed a year ago is showing signs of surface failure. I used color hardener in conjunction with powdered antiquing release and seamless slate-patterned texturing skins. The entire surface was sealed with a solvent-based acrylic sealer. Only one section of the project is showing signs of failure, while all other areas are wearing well and look good. What is causing this and how can it be repaired? Rip out and replacement of the deck is not an option because of the swimming pool.
The problem you are seeing is lack of adhesion between the color hardener and concrete. Color hardener is a dry cement-based powder that is cast on the concrete surface when it is still wet. The water from the concrete "wets out" the color hardener from below as it sits on concrete surface. Timing is everything. Applying the hardener when there is too much bleed water on the surface will wash out the color. Waiting too long, after most of the water evaporates and the concrete becomes too dry, will create a weak, thin layer of color.
The other key factor in successful color hardener application is proper floating. Once the color hardener has completely wet out it needs to be worked in with a float (preferably wood or resin) to become one with the concrete. Certain sections of this slab are showing signs that insufficient floating took place, with the color hardener coming off quite easily, in pieces ranging from penny to quarter size. The final piece of the puzzle came when the homeowner explained that the section with failures was poured late in the day, under poor light conditions, and was rushed. I suspect that lack of floating really caused this problem. Rushing the job and skipping a crucial step (floating color hardener into the surface) ruined what otherwise would have been a very nice problem-free pool deck.
The fix, unfortunately, will never look as good as what the original work would have looked like if it had been done properly. You will need to explain to the homeowner that the look will differ slightly, and the colors and texture may not match exactly. Since the color hardener is flaking off quite easily, high-pressure water or sandblasting can be used to remove all the loose color in the areas that are failing. Once all the loose color is gone, apply a stampable overlay in a matching color. The good news is that the original gray concrete surface is rough enough from the original application so that no additional surface preparation will be needed.
Apply the colored, stampable overlay at a thickness of ¼ inch, and use the same color release and texture skin originally used on the project. If necessary, use water- or alcohol-based stains over the entire slab or select areas to blend the new with the old once the overlay has cured. Once the overlay and color work is complete, the entire project (new and old) should be sealed.
I plan to use a color hardener on the faces of a set of stairs. I have been told that it's easier to apply color hardener to vertical surfaces by making a slurry with it. Can this be done, and what consistency should the slurry be?
Yes, color hardener can be used to make a slurry for coloring vertical surfaces. This process is most often used when "facing" the front of steps or the vertical edges of stamped concrete slabs. An advantage of this method is that you can color the vertical sections as time permits, even days later if necessary. That makes it a convenient alternative on projects with lots of steps or vertical surfaces and not enough time or labor available to remove the forms and finish those vertical faces while the concrete is still workable.
The process involves mixing color hardener with a 1-to-1 mixture of water and a concrete bonding agent. Add enough color hardener to achieve a consistency similar to peanut butter or a stiff paste. Before applying the slurry, remove the forms and work the surface with a wood or resin float to create a rough surface for better adhesion. Apply the color hardener slurry with a small trowel or float, as if icing a cake. When the slurry sets up, trowel it smooth and then use a stamp or skin that matches the corresponding flatwork sections. A common mistake is starting the finishing work too early, while the slurry is still wet. Wait until the slurry reaches the optimum stage for stamping or finishing so it will take a good imprint. At this point, cleaning and sealing can proceed as usual for the entire project.
I poured an 800-square-foot residential patio and colored it using a cream-colored dry-shake hardener. After applying eight pails of color hardener, I was still able to see blotches of gray where the color didn't cover completely. I followed the recommended application rate, so why do I still see gray? And how can I hide the gray areas and make the patio more uniform for the homeowner?
Average coverage rates for dry-shake color hardener range from 1/2 to 1 pound per square foot, depending on the opacity, or hiding ability, of the color. Lighter colors have less opacity, thus require a higher dosage rate to achieve uniform, total coverage. Conversely, darker colors hide better and require less material to achieve total coverage. In general, I recommend that contractors plan on using 3/4 to 1 pound of color hardener per square foot. It's always better to have leftover material than to run short with 30 feet to go!
While coverage rate is important, the real key to achieving uniform and complete color coverage with dry-shake hardener is proper execution, especially the timing of application. If the concrete is too wet when you apply the hardener, most of the color will be lost because it will be worked down into the wet concrete with the float. I believe this is what occurred with the patio in question. Even though you applied a full pound of color hardener per square foot, blotchy gray areas remained. And there wasn't much you could do to remedy the situation before the slab hardened because all the material planned for the job had been used.
There are two methods for fixing this problem. The first is to apply a coating in a matching color to help hide the gray areas. Options include a color wax, colored curing membrane, colored cure-and-seal, or colored sealer. While these are relatively quick and cost-effective fixes, they aren't permanent and will require occasional application of maintenance coats to rejuvenate the color. The other fix involves applying a thin overlay, or microtopping, to the entire surface. This is more costly and time consuming than applying a colored coating, but the results are more permanent and the surface requires very little maintenance. Both of these remedial measures should be sampled and the pros and cons explained to the homeowner prior to installation.
Learn more about how to buy color hardeners.

