- Concrete Sealer
- Comparison Chart of Concrete Sealers
- Buying Tips for Concrete Sealer Products
- Concrete Sealer Reviews: Sealer products other contractors use and recommend
- Common Questions about Concrete Sealers
- How to Remove Concrete Sealer
- Types of Sealers
- Acrylic Sealers
- Epoxy Sealers
- Penetrating Sealers
- Polyurethane Sealers
- Polyaspartic Sealers
- Application Surface
- Driveway Sealer
- Patio Sealer
- Pool Deck Sealer
- Sealers for Stamped Concrete
- Concrete Floor Sealers
- Concrete Countertop Sealers
- Pool Deck Sealer
- Exposed Aggregate Sealer
Concrete Sealers: A 9-part series
An overview of common cure and seal problemsThis series of blog articles will address the most common sealer problems encountered in the field, why they occur, and how to avoid and repair them.
Part 1: THE DIFFERENT CHOICES
Sealers, and the problems associated with them, continue to be the biggest source of frustration for decorative concrete applicators around the country. It's easy to understand why: There are a vast number of sealer products on the market for decorative concrete, yet many contractors lack a basic understanding of how to select and properly apply the products. This series of blog articles will address the most common sealer problems encountered in the field, why they occur, and how to avoid and repair them.
Before we can get into dealing with problems, it's necessary to give you some background on the products being used. I am continually amazed at how many applicators I talk to that know very little about the sealer they have been using for years (other than the color of the can it comes). While most sealers straight out of the container look, smell and flow similarly, there are major differences. Here's brief overview of the four types of sealer products used for decorative concrete. All have a different function, purpose and recommended method of application.
Cures are designed to slow initial hydration of concrete to create a stronger product and minimize shrinkage cracking. However, they are not intended to provide long-term durability and protection. They are applied as soon as the freshly placed concrete can be walked on, and they can be tinted to match colored concrete.
Sealers provide long-term protection and color enhancement. But they should not be applied until after concrete has cured. The recommended minimum curing time is 28 days, but most contractors typically wait only 7 to 14 days. View this comparison chart of concrete sealers.
Cure and seals, as you might expect, blend some of the benefits of cures and sealers. Like cures, they slow initial hydration of concrete to create a stronger product and minimize shrinkage cracking. They also provide mid-term protection of 6 to 12 months. These products are applied as soon as the concrete can be walked on.
Coatings provide long-term protection, the best chemical resistance, and color enhancement. Like sealers, they must be applied after the concrete has fully cured (28 days). They may also require special surface preparation for proper adhesion.
Note that cures, cure and seals, and straight sealers all have a dry film thickness of about 1 mil and are breathable. Coatings are thicker (2 to 3 mils) and typically nonbreathable. Even with so many options and chemistries, the problems I see with these products, such as environmental impact and application issues, are similar no matter what product is used.
Part 2: VOC REGULATIONS — HOW THEY AFFECT THE PRODUCTS YOU USE
Volatile organic compounds (VOCs) are emitted as gases from certain solids or liquids, including many types of sealers. VOCs include a variety of chemicals, some of which may have short- and long-term adverse health effects.
Regulations concerning the manufacture and use of sealers and coatings for concrete have been the source of much discussion and confusion. In an effort to try and simply the matter, the following is a brief summary of how the US Environmental Protection Agency’s 1999 Architectural Coating Rule for Volatile Organic Compounds impacts the manufacture and use of sealers and coatings in the concrete industry in 2014.
The Environmental Protection Agency published the architectural coatings rule on September 11, 1998 (63 FR 48848) under authority of Section 183(e) of the Clean Air Act. This rule took effect in 1999 and limits the amount of volatile organic compounds (VOC) that manufacturers and importers of architectural coatings can put into their products. VOCs are carbon-based compounds released from certain solvents, plastics or rubber that combine with other gases in the atmosphere to form ozone which can adversely impact the environment and atmosphere. The rule also has container labeling requirements for architectural coatings. There are different options for complying with the VOC limits, including exemptions for products that may be hard to reformulate and or small quantity manufacturing and packaging, but the bottom line is most sealers, coatings, cures, water proofers, and cure and seals for concrete fall under these guidelines. The question then remains which guideline and what are the limits for the product I am using?
To answer this question you need to know what category the product you are manufacturing or using falls under and the VOC limits for the that particular product in the area you are working. As an installer, most of that work is taken care of by the manufacturer or distributor, but it is still your responsibility to understand the guidelines and work within them.
In regard to sealers and coatings for concrete, there are federal standards, state and multi state group regulations, and in some cases counties or air quality management districts that have set their own regulations. To complicate matters further there are some 61 sub categories of sealers and coatings, each with its own VOC limit that can vary greatly depending on which state or county you are manufacturing or using the product in. This series of different regulations can complicate matters when determining if a concrete sealer or coating meets the VOC regulations for that area. . So which regulation do you need to follow? State regulations trump federal regulations, and district regulations trump both state and federal regulations. The chart below clarifies the VOC limits for the key concrete coatings categories by area as of 2014.
It is important to note that VOC regulations are not static and changes are always being proposed and implemented. July of 2014 several Northeastern states in the Ozone Transport Commission (OTC) and local California Air Districts have recently proposed amendments. Notably OTC Phase II was approved in 2014, and was adopted by Maryland, taking effect January 1, 2107. Seven counties in Utah also adopted OTC Phase II guidelines January 1, 2015. See the chart below for details.
You can find out the VOC content and category for the sealer or coating you are using by looking at the MSDS or specification sheet for that product. For more information on solvents, VOC regulations, and the Architectural Coating Rule for Volatile Organic Compounds (63 FR 48848) check out these resources:
- Architectural Coatings: National Volatile Organic Compounds Emission Standards
- Summary of State and Federal VOC Limitations for Institutional and Consumer Products
Architectural Industrial and Maintenance (A.I.M.) Coatings VOC Regulatory Regions in 2014
CARB - California Air Resources Board. Made up of 20 air management districts in the state of California.
OTC - The Ozone Transport Commission. Made up of the following states: Connecticut, Delaware, the District of Columbia, Maine, Maryland, Massachusetts, New Hampshire, New Jersey, New York, Pennsylvania, Rhode Island, Vermont, and Virginia.
SCAQMD - South Coast Air Quality Management District. Made up of the following counties in Southern California: Orange County and the urban portions of Los Angeles, Riverside and San Bernardino counties.
Canada - The entire country of Canada operates under the same VOC limitations.
VOC Limitations for Concrete Coatings by Product for the US and CanadaMeasured in grams per liter
| Federal | CARB | LADCO | OTC* | Utah** | MD OTC Phase II 1/1/17 | SCAQMD | Canada | |
|---|---|---|---|---|---|---|---|---|
| Concrete Curing Compounds | 350 | 350 | 350 | 350 | 100 | 100 | 100 | 350 |
| Concrete Curing and Sealing Compounds | 700 | 100 | 350 | 350 | 100 | 100 | 100 | 350 |
| Concrete Protective Coatings | 400 | 100 | n/a | n/a | n/a | n/a | n/a | 400 |
| Concrete Surface Retarders | 780 | n/a | n/a | n/a | n/a | n/a | n/a | 780 |
| Concrete Form Release | 450 | 250 | 250 | 250 | 250 | 250 | 250 | 250 |
| Primers, Sealers, and Undercoats | 350 | 100 | 350 | 350 | 100 | 100 | 100 | 350 |
| Stains, clear | 550 | 250 | 250 | 250 | 250 | 250 | 100 | 250 |
| Stains, opaque | 350 | 250 | 250 | 250 | 250 | 250 | 100 | 250 |
| Waterproofing Sealers and Treatments | 600 | 400 | 400 | 400 | n/a | n/a | 100 | 400 |
| Waterproofing Membranes | n/a | n/a | n/a | n/a | n/a | 100 | n/a | n/a |
| Concrete / Masonry Sealers | n/a | n/a | n/a | n/a | n/a | 100 | n/a | n/a |
| Driveways Sealers | n/a | n/a | n/a | n/a | n/a | 50 | n/a | n/a |
| Reactive Penetrating Sealers | n/a | n/a | n/a | n/a | n/a | 350 | n/a | n/a |
*The state of Maryland adopted OTC Phase II in 2010, it became effective 4/25/16 with a compliance date of 1/1/2017. OTC Phase II utilizes the same VOC minimums as SCAQMD.
**Seven counties in the state of Utah (Box Elder, Cache, Davis, Salt Lake, Tooele, Utah, and Weber) adopted OTC Phase II on 9/2013, with a compliance date of 1/1/2015.
As of late 2016, the states of NY and DE are considering adoption of OTC Phase II.
The stricter limit applies for products that fall under multiple categories.
Q&A: Does Your Concrete Sealer Meet VOC Content Regulations?
Part 3: PREVENTING MOISTURE PROBLEMS
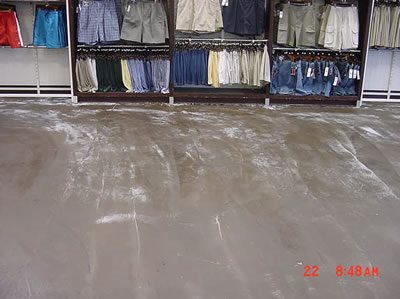
Whitening of sealer is often caused by applying it to a wet surface.
Moisture is a leading cause of problems with decorative concrete sealers. Under certain conditions, moisture can become trapped in or under the sealer, resulting in whitening or clouding of the sealer membrane. But why does this happen, how do we avoid it and how do we fix it?
There are two key contributors to moisture problems. The first is sealer contact with moisture in the concrete during application. Cures, cure and seals, and sealers for decorative concrete (see Part 1 for the differences between these product categories) are all designed to handle different levels of moisture contact. Cures and cure and seals can handle higher levels of moisture contact, allowing them to be applied to green (high-moisture-content) concrete and not turn white or cloud up. Decorative concrete sealers, on the other hand, can't take much moisture contact. This is why they need to be applied after the concrete has cured for 28 days. If a decorative sealer is applied to green, or wet, concrete, you can pretty much guarantee the development of a nasty white haze. This has to do with the type of resin (or plastic) the coating is made from, and how that resin deals with moisture contact.
The second key contributor to moisture problems is the permeability of the sealer, or how readily water is able to pass through the sealer membrane. Permeability is directly related to the solids type and content and thickness of the sealer. All exterior acrylic cures, cure and seals, and sealers are designed to allow some level of permeability when applied at 300 to 500 square feet per gallon. The lower the solids content and/or the thinner the membrane thickness, the more moisture that can pass through the sealer without getting trapped and turning white. This is why applying sealer at the proper thickness is so important, especially when dealing with high-solids-content products (in excess of 25%). The higher the solids content, the smaller the margin of error. Most of the moisture-related problems I see in the field are caused by overapplication of high-solids cure and seals or sealers.
In regard to avoiding moisture-related problems, it is really quite simple. Use a sealer with a solids content of less than 25% and apply it thinly by spray. If problems do occur, misting solvents over the surface, such as acetone, xylene or MEK (methyl ethyl ketone) followed by back rolling will spread out the sealer film and remove excess material. After the solvents evaporate, the sealer will reharden. In a worst-case scenario, it may be necessary to strip off the sealer followed by cleaning of the surface and sealer reapplication.
 D-One Penetrating Sealer
Non-yellowing, low sheen, good adhesion
D-One Penetrating Sealer
Non-yellowing, low sheen, good adhesion
 Deep Penetrating Sealer
RadonSeal - Waterproofs & strengthens.
Deep Penetrating Sealer
RadonSeal - Waterproofs & strengthens.
 Clear-Seal by Increte Systems
Seals and protects decorative surfaces.
Clear-Seal by Increte Systems
Seals and protects decorative surfaces.
 Gem-Guard SB
Penetrating sealer that protects against salt damage
Gem-Guard SB
Penetrating sealer that protects against salt damage
 Decorative Sealers
Reactive and penetrating formulas in various levels of gloss.
Decorative Sealers
Reactive and penetrating formulas in various levels of gloss.
 Water Repellent Penetrating
Sealer for driveways, parking structures, plazas, walkways & more.
Water Repellent Penetrating
Sealer for driveways, parking structures, plazas, walkways & more.
 Colored Concrete Sealer X-4
High gloss finish available in 20 colors
Colored Concrete Sealer X-4
High gloss finish available in 20 colors
Part 4: THE EFFECTS OF DEICING SALTS ON SEALER PERFORMANCE
First, the good news: Deicing salts have no direct effect on sealers. In fact, concrete sealers of any type have been proven to increase the lifespan of salt-treated concrete three to five times! Now the reality: Sealers for decorative concrete often fail in areas where deicing salts are applied or that receive drip-off from parked cars. It's not the salt, though, but rather what the salt is doing that causes the sealer to fail.
Salt chemically reduces the temperature at which water freezes. When salt is applied to a sealed decorative concrete surface covered by snow and ice, it causes melting and turns the frozen water into a liquid that is now able to migrate into the concrete. This salt-rich water (brine) goes through many freeze-thaw cycles as environmental conditions change (i.e., more snow falls, the sun comes out, more salt is applied, the temperature changes, etc.). So instead of one freeze-thaw cycle per day (or season, the farther north you live), it's possible to have hundreds per day when salt is used. During each cycle, the water expands as it freezes and thaws as it contracts. The problem is that while sealers help to retard moisture movement, they do not stop it completely. So as the saltwater passes through, under and all around the sealer, the water is expanding and contracting, and eventually the sealer will fail.
Think about what happens when you bend a steel wire. The first time, not much. But when you bend the wire 50 times, it's likely to snap. A sealer can only take so much pressure from water expansion and contraction before it snaps and pops off the surface. The same process is what causes the top layer of concrete to pop off (commonly referred to as spalling or surface delamination) in high-salt-use areas.
The best offense against sealer failure due to deicing salt use is a good defense. In areas with severe winters, some contractors use a combination of sealers to fight the effects of deicing salts. They start with a penetrating sealer (silane, siloxane or silicone) that fills the concrete pores from the bottom up. Then they apply an acrylic sealer for decorative concrete that creates a membrane from the top down. This systems approach costs a bit more, but when faced with stripping and resealing, it may be well worth it.
Part 5: THE EFFECTS OF TEMPERATURE ON SEALER REACTIVITY
The No. 2 cause of problems when applying sealers to decorative concrete (after moisture) is temperature. Both air and surface temperature play a role, but surface temperature is typically more critical. After application, sealers undergo a chemical reaction that causes them to cure and form a film. Temperature plays a critical role in how fast or even whether this reaction occurs. The best temperature range for applying sealers is 50 to 90 degrees F. That 40-degree window is really not very big, especially when you're working outside. This is why monitoring weather conditions and looking at a thermometer should be mandatory before every sealer application. Here's what can happen if temperatures are too low or too high.
Low temperature
Every sealer has a minimum film forming temperature (MFT), or the minimum temperature needed for the sealer to properly form its film, cure, and get hard. For most sealers, this temperature is around 40 to 45 F or higher. To be safe, most sealer manufacturers specify 50 F to provide a buffer zone. If the temperature is at or slightly below the MFT, the chemistry of the sealer is affected, the reaction slows down, and you get partial to no film development. Bottom line: The sealer is weak and will not hold up very long. If the temperature is really cold, film development stops altogether and all you are left with is a white powder on the surface after the carrier (solvent or water) evaporates.
High temperature
Temperature is a catalyst. As the temperature increases, so does the reactivity of the sealer. Increased reactivity decreases the working time, or pot life, of the sealer. The faster the reactivity, the less time the sealer has to wet out the surface, de-gas, and form its film. This makes it critical to get the sealer down on the concrete quickly and efficiently. As the temperature increases, the ability to roll out sealers becomes more difficult. I always recommend spraying solvent-based sealers, especially in warm conditions (see Summer Sealer Basics). A common indication that the temperature is too high is the formation of fine "spider webs" or "cotton candy" strings coming off the roller or spray tip. This occurs when higher temperatures cause the solvent to flash before the resin (plastic) in the sealer can form its film. The pressure from the sprayer or friction from the roller pulls the soft plastic into long, thin strands.
Another common issue caused by higher temperatures is the formation of bubbles or blisters in the sealer. They occur when the solvent flashes too fast, trapping gas and air in the sealer. With today's tightening VOC requirements (see Does the Voc Content of the Sealer You're Using Meet Current Federal and Local Regulations?) more fast-flashing solvents are being used, which makes the window of application even smaller. When outside temperatures are expected to rise above the recommended application range, apply the sealer during the cooler times of the day, typically mornings and evenings.
Part 6: WHEN TEMPERATURE + MOISTURE = CONDENSATION
We have covered how moisture (Part 3) and temperature (Part 4) can each affect sealer performance. But what happens when both come into play? Here's a mini lesson in meteorology to explain the problems that can occur when the two conspire.The air that surrounds us always contains water vapor, but the amount of water can vary. Humidity is the measure of how much water is in the air at any given time. We would not have to worry about this water vapor if it just remained trapped in the air as a gas. But it doesn't because temperature fluctuations convert that water vapor into a liquid. If temperatures rise and enough water is in the air, instability is created and rain can fall. As temperatures fall, condensation can occur in the form of dew. For example, on cool summer nights, you'll often see dew-covered cars, grass, and other surfaces once morning comes around. The dew point is the temperature at which water comes out of the air and becomes a liquid.
What does all this have to do with sealers and decorative concrete? A lot, if not taken into consideration before sealing. As humidity increases and temperature decreases, water will condense on cool surfaces. Since concrete is a sponge, it will absorb the condensation. The problem is that the slab surface won't look wet, but hiding just beneath it can be lots of collected water. If a sealer is then applied to the surface, the trapped water can cause the sealer to white out or not adhere properly. Outdoors, this problem is more common during transition seasons (spring and fall) as nights get colder but humidity is still high during warm days. Indoors, this problem is prevalent in the winter near walls and doors where floor temperatures are colder.
Part 7: PREPARING SURFACES FOR SEALER APPLICATION
A simple but often overlooked step in any sealer application is surface profile. When I use the term "surface profile" in regard to sealing, I am including all aspects of the surface at the time of sealer application. But the two heavy hitters are cleanliness and porosity. Overlooking either can cause even the best sealers to fail.
Clean means just that: clean! A surface that is to be sealed must be free of all dirt, dust and any other contamination that will come between the sealer and the surface. Just spending a little extra time cleaning can make all the difference in how well the sealer adheres. In some cases, a good broom or blower is all that is needed to remove loose dirt. More stubborn contaminants may require removal by scrubbing with soap and water followed by a clean water rinse or acid etching followed by neutralization. I also consider residue from stain and dyes, excess release powder and efflorescence as surface contamination. These types of dry contamination are most often the culprits when sealers fail due to a dirty or contaminated surface. Efflorescence and stain residue are especially nasty because their extreme pH levels can affect sealer chemistry. A sealer that exhibits white "curds" in the film or soft spots is often failing due to a surface pH imbalance.
Porosity refers to the concrete surface's ability to take in the sealer. If the sealer can't wet out there will be little or no adhesion and durability. A hand-troweled concrete surface is usually porous enough to accept a one-part sealer with a solids content lower then 30%. A machine-troweled concrete surface will usually require additional prep to open it enough to accept the same sealer. Typical methods for opening a very tight or dense surface include light sanding or acid etching. When dealing with higher-solids sealers (usually two-part polyurethanes and epoxies with solids in excess of 45%) opening the surface or diluting the first sealer coat is highly recommended. A simple water test (to see how well the water wets out the surface) is a great way to determine if the surface is ready to accept the sealer.
As with any sealer, always refer to the manufacturer's installation guidelines for specifics on surface preparation and proper application techniques.
Part 8: CHOOSING THE BEST APPLICATOR
How a sealer is applied can affect the final outcome and performance as much as all the environmental factors discussed in this series combined. Using the right tools is critical to achieving the best coverage rate and sealer thickness for optimal performance. For more of this answer, see Choosing the Best Applicator
Part 9: SEALER APPLICATION TIPS
Each type of sealer has a recommended applicator and coverage rate, as discussed in Part 8: Choosing the Best Applicator. But simply using the right application tool won't guarantee good results. You also need to practice the proper application techniques to avoid bubbles, blisters, lap lines and other eyesores.
The most common application problem is applying too much sealer at once (remember the phrase "thin to win"). Sealers are designed to perform best at a specific thickness, depending on the type of resin. This is determined by the coverage rate for that particular sealer. A good analogy is to compare sealers to a deck or cards. The first and second cards dealt are close to the surface, hard to pick up and very stable. The more cards you put on the pile, the more unstable the pile gets. The same holds true for sealers. The first and second thin coats are very stable, have good adhesion and provide good durability. The more you apply, either in one or multiple applications, the more unstable the system gets. With solvent-based systems, the signs of overapplication are typically bubbles, blisters and white haze. With water-based systems, you'll often see blisters, foam and a milky white cloudiness.
Another common application mistake is lap lines, or uneven application. When applying sealer, always go back over the previous pass about 2 inches as you move across the surface. This overlap needs to occur when the sealer is still wet, so the two passes blend and become one. If the first pass dries, the second creates a lap line and can be seen after the entire floor is dry. Fixing the problem usually requires applying another full coat of sealer.
When applying sealer by sprayer (whether using an LPHV, airless or pump-up type) make sure to maintain constant pressure and use the proper tip. A cone-shaped spray pattern is better than a fan pattern, and the more atomized the sealer the better.
When applying sealer by roller, make sure to buy a roller suitable for the sealer type (water- or solvent-based) and a nap thickness appropriate for the surface. When rolling on water-based sealers, be careful not to over-roll, which can causing foaming and blisters. You also may need to dip the roller more often. Some newer acetone-based fast-drying sealers can't be roll applied because they flash off too fast.
When using a lamb's wool applicator, micro-fiber applicator, synthetic mop or T-Bar, the application process is the same. Pour the sealer on the surface, and push and pull the product while maintaining a wet edge until you achieve the desired thickness. These application methods are very good for water-based sealers because they don't foam and you can see the white sealer go clear as you push and pull it around the floor. However, they will only work on smooth floors.
Author Chris Sullivan, ConcreteNetwork.com technical expert and vice president of sales and marketing for ChemSystems Inc.
Return to How to Fix Concrete Sealer Issues

