- Staining Concrete
- Stamped Concrete
- Concrete Overlays
- Concrete Resurfacing
- Concrete Polishing
- Concrete Dyes
- Colored Concrete
- Indoor Concrete
- Concrete Floors
- Concrete Countertops
- Garage Floor Coatings
- Furniture, Sinks, Fire Bowls
- Basement Floors
- Outdoor Concrete
- Concrete Patios
- Concrete Driveways
- Concrete Pool Decks
- Outdoor Kitchens & Counters
- Outdoor Fireplace
- Concrete Walkways
- Concrete Pavers
- Concrete Walls
- Repair & Maintenance
- Foundation Repair
- Concrete Crack Repair
- Concrete Sealers
- Building with Concrete
- Concrete Homes
- Concrete Basements
- Decorative Concrete
What is Concrete Delamination and How to Prevent & Fix It
Learn what causes the paste layer to separate or flake at the surfaceDelaminations in concrete slabs can be a serious problem, but often they are "heard" before they are seen. Here's an example. A concrete floor slab placed days ago has hardened and cured. As work from other trades continues in the area, someone drops a hammer from a ladder onto the floor, and an unexpected sound is heard. Instead of the clear ringing sound you would expect when metal hits solid concrete, a drummy sound or loud clack draws your attention. Using the hammer to tap around this spot, you identify more hollow-sounding areas. What's been discovered is a surface delamination in the concrete floor.
Find concrete contractors near me
How do delaminations happen?
When fresh concrete is placed and compacted, the solids (cement and aggregate) settle. This natural settlement causes excess mix water and entrapped air to be displaced (called bleeding), and the lighter materials migrate toward the surface. If finishing operations start prematurely and close or seal the surface before bleeding is completed, air and/or water are trapped under the densified surface mortar. As concrete hardens, subsurface voids develop where the water or air is trapped. These voids create weakened zones right below the surface that can eventually detach during slab use. Very thin mortar layers over delaminations may even detach when struck with a hammer, as you try to sound out the extent of the delaminated area.
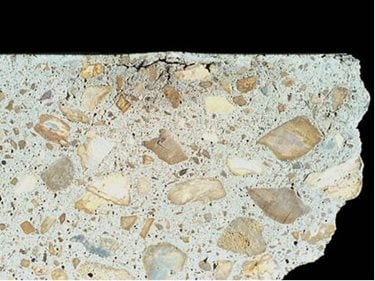
Photo 1 - Side view of slab surface containing a blister. (Photo courtesy of the Portland Cement Association)
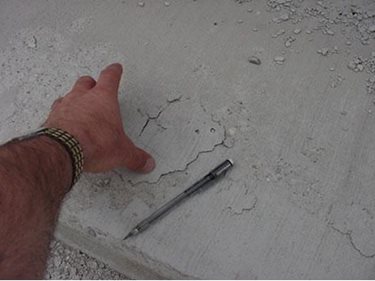
Photo 2 - Slab placed on waterproofing membrane on roof slab. Premature finishing resulted in widespread delamination.
When delaminations can be a problem
If the delamination is isolated to just one spot, it might not affect the performance of a concrete slab. But if it's widespread, then you have a more serious problem that should be addressed.
Delaminations come in various forms and degrees of severity. Blisters are small, isolated delaminations usually 1 to 3 inches in diameter (Photo 1). Blisters frequently happen when relatively sticky mixes with higher percentages of fines are placed. They occur in areas subject to moderate to high rates of evaporation and that are finished too soon.
When finishing operations occur too early, uniformly over the slab, a delamination problem can be quite widespread and affect larger zones of a slab surface (Photos 2 and 3).
How to avoid delaminations
The simplest way to prevent delamination is to start final finishing of the slab after the bleeding process has run its course. But this may not be as easy as it sounds. Following consolidation, and once bleeding is complete, there is nothing left to be trapped to cause voids. However, a finisher's job to properly time final finishing can be an art because job-specific influences impact this timing on each project. Stickier mixes, thicker slabs, different types of subgrades, initial concrete temperatures, different cementitious contents, and changes in ambient temperatures all affect the bleeding process and impact when finishing should begin.
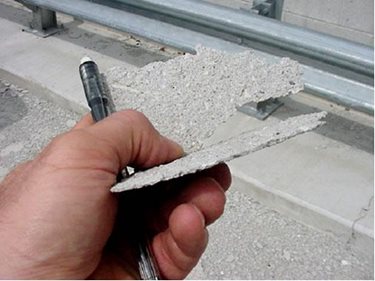
Photo 3 - The thickness or depth of a delamination can vary, depending on the mix and the timing of final finishing. Here the depth of delamination is about 1/8 to 1/4 inch.
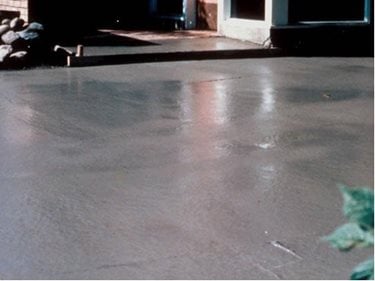
Photo 4- Postpone final finishing operations until the bleed water sheen has evaporated. (Photo courtesy of PCA)
Here are a few dos and don'ts to follow to help you avoid delaminations:
-
Don't seal or close the slab surface too early.
Bleeding must be completed before starting finishing operations that close the surface (Photo 4). Be aware that sticky mixes with higher cementitious or sand contents tend to bleed more slowly. -
Do take precautions when finishing if the concrete is air entrained.
At air contents greater than 3%, a dense, hard-troweled surface isn't necessary. There is less potential for delamination if you give the surface a light steel-troweled finish or a broom finish in exterior areas where slip resistance is a concern. -
Don't finish slabs placed on impervious surfaces too early.
When concrete is placed on an impervious subbase, bleed water must rise to the top because it can't exit out of the slab bottom. Compared to slabs cast on a porous subbase, the bleed water quantity will be greater and bleed time may be longer, especially in cold weather. -
Don't place concrete on cold subgrades when ground temperatures are below 40°F.
The cold ground slows setting of the bottom part of the slab, making the timing of finishing even more difficult to judge. To reduce this differential set retardation, keep the subgrade covered until the time of concrete placement. Learn more about pouring concrete in cold weather. -
Do warm the concrete or use small doses of set accelerator to promote more uniform setting of the mix.
This will make it easier to judge the timing of final finishing. -
Do take special precautions when ambient evaporative conditions are high and exceed concrete bleeding rates.
Under these conditions, it's tougher to judge when bleeding is complete. Here's a trick learned on the jobsite: Place a domed garbage can lid on the surface for a few minutes, and if you see bleed water after lifting the lid, bleeding is still in progress even if it's not easily visible over the entire slab. -
Do take measures to counteract rapid evaporative conditions on the jobsite,
such as wind, low humidity, and hot temperatures. Otherwise, crews are often forced to start final finishing of a surface before it gets away from them. The best ways to stop the surface from crusting and prevent high evaporation rates is to erect wind breaks, fog the air 5 feet above a slab (Photo 5), or spray on an evaporative retardant (such as EUCOBAR from Euclid Chemical or EVAPRE from W. R. Meadows). Learn more about pouring concrete in hot weather.
Remedies for delamination
If drummy-sounding areas on a slab are easily detectable by hammer or chain dragging, the subsurface probably contains voids. Depending on their severity and slab use (such as exposure to wheel loads and heavy traffic), these zones are likely to detach sooner than from a sound surface.
To achieve a high-quality surface, remove the defective concrete to a depth where only sound concrete remains. Proper removal of unsound concrete by suitable methods such as shotblasting (Photo 6), grinding, or hydrodemolition, is critical if subsequent steps are to be successful.

Photo 5 - Fogging a slab surface increases relative humidity and decreases the rate of evaporation. Here the fog spray is 5 feet above the slab surface. Do not spray directly at the slab surface or finish the water into slab. This commonly results in dusting. (Photo courtesy of PCA)
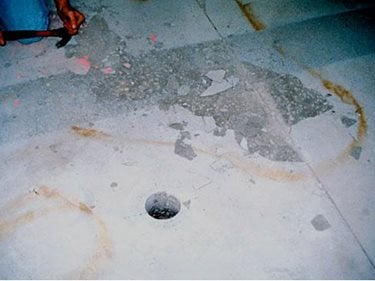
Photo 4- Postpone final finishing operations until the bleed water sheen has evaporated. (Photo courtesy of PCA)
After proper removal of unsound concrete, you can then apply a new surface. In some cases, the slab can be ground smooth and sealed, resulting in an attractive final surface with an exposed-aggregate appearance. Alternately, you can bond a topping or concrete overlay to the prepared roughened surface. You can find resurfacing products for both interior and exterior use that are formulated to bond to a sound substrate and provide an attractive, sound new working surface. Conduct a small mock-up with the resurfacing material in a noncritical area of the slab to verify that the final appearance and surface texture will be acceptable to the owner for the use intended.
Related Information:
Find Concrete Products
Author: George W. Seegebrecht, ConcreteNetwork.com Columnist and Principal Engineer at Concrete Engineering Group, LLC

