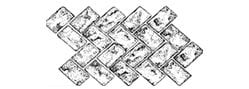
My first hands-on exposure to installing stamped concrete was back in 1976 at the innocent age of 14. I was working for my father at the time, helping him stamp a crosswalk in the busy downtown area of Alameda, Calif. The brick-pattern stamps we were using were made of plastic, and to prevent them from sticking to the fresh concrete, we stamped through a layer of 1-mil plastic. Once the stamping was complete, we added texture by dragging a broom across the surface.
Looking for a pro to complete your project?
Find concrete stamping contractors near me.
Roughly 30 minutes after completing the stamping for the day and setting up lighted barricades strung with "caution" ribbon, a little old lady with bluish-gray hair, driving a car in which she could barely see over the dashboard, crashed through the barricades and drove through the freshly stamped section. The funny thing was, she never even stopped. I can still vividly see her turning the corner down the street, dragging behind a piece of caution ribbon stuck to her bumper. And yep, you guessed it. We had to remove half of that day's pour, which my dad was not happy about.
Decorative Concrete Institute in Temple, GA
Decorative Concrete Institute in Temple, GA
Little did I know, that day would actually set the stage for my career in decorative concrete. A decade or so later, in the late 1980s and early 90s, I was pretty much stamping daily. One project we worked on involved stamping every driveway and pool deck for 350 homes in a new subdivision. Each prospective homebuyer had the choice of five different patterns to choose from, along with five different color options. This type of work, done in such a repetitive fashion, was a great learning experience. We were able to figure out how to overcome any obstacle thrown at us, making us experts in touchups and repairs. After several years of residential stamping, we moved into the big leagues of stamped concrete, doing commercial themed stamping for Disney World in Orlando, Fla., for close to 10 years, while hanging out with Mickey and friends. Any imaginable situation could arise at any moment in this type of environment, which taught us to become consummate professionals.
Throughout this entire time, I consistently encountered eight recurring considerations for a successful stamped concrete installation that made the difference between blasé and magical results. Certainly there are plenty of other considerations on a stamped concrete project, but these eight in particular always make the top of my list.
1. Adequate subgrade preparation
My golden rule:
Always place the subbase level, without variances in height. This is to ensure that the concrete is placed at a uniform thickness. Otherwise, it will not set at the same rate and you could get plastic shrinkage cracking in the thicker areas during stamping due to the differential setting times.
One of the most important aspects of any concrete installation is properly preparing the subgrade. Unfortunately, subgrade preparation is often overlooked and can lead to soil erosion and cracking of the concrete slab. In coastal regions, some contractors will even pour concrete right over the top of a sand base. Not only is it difficult to keep the sand flat and level during concrete placement, if you have to back a fully loaded concrete truck through the sand, ruts are inevitable.
For our subbases, we use a compacted, crushed granular fill. Typically, we install the fill at the same thickness as the concrete being poured, excavating the soil down to the thickness needed before placing the fill. A subbase, when installed properly, should be able to support a fully loaded concrete truck without rutting more than ¼ inch.
2. Using the right mix design
The concrete mix is probably one of the most misunderstood aspects of stamping, especially for newcomers to the process. Concrete is not a generic product that is the same from pour to pour. I always tell my students that no concrete, anywhere in the world, is the same from batch to batch. Most professional stamping contractors have several mixes they like to use under different circumstances, such as weather conditions and the size of the project. Contractors may have a mix design that is better suited for use during the summer because it's designed to set more slowly, while using a different mix in the winter that's designed to set faster. We even have an interior floor mix we use for thinner applications of less than 2 inches.
My golden rule:
The best mix design is the one that works in your area and fulfills your needs.
It also is imperative to establish a relationship with ready-mix producers and let them know the specifics of your requirements, such as the amount of cement, amount and type of sand, and how quickly you need the concrete to set. For stamping work, you typically want what we refer to as a "fatty" mix, one with a sufficient amount of cement paste to provide a layer of cream on the surface. If you use a mix without sufficient cream and too much coarse aggregate (referred to as a harsh mix), you will fight it through every step of the stamping process. While it's your responsibility to know and understand your concrete mix, there are prepackaged products you can use in a pinch to help you during the stamping process, such as premeasured admixtures you can add to concrete on the jobsite to give you greater control over setting times. Also, in dry windy conditions, you can spray an evaporation retardant on the concrete surface to help prevent rapid drying.
Find admixtures for concrete.
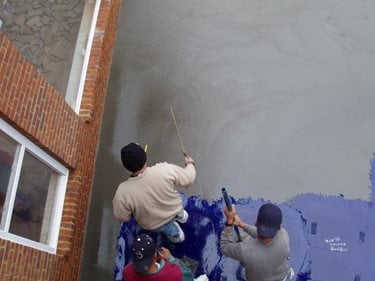
3. Concrete placement
My golden rule:
Start small and don't try to tackle 20 cubic yards of stamping work in one shot, especially if you are new to the process. Start by placing 5 to 6 cubic yards, and then once you can successfully cover areas this size, move on to tackling larger areas.
There are a number of ways you can place the concrete once it arrives at the worksite. Most concrete finishers will tell you that when the truck pulls up on the site, their heart rate goes up because it's imperative for them to off-load that truck as quickly as possible. At this moment, it's as if nothing else in the world matters and your goal is to get that concrete on the ground. In order to do this, you need to start the stop watch map the moment the concrete truck leaves the plant and map out a pathway and keep it clear of obstructions, so the truck driver can pull into the placement area without interference. The longer the concrete mix sits in the truck, the greater the heat of hydration that develops, causing rapid setting.
Just as important as getting the concrete placed quickly is to strike off and finish the concrete quickly as well. The work you do immediately following concrete placement is critical since this is when you create the canvas for decorative stamping. One of the biggest problems I see for newbies is not having enough skilled workers on hand to place the concrete expeditiously.
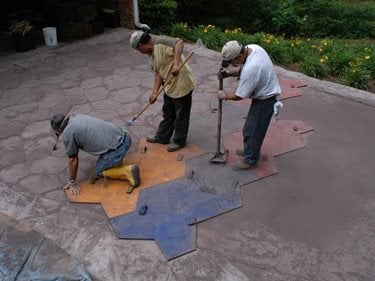
4. Having enough stamps
My golden rule:
Always purchase the necessary amount of stamping tools. Investing more upfront can pay huge dividends later.
Check out the latest trends in concrete stamping tools.
A problem I often see with those new to stamping, and even with seasoned veterans, is trying to save money upfront by purchasing the minimum number of stamping tools. This can come back to bite you later if you encounter a situation where the concrete sets faster than you can stamp the surface. The general rule is to have enough stamps to span the widest area, plus two additional stamps. For example, if you are stamping a 20-foot-wide driveway and your stamps are 2x2 feet, you would need 10 stamps to span the first row, plus two additional stamps to start the second row, for a total of 12 stamps. I know of one commercial stamped concrete contractor in Pennsylvania that doesn't stamp jobs smaller than 1,000 square feet. He has as many as 25 to 30 tools per set, enabling him to stamp these large areas very quickly. Remember, not only will you need enough stamping tools, you will also need accessory items such as hand chisels, tampers, detail rollers and a sufficient amount of concrete finishing tools.