- Concrete Sealer
- Comparison Chart of Concrete Sealers
- Buying Tips for Concrete Sealer Products
- Concrete Sealer Reviews: Sealer products other contractors use and recommend
- Common Questions about Concrete Sealers
- How to Remove Concrete Sealer
- Types of Sealers
- Acrylic Sealers
- Epoxy Sealers
- Penetrating Sealers
- Polyurethane Sealers
- Polyaspartic Sealers
- Application Surface
- Driveway Sealer
- Patio Sealer
- Pool Deck Sealer
- Sealers for Stamped Concrete
- Concrete Floor Sealers
- Concrete Countertop Sealers
- Pool Deck Sealer
- Exposed Aggregate Sealer
How to Fix Concrete Sealer That's Blotchy, Hazy or Spotty
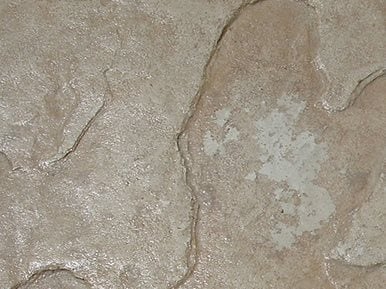
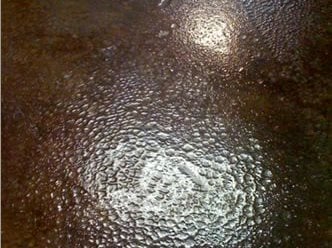
Tips for fixing blotchy sealer, white haze, dark spots and moreSPOTS ON STAMPED POOL DECK MAY BE SEALER DIFFUSION
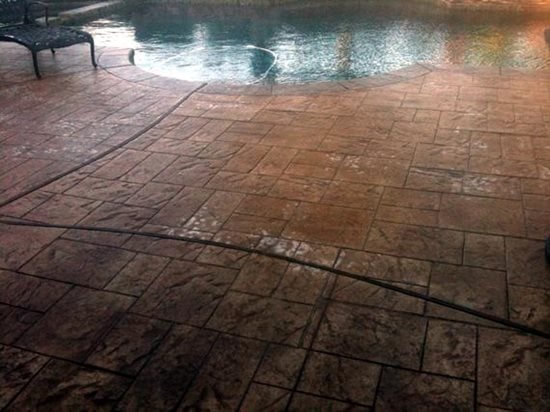
The grayish-white spots on this pool deck may indicate sealer diffusion, a condition in which the sealer lifts from the concrete.
Question:
We have an issue with efflorescence on a stamped concrete pool deck and need your advice. The last time the pool deck was sealed was about three years ago. About a month ago, we resealed the deck and now it has white spots (see photo). We used a 30%-solids solvent-based acrylic sealer. We applied the sealer to a test area about three months before we resealed, and there did not seem to be any issues. Before resealing, we cleaned the deck with a mild acid wash, neutralized, and then allowed the sealer to dry. We then applied one coat of sealer diluted with xylene followed by a second coat rolled on full strength.
What is causing the white spots, and what percent of acrylic sealer or type of sealer do you recommend for a stamped pool deck?
Answer:
From the picture, it appears that efflorescence may not be the problem. These white spots are actually more gray, and they don't have the look of efflorescence. Instead, this looks like sealer diffusion. This phenomenon, where the sealer is no longer adhered to the concrete, looks a lot like efflorescence from a distance, but on closer inspection is actually more gray or cloudy. Without getting into complex physics, the sealer has lifted (even if only by micro-meters) and it causes the discoloration. The small air gap that now exists between the sealer and concrete causes the light to diffuse and create the grayish-white cloudy look. Moisture-vapor pressure, contamination or over-application of the sealer can cause this problem. To confirm this diagnosis, do a sealer-adhesion scratch test or just lightly scratch the sealer with a key or some other hard blunt-end object. If the sealer holds and does not flake, it may be something else. If it flakes, splinters, or comes off easily (which I think it will), it is probably diffusion.
Another thing it may be is moisture condensation trapped under the sealer. Have you had any major wet weather events in the weeks prior to this occurring? As with most decorative concrete issues, it could be a combination of both of these things, with a little efflorescence thrown in for good measure.
To fix the problem, I would wait until the winter is over and you get some warmer weather. A xylene bath (lightly soaking the problem area with a xylene solvent and back rolling) is the first step. If this does not work, you will probably need to strip off some or all of the sealer.
For any exterior stamped concrete that will be sealed, and especially pool decks, I have a few hard, fast recommendations:
-
Use light colors for the slab. Dark colors show everything, especially all the chemical residue from pool water, including chlorine, bromine and salt.
-
Use less-aggressive stamp patterns. Water seeks low spots. If you have lots of "grout" lines and or lots of rough texture, water will puddle in those low areas. Pool decks are wet to start, so the combination can be especially bad. Lighter-texture seamless patterns with simple sawcuts or large light-texture stone patterns work best.
-
Use a sealer with a solids content of less than 20%. Less is more, and this is especially true when sealing decks around pools and hot tubs. Lower solids allow moisture and air to move through the sealer easier. Lower solids also reduce the risk of slipping accidents. Consider using a solvent-based acrylic sealer with an 18% to 20% solids content. They provide nice gloss, good color development, and greatly reduce callbacks.
Need professional help with your sealer problems? Find concrete contractors near me.
BLISTERS AND BUBBLES ON SEALER SURFACE
Question:
Shortly after applying a solvent-based acrylic sealer, tiny blisters and bubbles appeared on the surface of the sealer. What are these, and how do I get rid of them?
Answer:
According to several coating chemists in my resource network, as well as from my own personal experience, bubbles and blisters in sealers and coatings are always a concern. While they don't always occur, there remains a chance they can show up. For the rest of the answer, read Blisters, Bubbles on Sealer Surface.
EPOXY IN SAWCUTS LEAVES WHITE HAZE
Question:
I stained an old concrete floor the other day and sealed it with a two-part 100%-solids epoxy. I love the way the epoxy looks, but there are minor imperfections, such as trapped lint and small bubbles, that keep the surface from looking like a perfect sheet of glass. Also, there are really deep sawcut lines in the floor (1 to 2 inches), and the epoxy that went into the sawcuts stayed a milky white color.
What is the best method to apply the epoxy to avoid these issues?
Answer:
Welcome to the world of high-performance coatings, and the viscosity that is associated with them. Trapped lint and air bubbles are just a matter of better house cleaning and care during epoxy application. Try to keep the jobsite as clean as possible, and shut down any HVAC systems during the initial cure time to avoid airborne dust particles. When applying the epoxy, wear medical shoe covers, such as those used in hospitals, rather than cotton socks, which give off lots of lint. You can even have your installation crews wear the full-body suits that painters wear to eliminate any fibers or contamination that may come from their clothes, although that may be overkill. Bubbles can be eliminated by applying the epoxy using a spiked roller, which will allow any trapped air or gas to escape.
As for the white haze that developed in the sawcuts, the cause is either trapped moisture or the coating was applied too thickly. The fact that the sealer is a 100%-solids product and does not need evaporation to cure leads me to believe that moisture is the culprit. Cracks and joints are common places for water to hide. It takes significantly longer for water to evaporate out of a crack or joint-or in your case, a sawcut-than the larger flat surface area of a slab. With such deep sawcuts, you need to give the floor plenty of extra dry time or use a leaf blower or high-pressure air hose to speed drying. Unfortunately, the chance of the white haze going away on its own with a 100%-solids product 1 to 2 inches thick is slim. You may need to grind out or chemically strip the coating from the sawcuts. When you go to reseal the cuts, make sure they are dry and fill them with multiple thin applications of epoxy vs. one thick application. Thin coats of materials will give any trapped air or gas a better chance to migrate to the surface and escape.
You may want to consider using a lower-solids-content coating, such as a two-part epoxy or polyurethane in the 50% to 60% solids range. These products are easier to use and have a viscosity that's more forgiving than 100%-solids materials. Plus, they will provide almost the same performance when applied in multiple coats.
 D-One Penetrating Sealer
Non-yellowing, low sheen, good adhesion
D-One Penetrating Sealer
Non-yellowing, low sheen, good adhesion
 Deep Penetrating Sealer
RadonSeal - Waterproofs & strengthens.
Deep Penetrating Sealer
RadonSeal - Waterproofs & strengthens.
 Clear-Seal by Increte Systems
Seals and protects decorative surfaces.
Clear-Seal by Increte Systems
Seals and protects decorative surfaces.
 Heavy Duty Oil & Stain Protector
TS210 - 4 gal. kit ($439.95)
Heavy Duty Oil & Stain Protector
TS210 - 4 gal. kit ($439.95)
 Gem-Guard SB
Penetrating sealer that protects against salt damage
Gem-Guard SB
Penetrating sealer that protects against salt damage
 Decorative Sealers
Reactive and penetrating formulas in various levels of gloss.
Decorative Sealers
Reactive and penetrating formulas in various levels of gloss.
 Water Repellent Penetrating
Sealer for driveways, parking structures, plazas, walkways & more.
Water Repellent Penetrating
Sealer for driveways, parking structures, plazas, walkways & more.
 Clear Acrylic Concrete Sealer
$219.30 (5 gal.)
Clear Acrylic Concrete Sealer
$219.30 (5 gal.)
 Colored Concrete Sealer X-4
High gloss finish available in 20 colors
Colored Concrete Sealer X-4
High gloss finish available in 20 colors
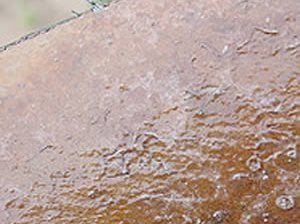
BEWARE OF APPLYING ACRYLIC SEALER TOO THICKLY
Acrylic sealers applied too heavily may fracture.
Question:
Here's a photo of a self-leveling overlay that I stained and sealed with a 30%-solids acrylic sealer. The slab is in a screened porch under a deck. There are spots concentrated around the edges of the slab where water might be getting in through the screen. I thought the spots were left from the water, but I tried scrubbing them and they won't come off. They do disappear when they are wet.
Have you ever seen anything like this? Normally when my sealer has moisture issues, it appears cloudy. Some of these spots almost appear as if the sealer has cracks in it. It's weird!
Answer:
The acrylic sealer is actually fracturing. Typically this occurs when the sealer is applied too heavily, as it appears to be in this case. Acrylic sealers are designed to go down very thin. Even with two coats, the thickness should be only about 1 to 2 mils. To give you some reference, a credit card is about 120 mils thick.
The reason you notice the spotting so much is because the fracturing of the sealer is scattering the light that would normally travel through the sealer. When light can travel through a sealer without interference, you'll see a nice, clean reflection. Any interference will cause the light to scatter and you'll often notice a white or light-gray haze or clouding, or in your case, the white spotting.
I am not a fan of acrylic sealers with a solids content above 24%. At higher solids, you need to be very careful to apply the sealer thinly. Acrylics are tough stuff, but they are prone to cracking once they exceed 1 to 2 mils in thickness. The substrate they are applied to also plays a part. Self-leveling overlays are pretty dense and usually have a polymer-rich paste on the surface. Unless this paste is sanded off prior to staining or sealing, you run the risk of limited sealer penetration and compromised adhesion. Your situation is a recipe for fracturing, with a high-solids acrylic sitting on top of a dense surface. Opening the surface by lightly sanding is usually enough to allow penetration.
If you like the high-gloss look of an acrylic but want to avoid this problem in the future, consider using a two-part polyurethane, which is designed to go down at 3 to 5 mils. Or spread out the acrylic more thinly to achieve a 1- to 2-mil thickness and then apply multiple coats of a wax-modified finish coat or sacrificial topcoat designed for concrete floors.
CAUSE OF DULL SPOTS IN SEALED FLOOR
Question:
Four years ago I covered my basement floor with a patterned overlay (I am in the decorative concrete business). I applied a two-part polyurethane sealer to it. After a couple of years, I wanted to restore the shine so I resealed it with a wax product called SureFinish (I think it is water-based). Over the course of a few months, the floor looked more and more dull in spots, especially where walked on with wet shoes. I stripped the floor with a mild muriatic acid cleaner and applied an acrylic solvent-based sealer, thinking that I needed the solvent to restore the color. The floor looked great at first, but after about a month it began to dull again in spots. When I wash the floor it looks great, but the dull spots show up when it dries, and over time I'm getting more and more spots. Do you know why this is happening? Is it perhaps because the original sealer was a polyurethane that the others sealers are not bonding to, and with washing and water exposure, they are coming off? How do I now reseal over the original sealer?
Answer:
I think you are on the right track in terms of the other sealers not bonding to the original polyurethane sealer. Now you have multiple layers of different sealers, all of which seem to be wearing. Applying a water-based wax and then a solvent on top was also not a good idea.
What is probably happening is diffusion. Where a sealer coat starts to come off, light no longer travels through it but instead diffuses, resulting in dull or white and hazy spots. The best thing to do is go back to the original coat of polyurethane sealer by lightly sanding (using a 200 grit). Then apply very light coats (800 to 1,000 square feet per gallon) of the wax. Test this remedy in a small area first to make sure it is working.
REMOVING BUBBLES AND ROLLER MARKS IN A SEALER
Question:
I recently applied a two-component, high-solids aliphatic polyurethane sealer to a stained floor in a spa. First, I applied the primer coat with a roller and then applied the polyurethane, which has a longer pot life, with an airless sprayer. While applying the primer on the first half of the floor, I could see roller marks and bubbles and the primer started to string up on me. I mixed a new batch and proceeded to finish rolling the rest of the floor but at a much faster pace, and I seemed to have no problem. But now roller marks are visible throughout the entire floor, not to mention the bubbles.
To remove the bubbles, I was told by the sealer manufacturer to go over the floor with a floor buffer or 150-grit sandpaper and then seal again. But will buffing be aggressive enough to take out the marks? Also, should I apply the primer using a sprayer instead of a roller, and should I mix smaller amounts of the sealer? I think I may have rolled on the primer too fast producing the roller marks. What do you recommend to fix the issue?
Answer:
Sanding will take surface bubbles out, but buffing with a floor machine will not be aggressive enough. If the bubbles go deeper than the surface, you may need to strip and start over. My suggestion is to try sanding out the marks and then reapply your topcoat. If this does not work, strip down to a point were no roller marks or bubbles appear and start over. Do a test area before doing the entire floor.
I am not a fan of rolling in general, especially heavier bodied materials like epoxies or polyurethanes. All rollers produce lines, with more material coming off the ends of the roller as it moves across the surface. Depending on the material used, application temperature and pot life, the roller lines may or may not even out. The speed of rolling, the amount of material on the roller and the weight pushing down on the roller also play a role in leaving roller marks. Picture a car tire that has mud on it. If you drive slowly, the mud comes off the tire evenly. If you speed up, the mud flies all over and leaves more prominent marks on the outside edges of the tire. Heavy-bodied materials are always best applied in small batches and with a push-pull applicator such as a lamb's wool or micro-fiber pad or a T-bar.
BLOTCHY SPOTS OF GLOSS IN A SEALED FLOOR
Question:
I recently applied two coats of an acrylic sealer to a stained floor. After the sealer dried, the floor appeared blotchy, with some areas glossy and others not. What causes this, and should I apply more sealer to remedy the situation?
Answer:
If you were to look at a concrete floor under a microscope, you would see what looks like an endless range of plateaus and valleys. The number and depth of these plateaus and valleys is directly proportional to the finish of the concrete. A smooth finish has fewer of them while a rough finish looks like the Grand Canyon. When sealer is applied, it fills the valleys, but you may need to apply more than one coat depending on the finish of the floor. Typically when we see a floor that has blotchy areas of gloss, this means that some areas do not have sufficient sealer to fill the valleys. Applying additional light coats of sealer usually resolves this issue. If this is an interior floor, a wax finish coating can also be applied to fill all the valleys and create a uniform, level layer with consistent gloss.
HOT TIRE MARKS ON A SEALED DRIVEWAY
These black tire marks could have been prevented by using a different type of sealer.
Question:
Why do car tires leave black marks on my sealed driveway? How do I avoid this and remove the existing tire marks?
Answer:
Answer:
This is a phenomenon called "plasticizer migration." Plasticizers are polymer compounds added to rubber, glue and plastic to make them flexible. The rubber used to make car tires contains plasticizers to improve traction. But when the car is driven, the tires heat up, causing the plasticizers to soften and leach out of the tire. When a hot tire is parked or driven on certain types of sealers, the plasticizers migrate into and discolor the sealer. The better the tire quality, the higher the quantity of plasticizer-and the greater the chance for hot tire marking. Lower-quality tires are harder and contain less plasticizer, so they usually result in less hot tire marking on sealers.
If switching to harder tires is not in the cards, then consider using a different type of sealer. When a sealer cures, the resins cross link, forming a sticky tangle, like a bowl of undercooked spaghetti. All sealers exhibit some degree of cross linking. The greater the cross linking, the denser the coating and the more resistant the sealer will be to hot tire marking. Most hot tire marks occur on acrylic sealers, which exhibit minimal cross linking. Using a higher-solids acrylic or a high-solids, highly cross-linked polyurethane or epoxy sealer will reduce hot tire marking greatly. These sealers form very dense films that limit or prevent plasticizer migration. Striking a good balance of sealer durability and density will make all the difference when sealing driveways and garage floors.
To get rid of discoloration from hot tire marking, cleaning the surface with a concrete degreaser may be all that's needed, depending on the level of discoloration. If the discoloration has migrated deep into the sealer, you may need to loosen the affected areas with a solvent or totally remove the sealer with a chemical stripper.
AVOIDING ROLLER LAP LINES IN SEALER
Lap lines in sealer are easy to avoid by maintaining a "wet edge" during application.
Question:
I applied sealer with a roller and ended up with lap lines. How do I prevent these lines, and is there a way to remove them?
Answer:
First, be sure you are using the proper applicator for the sealer type. Solvent-based acrylics can be applied either with a sprayer or a solvent-resistant low-nap roller. Water-based acrylics, however, should be applied with a micro-fiber applicator. And heavy-bodied coatings (such as polyurethanes and epoxies) should be applied with a block applicator or specialty roller followed by a spiked roller for de-gassing.
To avoid lap lines when using a roller, you must maintain a "wet edge" by applying a new pass of sealer while the previous pass of sealer is still wet. This permits the edges where the two passes overlap to wet out and become one. Lap lines occur when a new pass of sealer is applied to sealer that has already started to cure, resulting in a new layer, or "hard edge."
Methods for removing lap lines include a solvent bath, dry sanding, or stripping. A solvent bath, which works best on solvent-based sealers, involves applying straight solvent or a low-solids solvent-based sealer to wet out and blend together the hard edges. Typically the solvent re-liquefies the previous layer of sealer and no additional working of the coating is needed. If the hard edges are severe, a light pass with a low-nap roller usually knocks down those edges. Dry sanding is often used on water-based sealers. Use a 200+ grit screen to lightly sand the surface and knock down the lap lines, and then re-apply the same water-based sealer to even out the sanded surface. If the lap lines are severe, you may need to strip the sealer completely and start over.
SOLVENT-BASED SEALER PRODUCES 'SPIDER-WEB' EFFECT
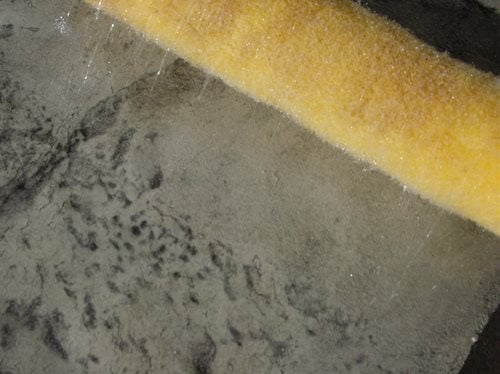
A sticky situation: Acrylic resin strands being pulled by a roller as sealer is applied.
Question:
While I was using a roller to apply a solvent-based acrylic sealer on an outside patio, the sealer came off the roller in long, thin, white strands. Now the sealed surface looks blotchy and uneven. What happened, and how do I avoid it?
Answer:
This is known as the "cotton candy" or "spider webbing" effect. It occurs when the solvent evaporates (flashes off) before the resin (an acrylic in this case) can form its film. This is more likely to happen when one or more of the following conditions exist during roller or spray application of a solvent-based acrylic sealer:
- The concrete surface or air temperature is high, above 90 F.
- The surface being sealed is exposed to warm, windy conditions.
- The sealer is being overworked with the roller.
With any one-part acrylic sealer, the plastic resin needs to wet out (penetrate) the concrete surface and form a film as the solvent evaporates. If the solvent evaporates too fast, the sticky, soft resin is pulled into strands by the roller. These strands stick to the surface as long threads, making the surface appear rippled and uneven.
Temperature and wind are the real culprits behind this problem. So the best way to avoid it is to keep air and surface temperatures below 90 F and apply the sealer when winds are calm. Also avoid overworking the sealer with the roller, and always maintain a wet edge. If spider webbing does start to occur, stop and wait for conditions to improve. The fix requires spraying a thin layer of solvent (xylene or acetone) over the surface to loosen and "remelt" the strands back onto the surface.
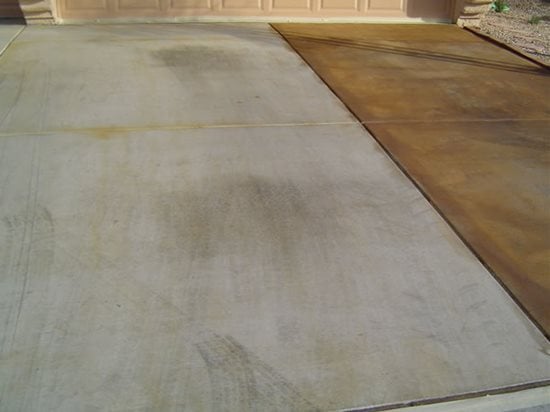
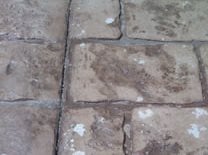
SEALER FAILURE ON STAMPED CONCRETE DRIVEWAY
Sealer failure
Question:
What caused the sealer to fail on this stamped driveway after only 6 months?
Answer:
This project was placed using a light beige color hardener for the base color, followed by stamping with liquid release and a slate-patterned seamless skin. The secondary accent color is a medium-brown acrylic/alcohol tint. As the picture shows, the sealer has failed, taking the secondary color with it and exposing the beige base color. The failures occurred only in low areas of the stamped texture and the driveway, as well as next to the control joints (not shown).
There are two triggers at play here causing these failures. The first is overapplication of the secondary accent color. With most stamped concrete projects, the secondary color should make up only 10% to 20% of the visible color, whether the color is from a release powder or, as in this case, a liquid tint. On this stamped driveway, the secondary tint makes up over 90% of the visible color. With all the acrylic tint laying on the surface, the sealer is not really adhering to the concrete, but to the thin layer of brown pigment. Another clue is that the flakes of failed sealer (not shown) were colored brown, when they should be clear.
The second trigger is moisture. These failures occurred in early spring, two weeks after the area experienced a 30-inch snowstorm. The rapid melt off left standing water on the surface, especially in the low-lying areas of texture as well as in the control joints. Pour drainage and slope caused this standing water to penetrate the already weak sealer, and failure occurred. If the sealer had been well adhered, discoloration might have occurred but probably not failure. Chances are the remaining areas of the driveway will fail over time because of weak adhesion caused by overapplication of the secondary color.
The fix for this driveway is to strip all the sealer. This process usually removes the excess offending secondary color as well. Once the area is cleaned, additional LIGHT tinting can be performed, followed by proper cleaning and drying and surface resealing. Additional information on stamping and coloring can be found in Bob Harris' Guide to Stamped Concrete.
SEALED SURFACE IS HAZY-WHITE AND BLOTCHY
Question:
On a project in Florida in mid-September, I applied a microtoppping on a Monday, acid stained the next day, and then neutralized and cleaned the stained surface the following morning. After letting the floor dry in 95 F heat for 2 ½ hours, I applied the sealer as directed. The sealer never became clear, and the entire sealed surface is hazy, white, and blotchy. What went wrong?
Answer:
This is a common problem, more often found with water-based sealers. There is always a trigger mechanism for sealers becoming cloudy or white, and we need to timeline your project to find what it is.
You allowed approximately 24 hours of cure time for the overlay, which is standard and acceptable. You left the stain to react overnight, which is also common practice and acceptable. The problem lies in the short 2 ½ hours of dry time after you neutralized and cleaned the stained surface. Even with the high air temperature, the humidity was not taken into consideration. Most sealers need 12 to 24 hours of dry time before application, especially when a large amount of water is used in the cleaning process. So in this case, moisture was trapped under the sealer, causing the white, blotchy haze.
Depending on the type of water-based sealer you used, a thin application of solvent might loosen the sealer enough to allow the moisture to escape. Otherwise, you will need to strip the sealer, clean the surface and allow it to fully dry, and then reseal.
Four key factors to always be aware of when sealing are moisture, temperature, cleanliness, and application method. Also, read the label, because in this case it clearly stated minimum dry times of 12 to 24 hours before application. More information on sealing stained concrete is available in Bob Harris' Guide to Stained Interior Concrete Floors, as well as from most reputable stain and sealer manufacturers.
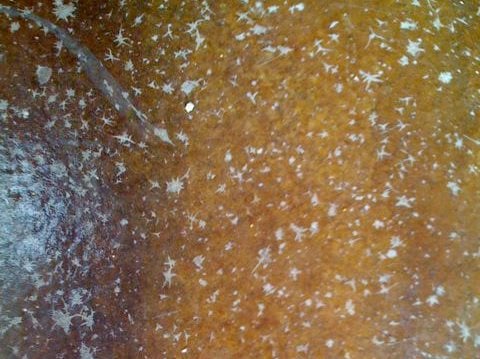
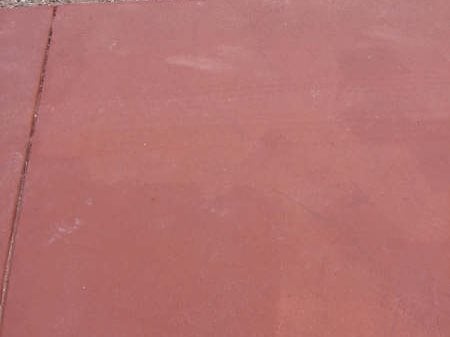
COLOR DIFFERENCES IN SEALED SURFACE
Question:
This driveway was integrally colored and has a very light brush finish. The concrete was all the same color before sealing, but dramatic color differences occurred after sealing (see photo). The whole driveway was sealed with one coat of a water-based acrylic sealer. The sealer is in good condition with no failures. What caused the light and dark color differences, and how do I make the whole driveway uniform again?
Answer:
I found this situation a bit perplexing at first, and had to do some digging to figure out what happened. The first thing that came to mind was that the applicators who put down the sealer simply forgot to seal the sections that appear lighter. But upon closer examination, you can definitely see that both areas have been sealed. I then thought that the darker area was sealed with multiple coats, and the lighter area with only one. That idea was shot down when multiple parties confirmed that the entire area was sealed with only one coat of sealer.
The break came when one of the applicators stated that three 5-gallon pails of sealer were used on the driveway. Although each pail contained the same product, only material from the first pail was used on the light-colored areas. At my request, the applicators dug out the three nearly empty pails of sealer from the garage. A 1/4-inch-thick layer of resin remained at the bottom of the first pail, indicating that it wasn't thoroughly mixed prior to application. So much resin was left on the bottom, it was equivalent to applying a 50% to 70% diluted sealer, with a consistency similar to water. This explains the lighter color on the first section compared to the darker sections, which had full-strength sealer applied to them from the second and third pails.
Over time, water-based sealers can separate. Always stir the sealer prior to application to make sure all the resin is in solution. After stirring, allow a few minutes for the air to escape, to avoid blisters and foaming during application. Fortunately, the fix in this case is easy. A second, very light application of sealer (properly mixed, of course) over the lighter areas should bring those areas into uniformity with the darker sections.
HOW TO FIX UNEVEN GLOSS ON SEALED CONCRETE FLOORS
Question:
I applied two thin coats of a high-gloss sealer to a stained concrete floor, following the manufacturer's instructions, but some areas of the floor look dull instead of shiny. What went wrong, and how do I fix the problem to achieve a uniform shine?
Answer:
It's not uncommon for an uneven gloss to occur after two thin coats of sealer have been applied to a stained floor. The cause is different levels of porosity in the concrete surface. In some areas, the concrete is more porous and most or all of the sealer was absorbed into the substrate. These areas look dull because very little sealer remains on the surface to reflect light and produce gloss. In other areas, the sealer has saturated the surface of the concrete while leaving the desired film on the surface. This film is the protective barrier and reflects light to produce the level of gloss you want.
To eliminate the dull spots and produce a nice, uniform gloss, apply an additional coat of sealer followed by two or three coats of a floor wax or finish. These finish coatings are low cost, go down very thinly and are easy to maintain. They can be applied with a micro-fiber mop, and they dry in a matter of minutes. See this video on using sacrificial waxes for concrete floors.
HOW TO AVOID THE ORANGE-PEEL LOOK
Coloration Systems, Inc.
Question:
I applied a two-component high-solids epoxy sealer to a concrete floor, putting down the first coat in December and the second coat two months later. Prior to applying the second coat, I sanded the floor and wiped it with xylene. I used a squeegee to apply the sealer, then rolled it with an epoxy roller with a 1/8-inch nap thickness. Then I rolled over it with a spike roller. The sealer did not lay out smoothly, and is very uneven and rough. What went wrong, and how do I fix it?
Answer:
This is a classic case of "fish eyeing" or "orange peel," two different terms that describe the same issue. It's caused when the second coat of sealer fails to "wet out" or become one with the first sealer coat. This can be due to chemical or dirt contamination or because the surface is just too hard and smooth to accept the new coat of sealer. By wiping the floor with xylene, you may have left behind a chemical residue. Or maybe you didn't sand the surface enough prior to applying the second coat of sealer. How did you sand, and with what grit of sandpaper or screening? When sanding, you have to micro-scratch the surface enough to reduce the surface tension that can prohibit the second coat from adhering to the first coat. The two sealer coats look like they are repelling each other, which can occur with high-solids coatings if the first coat is not prepared properly.
RELEASE POWDER CAUSING SEALER DISCOLORATION
Excess release powder causes the sealer to fail and discolor.
Question:
I'm beginning to suspect that something in the release powder I'm using with my concrete stamps (maybe the calcium stearates?) is causing sealer discoloration. Have you observed this? It seems to happen more with particular charcoal-gray releases. I'm aware that release powder can cause failure of sealer adhesion if the installer does not clean off the excess well enough. Do you have any other advice?
Answer:
I don't have any data to support discoloration of sealers from the chemicals in release powders. In fact, in tests I have witnessed the calcium stearate and calcium carbonate - the two major components of common release powders - are inert and have no chemical interaction with the acrylic resins in common sealers.
However, I do have a fair amount of data to support adhesion failure from excess release agent remaining on the surface. Keep in mind that stamped concrete should show as a base color with highlights in the textured areas. Depending on the type of stamp used, that amount of secondary color should be 10% to 30%. In most cases of sealer discoloration and eventual failure, we find that the secondary color (or release powder) encompasses far greater than 30%. Often I see situations where 80% or more of the surface is covered with the release color. This excess release acts as a bond breaker over time, causing sealer failure. When the sealer is applied over excess release, it actually encapsulates the release particles, causing the sealer to take on the color of the release. This may be the discoloration you are witnessing.
CLOUDY SEALER MAY SIGNAL IT'S TIME TO STRIP & RESEAL
Question:
I have a colored, exposed-aggregate driveway. Over the years, the sealer has become more and more cloudy. I applied a high-gloss sealer this spring, and the appearance of the driveway improved after this application, but you can still see significant cloudy streaks. I think I need to strip the sealer and reapply. What are your suggestions? What products should I use?
Answer:
After too many reapplications of sealer, there comes a time when the coating can no longer breathe. When this occurs, moisture builds up and condenses under the sealer, making it turn white and cloudy. It typically does not occur in all areas and often appears random and streaky. After time, the sealer can also start to delaminate (come away from the concrete or previous layer of sealer), which will only make the cloudiness worse.
It sounds like you have reached the point where you have too much sealer, and as you suspected, it is time to strip and start over. I would start by contacting the sealer manufacturer and ask what they recommend using to strip their product. In general, a good-quality chemical stripper will do the trick. (see The Best Method for Stripping Sealers). It may take multiple attempts to get it all off, depending on how many layers of sealer are on the slab. After stripping the sealer, scrub the surface with soap and water, followed by rinsing with clean water. Hot water is better if you can arrange it. Let the driveway dry for a minimum of 24 hours, then reseal with one or two thin coats of sealer.
Return to Concrete Sealer Q&As

