- Stenciling Floors Home
- Stenciled Floor Pictures
- How to Stencil Concrete Floors
- Creative Ways to Use Stencils
- Stenciling Design Ideas
- Concrete Logos and Graphics: Creating images in concrete
- Adhesive Stencils
- A New Way to Stencil Concrete
- Related Information
- Concrete Stencils for Exterior Concrete
- Common Questions about Concrete Floors: Are they cold? Are they loud? Are they expensive? for Exterior Concrete
Stenciled Concrete Overlay Adds a Touch of Class
To showcase its vintage wares, a resale shop covers its worn concrete with a luxe floor finish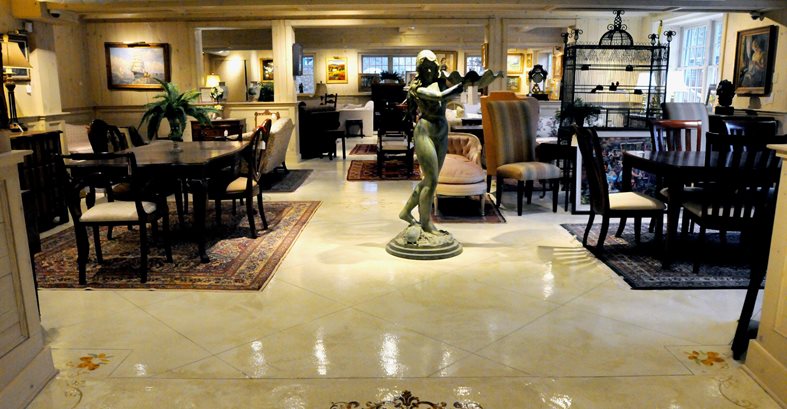
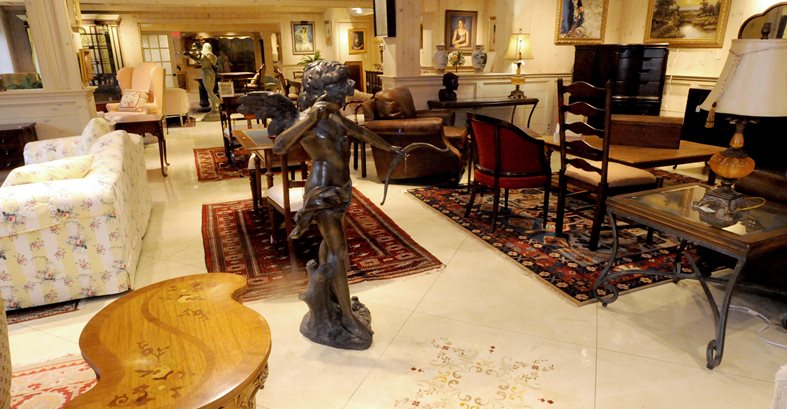
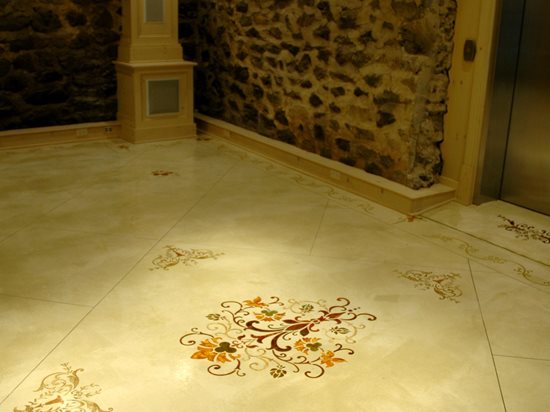
Another view of the floor, just outside the elevator. The large stenciled design is the first thing people see as they step out of the elevator.
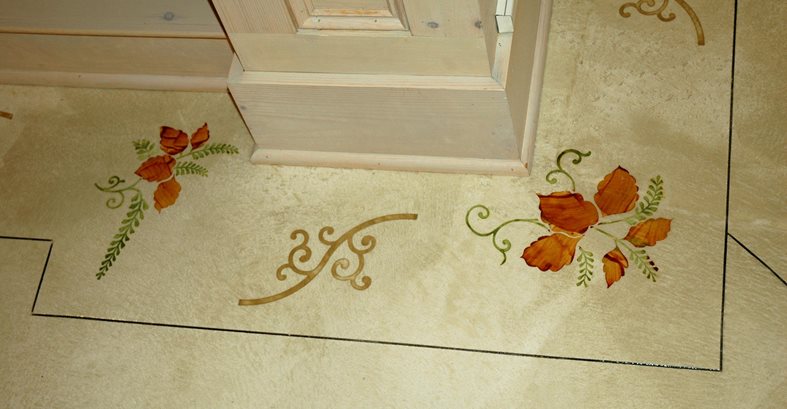
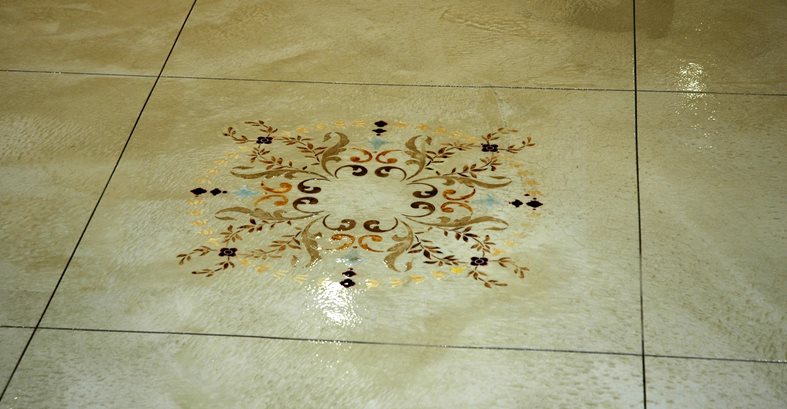
The whitewashed greenish-beige tones of the overlay complement the beautiful pickled woodwork on the doors and walls. The stencil design in the center was colored with acid stains. For the designs in the corners, a gold metallic pigment was used.
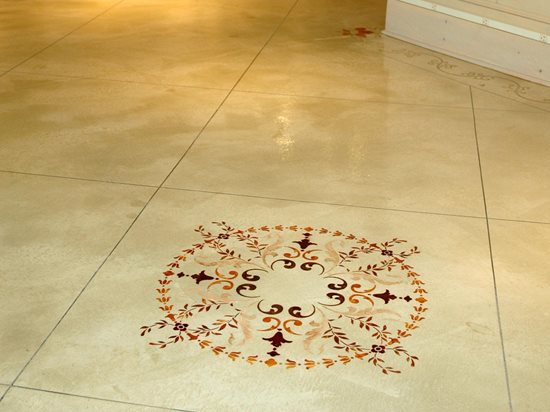
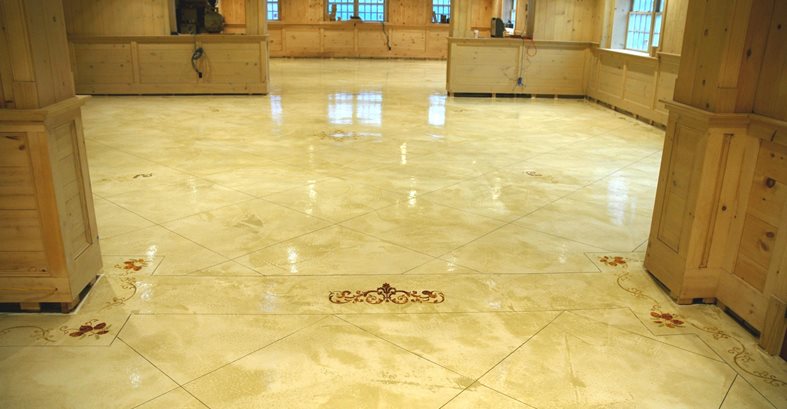
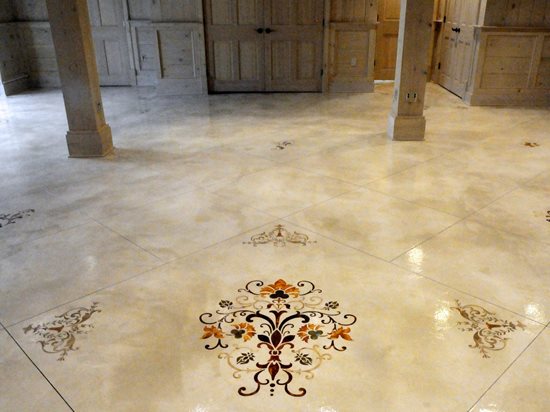
Another stenciled design, which fits perfectly within the 3x3-foot sawcut pattern.
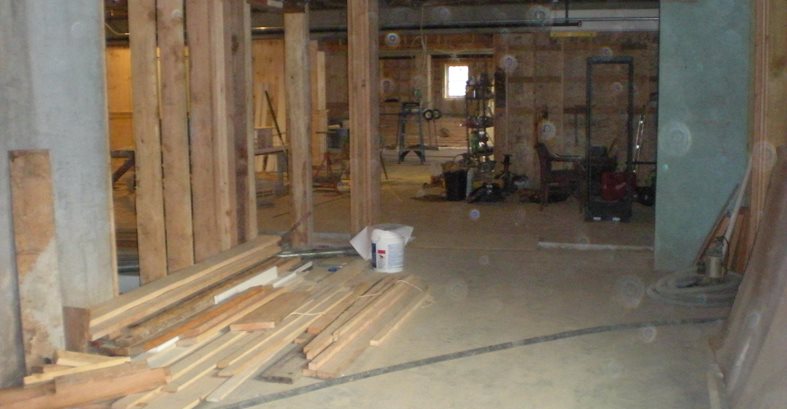
The challengeWhen the new owner of a rundown 1930s warehouse in Middlebury, Conn., wanted to turn it into an upscale consignment shop, the existing concrete floors were one of the biggest concerns. "They were in terrible shape," says Don Pinger of Custom Concrete Solutions. "They were covered by years of grease and grime and paint and God knows what else."
Originally, the owner wanted to paint the floors with a red and beige checkerboard pattern, but Pinger had a better solution. "One of the painters called us and asked for advice on painting the floors. I realized that what he was planning would not have lasted and wouldn't fit with the rest of the décor," he says. That's when his crews arrived on the scene, completely resurfacing the floors with a decorative concrete overlay.
Design goalsPinger's plan was to cover the floor with a high-strength cementitious microtopping, enhanced by decorative score cuts and stenciling. "The understated stenciling would add just the right amount of sophistication to the area without being ostentatious," he says. He used the stencils and various colors of acid stains and dyes to create elegant focal accents and decorative borders. For the score cuts, he decided to simply saw through the overlay so the dark "grout" lines would actually be the original concrete. To complement the beautiful pickled woodwork inside the building, he integrally colored the overlay with an antique-beige tone with a hint of green in it to attain a faded whitewashed look.
Secrets to successProper surface prep was essential to achieving a flawless finish. After using grinding and polishing machines to remove all the grime and to profile the floor, Pinger primed the concrete with Elite Crete CPR-1000 (a concentrated polymer resin) and then applied two coats of Elite Crete Thin-Finish (a high-strength, cementitious topping and bond coat). He then sanded the surface and applied two coats of Elite Crete's Micro-Finish, a cementitious microtopping designed for thin resurfacing.
To give the floor subtle color variations that would enhance the pickled woodwork, Pinger pigmented the base coat with Elite Crete's Palomino integral color, and then used the same pigment in a slightly lighter concentration for the topcoat. Crews applied the first two base coats with long-handled magic trowels. But for the final coats of microtopping, they got down on their hands and knees with small hand-held trowels. "For the final trowel, I like to use a small magic trowel that's only about a foot long. I lightly coat it with epoxy and let it stiffen a bit. Then I basically scrape on a thin coat of overlay with this semi-rigid trowel, held at a 90-degree angle to make it look random," says Pinger.
After sawcutting the floor in a diamond pattern, Pinger applied the adhesive stencils, using a selection of stock patterns from Modello Designs. He went over the stencils with another coat of microtopping, and then acid stained the areas with different colors of stain suspended in a gel thickener, so the colors wouldn't run. "Some areas we sponged, and some areas we brushed to achieve different effects," he says. The final step was the application of a clear epoxy followed by two coats of water-based polyurethane to protect the floor and give it a glossy finish.
Materials usedResurfacing system: Elite Crete Micro-Finish
Overlay pigment: Elite Crete Color-Fast, in Palomino
Stencils: Modello Designs
Acid stains: Kemiko Stone Tone and Elite Crete Chem-Stone
Dyes: Colormaker
Stain thickener: Stain Mule, from Surface Gel Tek
Water-based polyurethane coating:Perdure, from Duraamen
ContractorCustom Concrete Solutions, LLC
West Hartford, Conn.

