- Foundation Repair Home
- Foundation Repair Cost: What are the variables?
- Does Insurance Cover Foundation Repair?
- Foundation Cracks
- Methods of Repair
- Piering: Fixing your home's issues
- Slabjacking: What is slabjacking?
- Related Information:
- Concrete repair: Repair methods and troubleshooting basics
- Read more about foundation information on FoundationRepairNetwork.com
- Houston Foundation Issues: Answers to common questions about foundation problems in Houston
Section Sponsor
Foundation Repair Near Me
Slab Jacking - How to Lift a Concrete Slab
An overview of how slab jacking fixes sunken concrete
HMI Company
If your concrete is sinking, there is a very good possibility that the concrete slab was installed on poorly compacted fill dirt. Sub-surface erosion and shrinking soils are also possibilities.
If you are fortunate enough to have a slabjacker in your area, you should not have to replace the concrete. These contractors can lift a slab back to its original level by pumping a grout mixture or foam beneath your slab. This process of concrete raising is also sometimes called mud jacking.
Polyurethane Foam Injection: An Alternative to Slabjacking
Find a Concrete Lifting Expert
They simply drill strategically placed holes into the settled slabs. Using a portable pump and flexible hoses, they fill these holes with the special mixture. Lifting a slab using this method can often be accomplished in a few hours.
Often the cost to perform this sort of concrete leveling is less than half that of replacing a new slab.
Benefits of Slab Jacking
- This concrete repair can be done in virtually any weather. The material injected beneath the slab provides a strong base.
- There is little or no disruption to landscaping.
- Nothing needs to be moved off the slab, as the pump can lift the weight of the slab and anything you have placed on it.
Why Concrete Sinks
Fill dirt is almost always placed along side of house and garage foundations after the foundation work is completed. This fills in voids created during the foundation construction process. Rarely does a builder take the time to compact this dirt.
Soils consist of solid particles and the spaces (voids) between these particles. However, void spaces in soil can cause big problems for buildings and concrete slabs. Concentrated loads, such as buildings or slabs can literally squeeze air and water from soils.
When this happens, the soil sinks and the buildings or slabs follow closely behind. The result is uneven concrete that is unattractive and unsafe.
Avoiding the Problem from the Start
Sunken concrete slabs can be avoided. Instead of installing fill dirt, a builder should install granular fill such as sand or a sand and gravel mix. These materials can be compacted quite easily with a hand held vibratory compactor.
This material should also be used to fill trenches that cross sidewalks and driveways.
Proper compaction will remove air voids, which if not removed, will later settle and cause the concrete to crack and sink.
Advantages of Slabjacking
Slabjacking has many benefits:
- The grout used to raise the slab provides a stable base, thus strengthening the slab.
- Low cost: The cost to raise the concrete slab to its original position is approximately one third compared to replacement.
- Since slabs are not being removed, there is very little mess or inconvenience.
- No loss of use: Traditional mudjacking allows the client to use the slab immediately. If the slab is replaced the concrete has to cure for a minimum of 28 days.
- There is no waste involved, compared to slab replacement, where the removed material will end up in the landfill results are better environmentally.
- There is no noisy concrete breaking, with its associated dust and debris.
- Slabjacking can be performed in almost any weather conditions.
- Surrounding grass is not dug up, so there is no reseeding and waiting for new grass to grow.
- Because the old slabs are still there, the color of the concrete remains constant.
Pictorial Overview of Slab Jacking
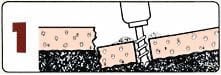
A pattern of 1-5/8 inch holes are drilled through the sunken slab.
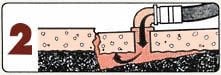
A grout mixture is pumped under the slab with our specialized equipment. Once any void is filled, the grout becomes pressurized, hydraulically raising the slab to the desired height.
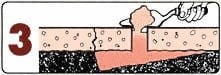
The holes are patched using a concrete mixture.
Photos Courtesy of Concrete Slab Jacking, Inc. in Maryland USA
How to Lift a Concrete Slab
First, a pattern of holes typically between 1-1/2 and 2 inches are drilled or cored through the sunken slab.
Next, a grout mixture is pumped under low pressure (about 10 PSI) under the slab using a 2-inch hose with a nozzle that fits into the holes. Once any cavities or voids are filled, the grout becomes pressurized, hydraulically raising the slab to the desired height. The grout is typically comprised of water, Portland cement, Bentonite or flyash and sand. Additives are used to prevent shrinkage.
Then, the drilled holes are patched using a concrete mixture.
Step 1: Making drill holes
The number of drill-holes needed depends on the size of the slab. A smaller slab, such as a sidewalk slab no more than four feet on a side, may only require pumping grout through one or two holes in the middle of the slab.
Larger slabs may need three holes, arranged in a triangular pattern. Spacing, roughly related to slab thickness, determines the total number of holes. The thicker the slab, the farther apart you can drill the holes.
In most operations, the holes are drilled three to eight feet apart, but no closer than 1 foot from the edge of the slab. Unless there's a reason not to, holes should be drilled at distances approximately equal from each other.
Some experienced contractors are adamant that the size of the hole is very important, others it may matter very little as long as it gets the job done so the smaller the better. The usual range is 1 inch in diameter at the low end of the spectrum, and a maximum of 2 inches in diameter at the upper end.
Step 2: Pumping grout
Pumping the grout should begin at the lowest point of the slab, on most jobs. At the areas in which the grout will do the most lifting, a heavier grout is used. The operator moves from hole to hole as the slab rises about inch to inch. He then moves back and repeats the process.
Additional holes may have been drilled as "support" holes, to be filled in order to support the slab as it rises. These holes usually are filled with a less dense, more fluid grout, so it flows easily into the smaller voids.
Step 3: Hole patching
This is the final step in the slabjacking process. First, any remaining grout in the drilled holes is removed. The holes are then filled with a stiff mortar mix, striking the surface off cleanly.
Remember that patched holes are often the most noticeable feature of a lifted slab, but they can be made less noticeable by drilling cores instead of holes, coding the cores, and gluing then back into the same holes after slabjacking. However, this process is much slower, and thus more expensive.
Slabjacking Equipment & Materials
Equipment:
Basic equipment on a slabjacking job includes a rock drill, grout mixer, and grout pump.
Make sure to keep all equipment in good working order and regularly maintained. Equipment failure during the slabjacking operation can result in project complications.
Grout mixers are often the weak link in the operation, causing a great deal of maintenance problems and downtime. They are most often high-speed colloidal shear mixers or the equivalent, being capable of producing a consistent and homogeneous mixture free of lumps. Smaller jobs may require only a mortar mixer to adequately mix the grout. The mixer should have at least a 7-cubic foot capacity with about 10 horsepower engines, and be built to withstand heavy use. The consistency of the grout has to permit a consistent flow of material under the slab to ensure spread of the grout and even lift.
Other features may include:
- Providing maximum air circulation with an engine housing designed for maximum air circulation by providing additional vent holes. This prevents heat build-up.
- Beefing up the suspension and rebuilding the tow bar.
- Using an enclosed gear drive as opposed to belts for fewer breakdowns.
- Wheel bearings last longer if there are hub caps on the wheels to keep dust and debris out.
- Using all steel mixer blades rubber tipped blades wear out more quickly.
- Making sure there are handles on the trailer tongue to reduce the chances of worker foot injuries while the mixer is being maneuvered.
Grout pumps are typically either positive displacement hydraulic piston pumps; air-operated, double diaphragm pumps; or hydraulically operated progressive cavity pumps. The output of single-cylinder hydraulic piston pumps is up to 110 cubic feet per hour, and a 180 cubic feet per hour output from dual-cylinder models. Which ever pump is chosen for the job, it should be capable of delivering variable pressures from 1 to 100PSI, and be able to deliver the grout in a uniform and consistent manner. The pump should also be able to deliver a minimum 60 GPM. The pump control is placed at the injection nozzle.
Slabjacking units are available that are a combination of a paddle-type mixer and a piston pump. However, these higher-end, high-output units are usually most suitable for high production jobs, such as highway construction, where they can pump several cubic yards of grout per hour at line pressures up to 600 psi.
A Rock drill or Coring machine that prevents excessive dust and breakout at the bottom of the slab is typically needed. The drill bit should have four points, and maintained to ensure that the holes are not " out-of-round". A gas-powered rotary percussion drill with a 2- or 2 -inch diameter bit is a common tool for this application.
Materials:
The Grout used in slabjacking is a mixture of water, Portland cement, and some combination of limestone dust, fly ash or sand as well as additives. The consistency has to be of a homogeneous paste with sufficient slump to ensure that all voids are filled to prevent undue stress on the slab. The comprehensive strength needs to be 5 Mpa minimum.
Type 10 Normal Portland Cement is used unless otherwise specified. Type 20 Moderate Portland Cement is used where precaution against moderate sulphate attack is important. Type 40 Low-Heath of hydration Portland cement is used where rate and amount of heath must be minimized. Type 50 Sulphate-Resistant Portland Cement is to be used where grout is exposed to severe sulphate action.
Cement content may range from 5% to 20% by weight of dry materials, depending on the setting time required.
Sand: Fine sand (5mm) with no silt permitted is used
Additives: Bentonite is used to promote lubrication which ensures complete void filling and to reduce bleed. The proportions should not exceed 12% to avoid compromising the strength.
Expanders are used to compensate for shrinkage during curing.
Cement fondue is added to promote rapid set if required.
Problems & Solutions When Lifting Concrete
Problem: Grout doesn't pump into hole, or squirts back out.
Solution: Blow out the hole with air or drill further into the sub-base.
Problem: New cracks form or old ones are enlarged.
Solution: Usually a problem with technique: pumping too much grout into one hole, using grout that is too stiff, or pumping holes in the wrong sequence. Rule of thumb: don't lift a slab more tha an inch while pumping at one hole.
Problem: Slab lifts in wrong place.
Solution: The grout may be too thin. Leave the hole for a while, and come back with a thicker grout.
Problem: Slab binds against concrete and won't rise.
Solution: Grout may be flowing beneath an adjoining slab, use a thicker grout. You can also relieve binding by chipping concrete the edge of the slab, sawing a relief slot all the way through the slab, make sure joints and cracks are clean before starting to pump grout.
Problem: Grout leaks through cracks or joints at the side of the slab.
Solution: Let it set up, then resume normal pumping. Leaks at the slab edge can be stopped by using a thicker grout.

