- Foundation Waterproofing Home
- Waterproofing vs. Dampproofing
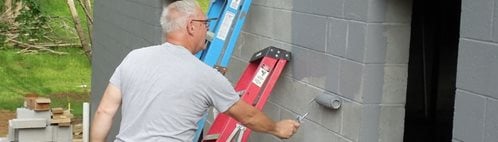
- Intro to Waterproof Coatings
- Waterproofing Product Comparison
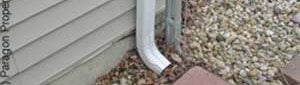
- Foundation Drainage
- Related Information
- Foundation Construction Process
- Basement Construction Checklist
- Crack Injection: A permanent solution for stopping leaks in basements
- Concrete Vapor Barriers
- Concrete Sealers
Foundation Waterproofing Options for Concrete
Stopping water from infiltrating basements requires choosing the right waterproofing system and installing it properly
W. R. MEADOWS
Other than burning down, probably the worst thing that can happen to a residential structure is a foundation problem. The foundation is literally what the house is built on, what keeps the building where it was built, transferring the dead loads and the live loads into the ground.
The source of the vast majority of foundation problems is water. Wet soil beneath a foundation can swell or lose strength.
Shop for waterproofing products & vapor barriers designed to protect your foundation.
And that's only the first reason to keep the foundation dry. Then there's the little problem of wet damp basements and crawl spaces that can breed mold and make below-ground interior spaces generally unpleasant. The problem is that typical concrete is not waterproof. Although uncracked (and what concrete is uncracked?) it will typically keep out liquid water, water vapor can still penetrate quite easily. Keeping water drained away from concrete foundations and preventing it from moving through the concrete are essential to a successful structure.
Accomplishing our goal, then, of draining any water away and ensuring a dry interior space below grade can be relatively simple or fairly involved depending on geographic location, climate, topography, soil/water table conditions, and depth of the foundation. There are three components of any system designed to keep water out. These are, from the bottom up:
- Drains to move water away from the bottom of the foundation
- Wall treatment to prevent moisture from moving through the wall and to route water down to the drains
- Ground surface treatment adjacent to the building to direct surface water away
And remember that since this will mostly be underground when the building is complete, doing it right the first time is critical, because coming back to fix it is an expensive undertaking. A leaky foundation in a residential building can damage finishes and furnishings, even the structure itself. In a commercial building, water can ruin expensive equipment and disrupt vital work. It all adds up to lost money, wasted time, upset customers and sometimes litigation.
HOW TO WATERPROOF A FOUNDATION
Scheduling and Planning For Concrete Waterproofing
Allow considerable float time for waterproofing. If you're using a waterproofing subcontractor, recognize that good waterproofers can be in high demand during the busy season. Rain can also delay waterproofing work.
Plan the layout of waterproofing well ahead of time. The plan elevations will likely show the finish grade line on the foundation walls, but these lines should be confirmed with the architect, if necessary. You don't want black, gooey waterproofing showing above grade. Watch for changes in the level of grade. A line of waterproofing descending at a diagonal from one level to another won't work if the architect has decided to handle the change with a retaining wall.
Construction Tips
Ideally, you should mark layout lines with a crayon or chalk line, especially on a complex foundation with varying grade. On a simple foundation, it might be safe to just instruct the waterproofer to keep his work so many inches from the top of the foundation. I like to see waterproofing as close to finish grade as possible, but no lower than 6 inches in any case. Don't leave form-tie holes that are below grade unprotected. Work out ahead of time what you're going to do at basement windows and bulkheads, porch foundations, and intersecting walls that don't have to be waterproofed.
When deciding what walls get waterproofed, follow this basic rule: Waterproof any foundation wall that has earth on one side and usable space on the other, including crawl spaces. Extend waterproofing at least 12 inches onto intersecting walls that don't have to be waterproofed. You might want to continue the waterproofing on other walls if it's a very wet site. Under extreme conditions, water has been known to travel through the keyway along the footing and into occupied space. Consult with the architect if you have any doubts.
Check the waterproofing manufacturers literature for temperature limitations. You're probably okay applying waterproofing on a cold day if you're working with a solvent-based material. But watch out if your material is water-based. The lower limit for some products is 40F.
 HYDRALASTIC 836
Cold Applied, Single-component Waterproofing
HYDRALASTIC 836
Cold Applied, Single-component Waterproofing
 Deep Penetrating Sealer
RadonSeal - Free Shipping on 5-Gals.
Deep Penetrating Sealer
RadonSeal - Free Shipping on 5-Gals.
Waterproofing Curing Time
Likewise, check the manufacturers requirements for concrete curing time. For every sheet membrane I know of, concrete must be cured a minimum of seven days before membrane application, sometimes even longer. This is because the concrete will continue to dry long after it's poured. The water vapor escaping from the concrete can prevent the waterproofing material from bonding. Concrete curing times for liquid membranes also vary considerably. Some require 14 days or longer. Others can be applied as soon as the forms are removed.
Protecting In-place Waterproofing
Most waterproofing systems need protection during backfilling. Some manufacturers have their own protection board for this purpose. A drainage mat or insulation can also function as protection board. An inexpensive 1-inch-thick expanded-polystyrene-foam board works fine as a basic protection course. However, one manufacturer has a protection board that functions as insulation, protection board, and drainage medium in one.
When adhering protection board, make sure to use an adhesive that's compatible with the waterproofing membrane. I've seen some adhesives eat right through waterproofing material. Besides providing protection during backfilling, you should protect waterproofing work that is in place from damage by other workers and trades. Keep workers from tracking across exposed membranes on footings, decks, or other horizontal surfaces. Don't expect others to be as sensitive as you are to the importance of waterproofing.
Waterproofing Safety
Waterproofing below grade can be dangerous. Because of the hazards, it's usually not a good idea for anyone to waterproof alone. If you're using a water-proofing subcontractor, make sure workers follow a written safety program and comply with hazard-communication requirements. Keep other trades and workers well away from the waterproofers work area.
Once you learn how to work with waterproofing materials, you can make good time without sacrificing safety. Here are some primary safety concerns that go along with waterproofing.
Flammable materials: Many waterproofing products are solvent-based. Keep fire, smoking materials, welding operations, cutting torches, and other sources of ignition well away from the area.
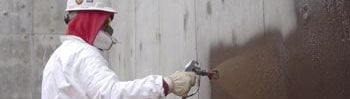
Respiration hazards: Use the manufacturer-recommended respirator, especially with solvent-based materials. In a close area, you might need an air-fed respirator. Don't be complacent about this. Solvent vapors are deadly, and a large surface area of newly applied material can put out a lot of vapor. The vapors are usually heavier than air, so they tend to build up in a sunken area like a foundation excavation.
Skin injuries: Waterproofing materials can contain all sorts of chemicals that can harm your skin. As needed, wear protective clothing and gloves. When cleaning tools in solvent, wear chemical-resistant gloves.
Injection hazards: Take precautions when working with or around spray equipment. A high-pressure airless sprayer can inject toxic chemicals directly into your blood-stream.
Eye injuries Wear protective glasses or goggles as needed, especially when working with liquids.
SURFACE PREPARATION PROCEDURE
Don't skimp on surface preparation. You must get the foundation wall and footing clean, free of loose material, and fairly smooth. Do as much as you can ahead of time: Once you start waterproofing, rhythm is crucial, and you don't want to have to stop to scrape loose concrete from the footing or break off a form tie.
Waterproofing materials aren't designed to cover large voids or honeycombs. You'll need to fill these, preferably with nonshrink grout or a good patching cement. You may be able to patch form-tie holes or smaller voids with trowel-grade mastic. Check the manufacturers instructions to make sure that whatever material you use for patching is compatible with the waterproofing product.
Waterproofing likes a clean wall. Here's what I recommend for a surface preparation procedure:
Survey the entire surface to be waterproofed. Identify special problems, such as water on footings, concrete forms not removed, footings not dugout, and pipe penetrations not prepared. Have these problems worked on right away, especially if these areas are the responsibility of another trade.
Dry off all footings. A big propane torch with a 20-pound tank is good for this. For puddles, sweep standing water off with a broom, then dry the damp spot with the torch.
Remove concrete form ties. If there's an odd form tie that wasn't aligned properly and won't break off flush, cut it off with a cutting torch or reciprocating saw. Break form ties off on the inside of the foundation too. Another waterproofer once told me that on one of his jobs the general contractor sent in a laborer, after waterproofing was applied, to break off form ties on the inside of a foundation. The laborer decided it would be easier to just pound the ties back into the wall. Every one of them punched through the waterproofing membrane on the other side, which was already backfilled.
Scrape off excess and loose material from walls and footings. A long-handled ice breaker is good for this. Some waterproofing manufacturers will require you to machine-grind any ridges or protrusions before applying their products. It's good to have a brick hammer on hand, too. Pay special attention to the footing. Quite often, puddles of congealed slurry form on the footing when the wall is poured. This material doesn't have the full strength of concrete, it isn't bonded to the footing, and should scrape off easily.
Sweep off the walls and especially the footings. They don't have to be clean enough to eat off of, but don't leave a film of dust or mud. Waterproofing materials won't stick to a dirty surface. Keep other trades and workers out of the area. Besides the safety hazards, other workers tend to be oblivious to what waterproofers are trying to accomplish. Many times I've cleaned a footing, only to see a muddy-booted laborer stride right down its length, leaving tracks the whole way.
Take care of any patching or filling. Grout around penetrations and follow any other instructions from the waterproofing manufacturer that apply at this point.
Acknowledgment: Portions of this section were reprinted from the March 1995 issue of Journal of Light Construction by permission of the publisher, Builderburg Partners Ltd., Richmond, Vt.

