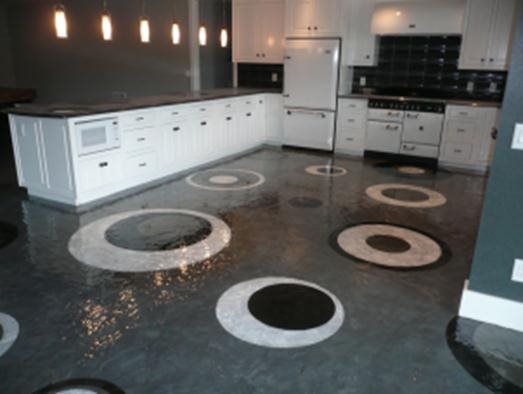
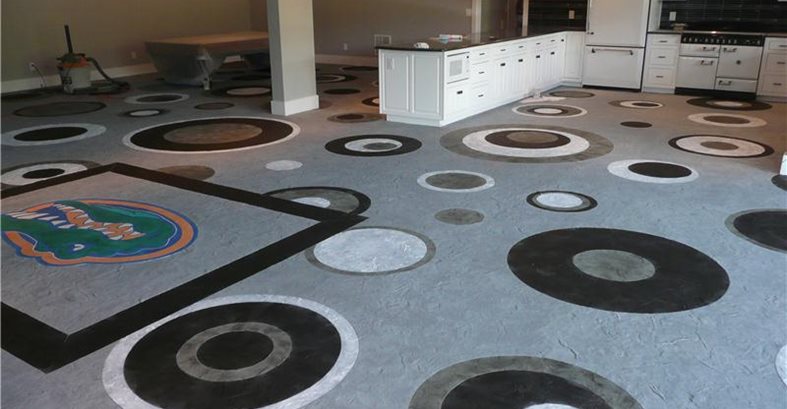
The new decorative floor overlay in this basement family room features an unusual geometric design with over 200 circles. The existing concrete floor was covered with a stampable overlay, and the circles, all cut by hand, feature various colors of water-based stain.
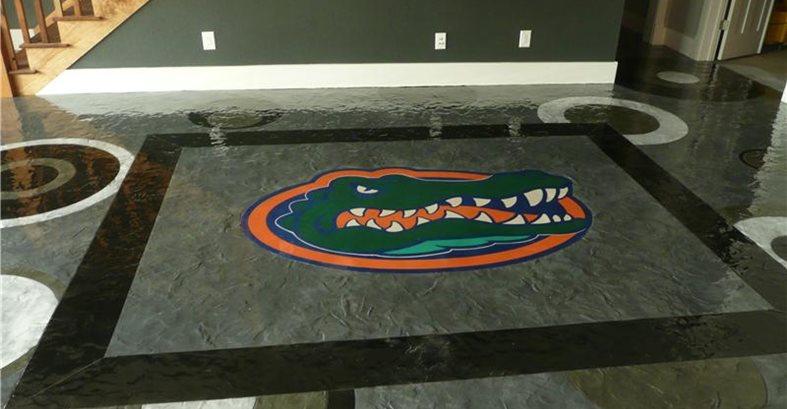
Another element of the floor was a graphic of the Florida Gators logo, incorporating the actual team colors.
One of the first steps was to mask the perimeter of where the Florida Gator team logo would go, so we could put down the self-leveling overlay.
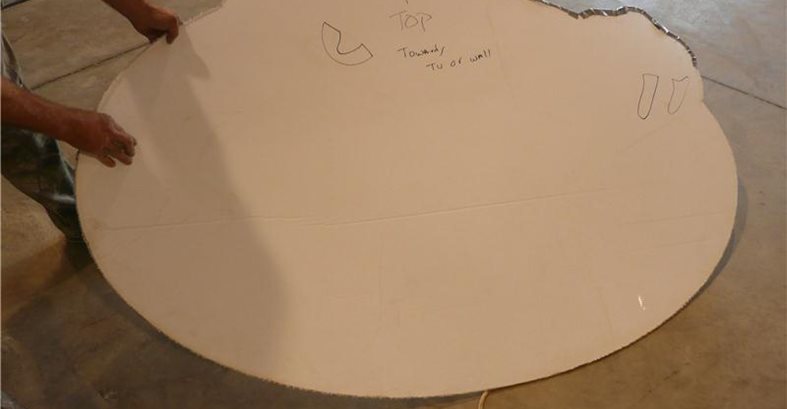
This is the 3/8-inch-thick template used to create the blockout for the gator.
Seamless texture skins are being used to stamp the overlay.
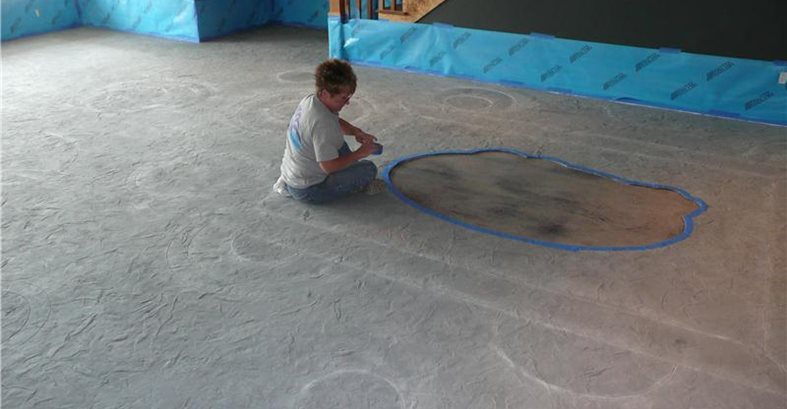
The third stencil was followed by application of the green skim coat. One of the many circles is also being colored.
The floor prior to the application of a high-gloss epoxy.
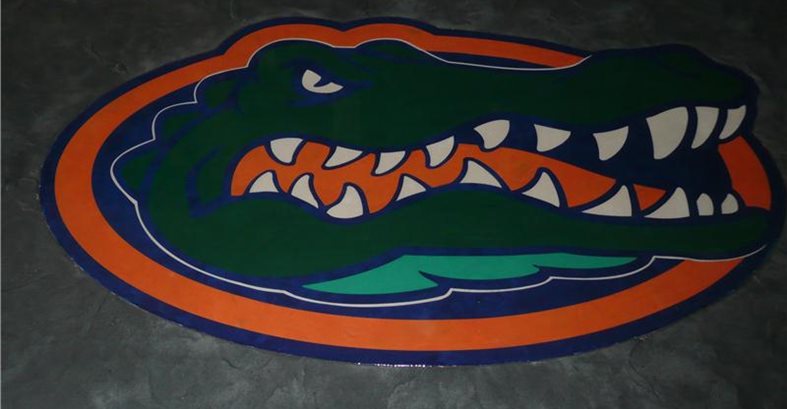
A close-up of the gator after the first coat of epoxy.
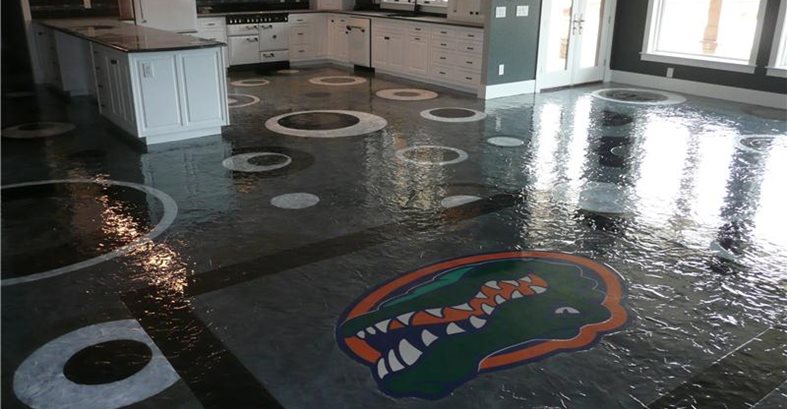
The finished project.
Roughly six months after completing a very challenging decorative concrete dream job, which included concrete countertops, outdoor kitchens, vertically stamped walls and a host of exotic decorative finishes (see River Runs Wild and S-Curve Ahead), we found ourselves involved on another very unique project for that client's sister, Angie, and brother-in-law, Chad. The couple had visited the house on occasion during the construction and would often watch our crews as we did crazy things like broadcasting glow-in-the-dark rocks into concrete floors and countertops, using vibrating tools to chip up newly placed concrete countertops, and throwing cement-based vertical overlays on walls. After they viewed some of the finished work, their comment was, "We had no idea that concrete could look like that." Chad and Angie were sold and requested a meeting to have some of this "crazy work," as they put it, done in their own home.
The couple planned to completely change their downstairs décor and wanted us to transform their existing basement floor. Upon my first visit, I remember looking at the floor and wondering why they would want to change anything. Initially, a contractor was hired to stain the floor with several coats of black acid stain followed by a coat or two of epoxy sealer. Although the contractor did a respectable job, he neglected the final piece of the puzzle, which was to coat the floor of with a polyurethane sealer and several coats of sacrificial floor finish. The result was severe scratching.
I was asked to do conceptual drawings to give Chad and Angie some ideas. The main decorative elements they were after were texture, uniqueness and neutral colors consisting of black, white and various shades of gray. Although Angie loved some of my original drawings, she created her own roughly sketched hand-drawn rendering and asked me what I thought. Although initially I thought her design was pretty cool, I didn't consider the challenges involved to execute it. The project would consist of cutting, free-hand, 240 circles into a 3/8-inch-thick stamped overlay. The circles would then need to be colored with various colors of water-based stain. Another unique element of this floor was to reproduce a 6-foot Florida Gator logo with the actual team colors. Chad is an avid sports fan and insisted that the logo of his favorite college football team and alma mater become a permanent feature of their new floor.
Kick-Off Time
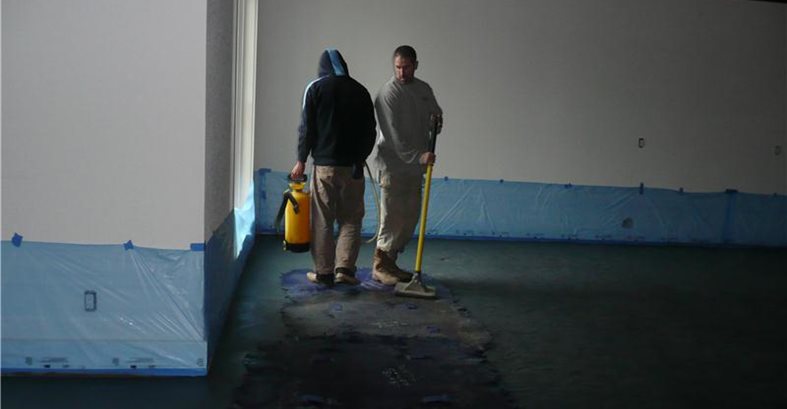
The work began with us profiling the floor with a dustless grinder (like we do on most projects) to erase the existing stained surface. Once the grinding was complete, we had to consider the best products and installation sequence for the Florida Gator graphic. We determined that we would have to use a stencil with a colored skim coat. We decided to create a blockout outline of the gator graphic, so that everything on the outside of the graphic would be textured, stamped overlay with the inside being a smooth self-leveling overlay that would allow the stencil to stick down flat to the surface.
To create the blockout, we used a CNC machine to cut the outline of the gator in a sheet of corrugated plastic material similar to cardboard, with a smooth top and bottom. This material was 3/8 inch thick, which matched the thickness of new overlay we were about to install. After using double-sided tape to stick down the gator blockout, we applied bonding primer to the profiled floor and proceeded with our stamped overlay installation.
On projects like this, you really need to take into account the size of the area and how the rooms are laid out. We had very limited access to this basement, which meant we needed to break our pours into three sections to allow for a more controlled installation. The first pour was roughly 400 square feet and consisted of two closets, a bedroom and a long hallway. Once we completed the stamping of this pour using seamless texturing skins, it was onto the next pour, which was only approximately 120 square feet. We used 3/8-inch-thick adhesive-backed foam as termination points, and rather than stopping the pour between doorways with a straight line, we wanted to mask the control joints between one pour to the next. Considering that the overall design of the floor had hundreds of circles, we laid out a circle to terminate that day's pour and form the next one by sticking down foam that followed the circumference of the circle. The next day after this section was poured, we removed the foam tape and poured the remaining portion of the floor (approximately 1,500 square feet) making sure to carefully apply the stamped overlay up against the previous day's pour. Once the entire floor was installed and dry, we came back and sawcut the cold joint between pours. Since there were no straight lines, you couldn't tell that we had poured the floor in sections.
Round and Round We Go
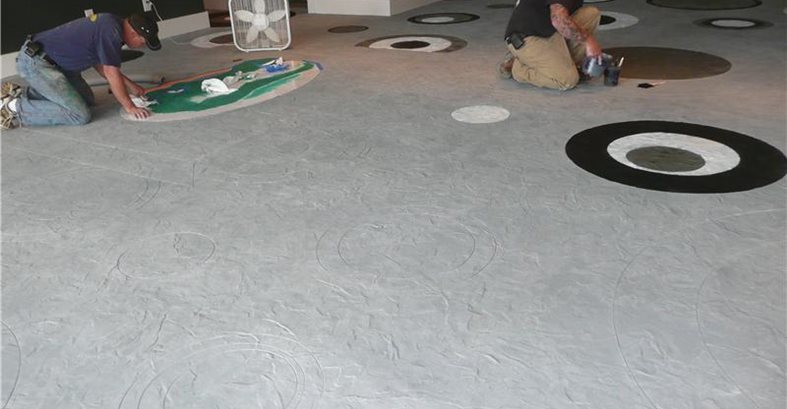
Now came the daunting task of drawing and cutting the 240 circles. Normally we use a nifty electric-powered tool called the Mongoose, which attaches to a pivot point to cut perfect circles. On this job, however, the extension cords and shop vac that would be needed to follow the Mongoose around would have created too much clutter and chaos. So instead we used a tool called a pivot point with a soap stone attached to it to draw the circles. We then used a 4-inch hand-held grinder followed with a vacuum to control the airborne dust particulate. As we learned, free-hand cutting of so many circles requires a tremendous amount of concentration and plenty of Advil at the end of the day.
Once the circles were complete and the floor was cleaned, it was time to fill the gator logo with a white self-leveling overlay as our base. Masking the outer portion of the newly stamped floor was critical since the white overlay being poured into the recessed area could permanently stain the adjoining section. Because of the multiple colors of the gator logo, the stencil had three pieces to it. We installed the first stencil and then applied a blue-tinted skim coat. Roughly three hours later, we lightly sanded the skim coat and applied the second stencil followed by application of the orange color. One more stencil along with a green skim coat completed the design. While all of this excitement was transpiring, our coloring team was busy working on all the circles and becoming hypnotized as they stared at the orbs they were applying color to.
At last, we were getting closer to the end of the project. The next step was to seal the entire floor with 100%-solids clear epoxy. Then we had to grout all of the previously sawcut circles. By this time, the crew began humming "round and round you go, where we stop, nobody knows." One more coat of epoxy followed by a coat of polyurethane completed the project.
Although our team was dizzy by the end of this project, the most important thing was that the clients loved the end result. As a funny side note: After cutting all of these circles, I thought it would be fun to put one little 2-inch square in the floor, hidden under the pool table. Our clients chuckled at the idea and gave us the go ahead.